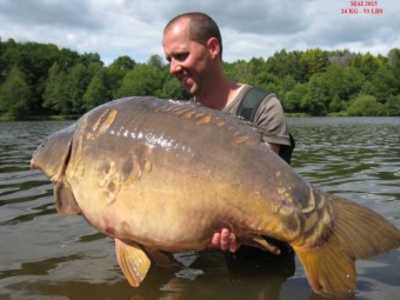
You do not need a complicated rig to catch carp. You need a sharp, permitted hook, a bait that sits as intended, sound knots and a complete setup that can release safely after a line break. This guide to carp rigs for beginners starts with a simple hair rig, then explains the main alternatives so you know what to learn next and what you can leave in the tackle shop.
The important distinction is between the hook rig, which presents the bait, and the lead system, which connects it to your main line. A blowback rig can be used with more than one lead arrangement. A solid PVA bag is a way of delivering a rig and feed together. A snowman describes the hookbait, not a completely different knot. Keeping those ideas separate makes the names much easier to understand.
Which carp rigs should a beginner learn first?
For a first session on a reasonably clean spot, learn the coated-braid hair rig with a sinking bait. Practise until you can tie and test several that behave the same way. If you need a raised bait, learn a properly balanced spinner rig with help checking the swivel connection. If you want a compact parcel of feed, learn a short supple hair rig inside a solid PVA bag. Those are useful next steps, not three rigs you must buy immediately.
Find out what you are casting onto before choosing. A hard tap through a marker setup, a soft landing and strands of retrieved weed suggest different problems; none gives a perfect underwater view. Our marker-float guide and rig selector help organise that decision. In dense weed or near snags, being able to land a hooked fish safely takes priority over finding a rig that might present there.
| Rig or presentation | Useful starting situation | Learning level |
|---|---|---|
| Hair / knotless knot | Sinking bait on a confirmed clean spot | Start here |
| Blowback | Bottom bait or tested wafter; moving hair ring | Next step |
| KD | Balanced wafter with a curved-shank hook | Next step |
| Line-aligner / flipper | Different ways to control the hooklink or hair exit | Next step |
| D-rig / IQ D | Wafter on clean, relatively even ground | Intermediate |
| Slip-D | Wafter with a collapsing braided D | Intermediate |
| German / Turbo German | Wafter or bottom bait on clean ground | Intermediate |
| Combi / combi-multi | Stiff boom with movement at the hook | Intermediate |
| Spinner / Ronnie | Low pop-up over a spot where its boom can settle | Intermediate |
| Multi | Pop-up with a replaceable hook | Intermediate |
| Hinged stiff | Buoyant pop-up on an articulated stiff hook section | Experienced help |
| Chod | Pop-up over suitable light debris or soft ground | Experienced help |
| Solid PVA bag | Short rig enclosed with dry feed | Next step |
| Fixed / adjustable zig | Fish feeding off the bottom | Intermediate |
| Surface / controller / freelining | Visible fish confidently taking floating feed | Situation-dependent |
These are the main families and practical presentations, not a claim to list every personal or branded variation. Bottom-bait, wafter and pop-up versions of a familiar rig can behave differently. The rigs below describe a particular version; changing the bait or a component means testing it again.
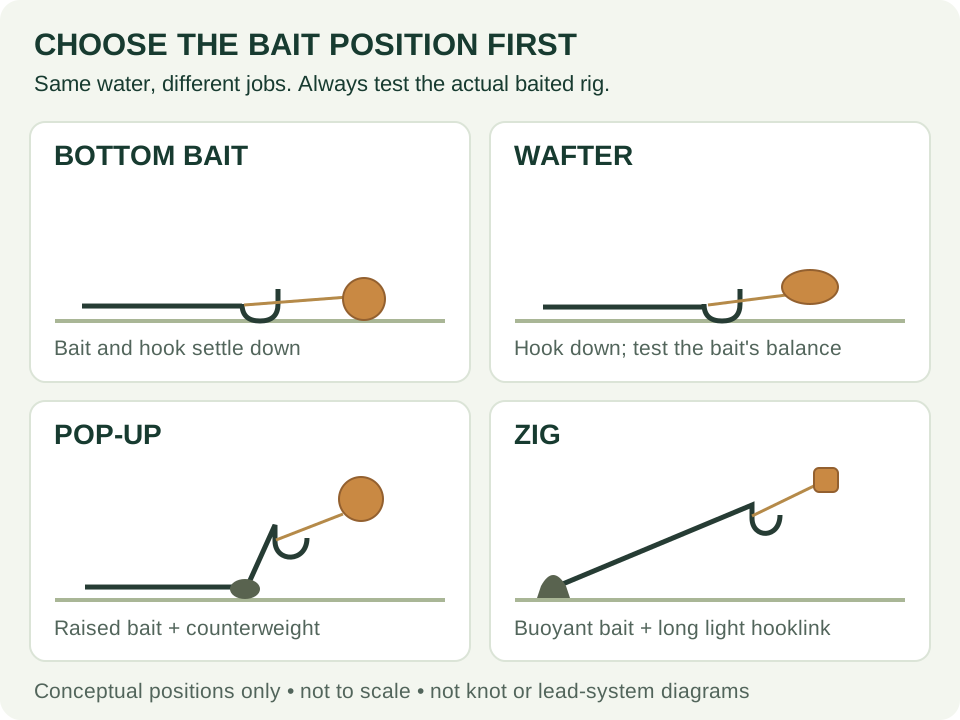
Shared kit: buy it once, not once for every rig
The component lists favour Korda, with other brands used for suitable bait examples. Check the actual size, breaking strain, hook type and compatibility before ordering.
You do not need every item on this page. Choose one rig and use its list with the shared tools and lead-system checklist. A pack of hooks or swivels normally makes several rigs. Some linked hooks are micro-barbed: do not buy or use that variant on a barbless-only fishery. Use a permitted equivalent of the correct pattern, or ask the fishery which ready-tied option it accepts.
Tools used across the rigs
- Korda RazorBlades scissors (paid link) for cutting the specified hooklink cleanly.
- Korda Fine baiting needle (paid link) for suitable firm hookbaits. Use a needle appropriate to the bait; a fine needle can bend in an unusually hard bait.
- Korda Strippa tool (paid link) for coated braid, without nicking its inner fibres.
- Korda Pulla tool (paid link); use a pair for controlled knot testing, with the hook point directed away from you.
- A small container of water for checking the actual baited rig. You do not need to buy a special testing tank.
A lighter and heat-resistant handling tools are only needed for the specialist rigs that specify a carefully formed tag-end blob. They are not needed for the basic hair rig. Work away from bait tubs, aerosols, dry vegetation and your main line. Never use a naked flame to shrink tubing over a load-bearing connection. A purpose-made kicker avoids that operation on our beginner rigs.
The complete lead system is part of the shopping list
For every bottom or mid-water rig that uses a lead, the hook-rig component list must be combined with suitable main line and one complete lead arrangement. A hooklink alone is not a cast-ready setup. The lead-clip example below serves the compatible rigs; the solid-bag, chod and adjustable-zig sections specify different arrangements. Do not buy or assemble all of those systems together.
For the ordinary hair, blowback, KD and other lead-clip-compatible rigs below, the shared example is a Korda Lead Clip Action Pack (paid link) with its matched clips, swivels, tail rubbers and tubing, plus a Korda swivel lead, 3.5oz — choose a weight suitable for your rod and swim (paid link) of a weight within the rod's safe casting capability. Check the pack contents on the selected listing; a bare replacement clip is not a complete system. You also need suitable main line, for example Korda SUBline (paid link), if your reel is not already correctly loaded.
The hooklink connection must suit the actual pack. Where a rig uses a loop on a Korda size-8 quick-change swivel (paid link), cover its open connection with a Korda anti-tangle sleeve (paid link) and check that this exact swivel is approved for the chosen clip. Otherwise use the supplied swivel and the maker's specified knotted connection. Do not force an approximately fitting replacement into a clip.
A running lead, an inline lead and a helicopter arrangement work differently. They are not interchangeable finishing touches. The solid-bag and chod sections identify their additional requirements. A leader is not an essential ingredient; many venues restrict or ban certain leaders. Follow their rules and the complete manufacturer's assembly, including the line-break test.
Two safety questions matter: can the lead release when the system is designed to do so, and can the fish escape the remaining tackle after a main-line break? Dropping a lead alone does not prove a helicopter or chod arrangement is safe. Never glue a tail rubber, jam a safety bead against a knot or add a stop that prevents escape. Read our safe carp lead systems guide and Korda's lead-system explanation before assembling an unfamiliar arrangement.
1. The simple hair rig: the best place to start
Go deeper: Read our hair-rig tying guide for the detailed setup, testing and fishing advice.
The hair holds the bait below the hook, leaving its point and gape unobstructed. The knotless knot secures the hook while retaining that hair. It is called knotless because of the whipping-style connection, not because you can leave the hook unsecured. Our starting version uses coated braid and a sinking boilie on a clean patch of lakebed.
Hair-rig components
- Korda Wide Gape X hooks (paid link), in a permitted size matched to the bait.
- Korda N-Trap Soft coated braid (paid link), such as the linked 20lb version where suitable and permitted.
- Korda Hybrid Bait Stops (paid link); choose a stop that seats securely in the bait without forcing an unwanted hair length.
- 15mm Mainline Banoffee boilies (paid link); the linked 20mm bait needs an appropriate hook and hair, not a tiny hook selected by habit.
- Korda anti-tangle sleeve (paid link) and Korda size-8 quick-change swivel (paid link) only where compatible with your complete lead system.
Add the shared tools and main line and complete lead system. Putty and a kicker are not compulsory for this basic sinking-bait version.

How to tie this beginner carp rig
- Start with spare material. Cut around 30cm of coated braid. Strip enough at one end for the hair, whipping and a short flexible section beyond the eye; roughly 10–13cm is a practical starting allowance. Inspect the exposed fibres before continuing.
- Make a small hair loop. Tie an overhand loop, tighten it neatly and leave a short tag. Pass the actual bait onto the hair with the needle and secure it with the stop. Set the hair with the bait fitted, not by guessing from an empty loop.
- Set the gap. Hold the hook beside the bait with the hair along the back of the shank. Start with approximately 5–10mm of clear space between bait and bend. Larger or irregular baits can need more space; the point and gape must remain exposed.
- Pass the long end through the eye. Arrange it so the finished hooklink will leave on the hook-point side. Hold the hair straight down the back of the shank, away from the point.
- Whip towards the bend. Make about seven to nine neat adjacent turns around the shank and hair, adjusting to the hook and line diameter. Start wrapping away from any open eye join. Do not overlap turns or carry them unnecessarily around the bend.
- Return through the eye. Pass the working end so it exits towards the hook point, moisten and draw the wraps down evenly. Look from both sides: the hair should not be trapped across the gape.
- Finish the lead end. For the compatible quick-change version, slide on the sleeve before tying a figure-of-eight loop. A finished hooklink of around 15–20cm is a useful clean-bottom starting point, not a rule for every lake. Tie directly to the supplied swivel instead if your lead system requires it.
- Test before fishing. Apply controlled pressure with pulla tools, check the hook point and lower the baited rig into water. Then test the complete lead arrangement. If a knot slips, fibres fray or the bait masks the hook, remake it.
The point-side exit is worth checking every time: “front” and “back” are easy to interpret differently when you turn a hook in your hand. Our detailed hair-rig tutorial breaks down the same process. Korda's BASIX hair-rig walkthrough is a useful manufacturer demonstration, although its BASIX components are a different specified rig.
A bottom bait should settle naturally with the hook unobstructed. Do not replace it with a buoyant pop-up and assume nothing else changes: a pop-up can lift the hook and hooklink. A wafter also needs checking with the exact hook you intend to use. The label on the tub cannot tell you the weight of your particular assembled rig.
2. Blowback rig: a moving ring on the hair
Go deeper: Read our blowback-rig tying guide for the detailed setup, testing and fishing advice.
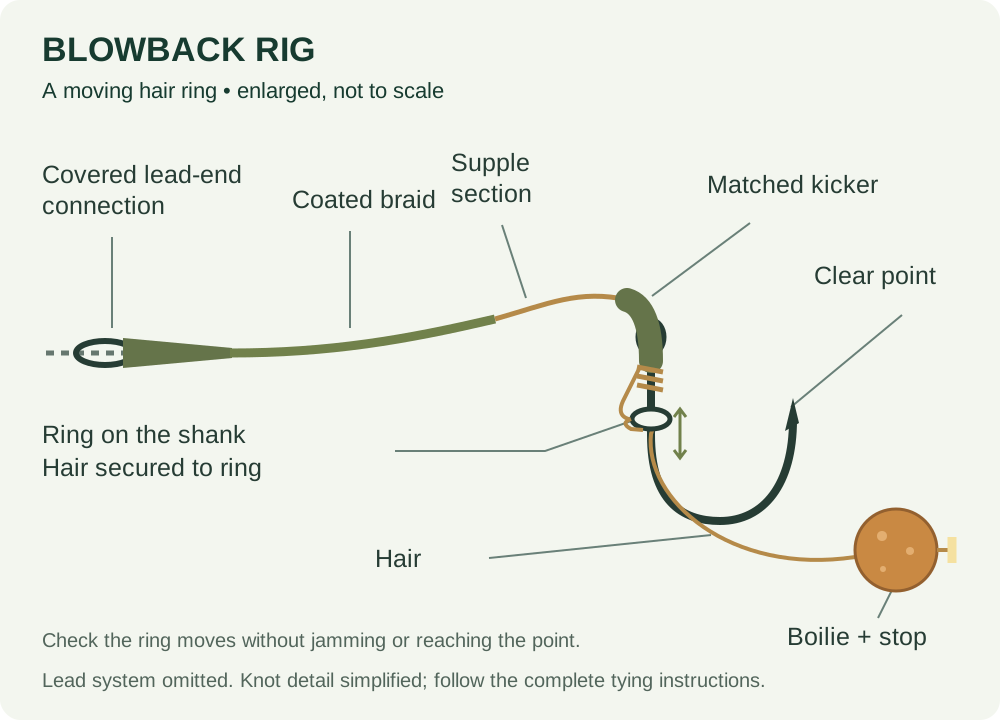
A blowback rig adds a small ring on the hook shank through which the hair is positioned. That allows movement between bait and hook; it does not make the rig impossible for a fish to eject. It is a sensible progression when you understand the ordinary hair rig and want to compare how a bottom bait or balanced bait moves.
Blowback components
Korda Wide Gape X hook (paid link) (select size 6 for the medium Kicker below), N-Trap Soft (paid link), Korda rig ring (paid link), Korda medium Kicker (paid link) matched to the hook, Hybrid Bait Stop (paid link), 15mm Mainline Banoffee bottom bait (paid link), anti-tangle sleeve (paid link) and compatible quick-change swivel (paid link). Add shared tools and the complete lead system. A small pop-up (paid link) is optional only for the tested snowman version.
Tie a hair loop and mount the bait. Secure the ring on the hair so it sits in the intended position on the shank, thread it carefully over the hook point, and set the hair gap. Tie the knotless knot without trapping the ring. Fit the correctly sized kicker over the eye, finish the lead-end connection and test. The ring must move through its intended range without passing into the point or becoming wedged against the eye.
Our blowback tutorial teaches a knotted coated-braid version. Korda's DF blowback rig uses Hybrid Stiff and an approved crimped finish. Do not copy its crimp connection onto N-Trap. The name of a rig does not make its hooklink materials interchangeable.
3. KD rig: hair position changes the presentation
Go deeper: Read our detailed KD-rig guide for the detailed setup, testing and fishing advice.
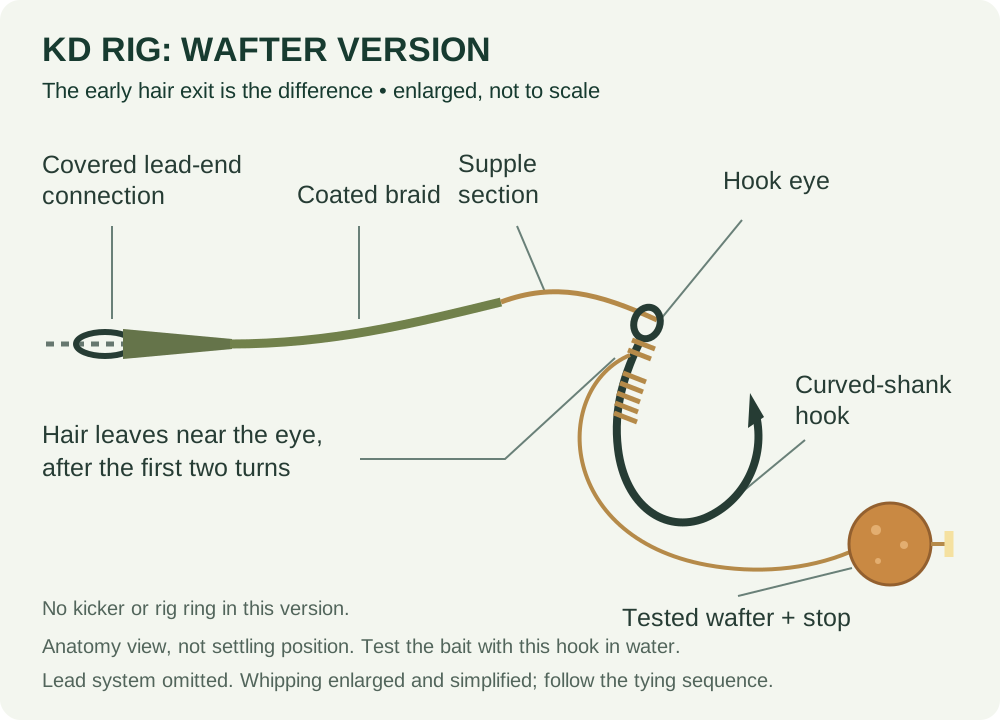
The KD uses a curved-shank hook and a hair that leaves the whipping early, near the eye. In the wafter version, the bait counteracts some weight while the hook settles separately. This is not simply a normal hair rig with fewer turns: pay attention to which turns trap the hair and which do not.
KD components
Korda Kurv Shank hooks (Size 6 barbed) (paid link), N-Trap Soft coated braid (paid link) with a supple hook section, Hybrid Bait Stop (paid link), 12mm Mainline Banoffee wafter (paid link), anti-tangle sleeve (paid link) and compatible quick-change swivel (paid link). Add shared tools and the complete lead system. No kicker or rig ring is required for this version.
Set the bait and hair first. Begin the knotless knot with two turns trapping the hair, move the hair clear, then complete the remaining turns around the shank alone before returning through the eye. Keep the hair in its intended position while tightening. Check in water that the hook rests down and the bait does not drag it upright.
See our KD-rig guide and Korda's manufacturer tying sequence, which specifies its own material version. Pop-up KD arrangements add counterweight on the hair below the bait; they are not the wafter rig above with a different bait attached.
4. Line-aligner and flipper rigs
Go deeper: Read our line-aligner and flipper guide for the detailed setup, testing and fishing advice.
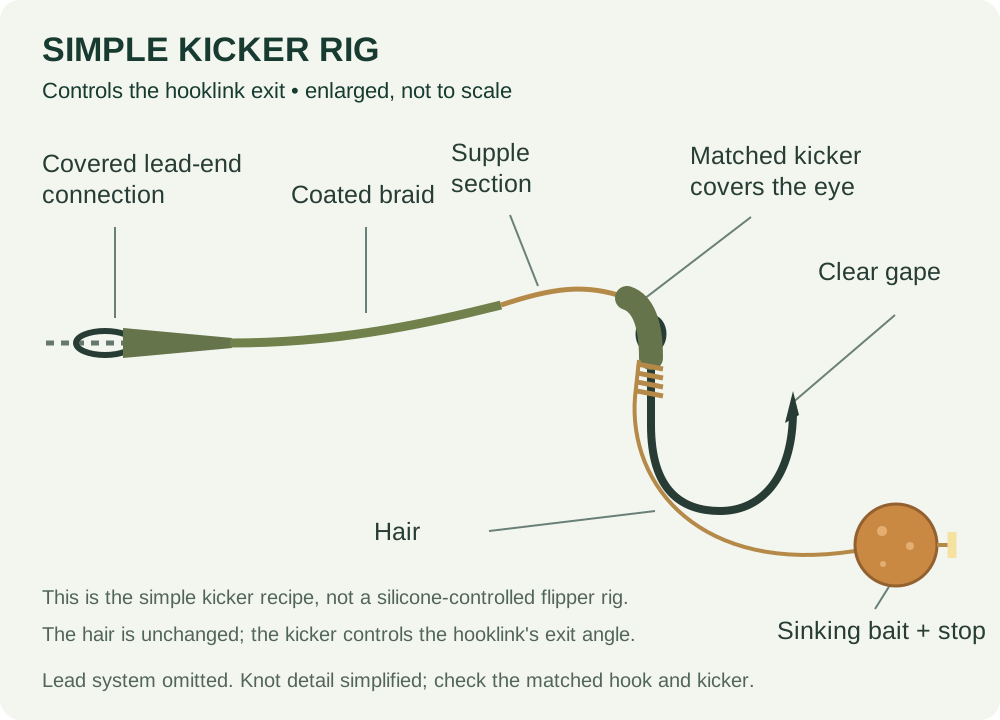
A line-aligner controls where the hooklink leaves the hook using tubing or a purpose-made extension. A flipper instead uses a small piece of silicone on the hook to position the hair's exit towards the bend; it can also have an eye extension. They are not the same construction. The simple kicker variation listed below changes the hooklink angle, not the hair position.
Simple kicker-version components
Wide Gape X hook (paid link) (select size 6 for this medium-Kicker example), N-Trap Soft (paid link), matched Korda Kicker (paid link), bait stop (paid link), 15mm Mainline Banoffee bottom bait (paid link), anti-tangle sleeve (paid link) and compatible swivel (paid link), plus shared tools and lead system.
Tie and check the hair rig, then fit a kicker designed for that hook size. It should seat over the eye without splitting or obstructing the gape. Do not build an exaggerated curved extension by stacking kickers or use a bare long-shank/bent-hook adaptation simply because it turns dramatically in a hand test. For the separate silicone-controlled hair arrangement, follow Korda's bottom-bait/flipper demonstration; the kicker list above is not its complete rig. “Claw rig” is another name used for particular hair-control and tubing arrangements; check the actual construction, not just the name.
5. D-rig and IQ D: a stiff D instead of a hair
Go deeper: Read our IQ D-rig tying guide for the detailed setup, testing and fishing advice.
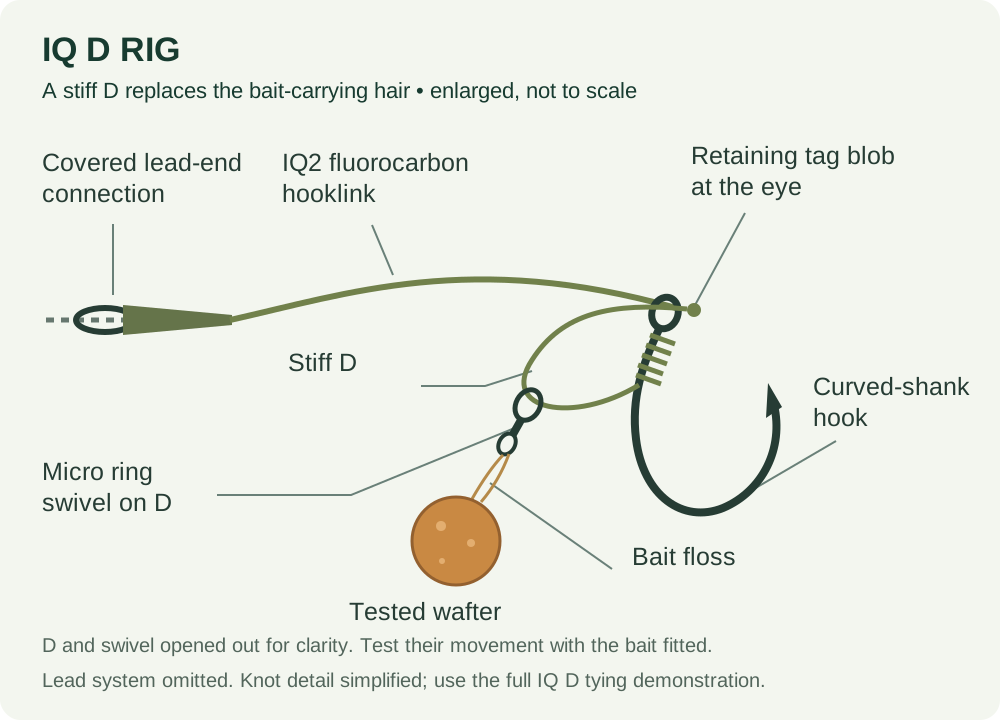
A D-rig carries the bait attachment on a D-shaped section behind the hook. The IQ D version uses fluorocarbon, which behaves differently from a supple braided hair. Use it where the hooklink can settle without bridging awkwardly across debris. Its value is controlled separation and movement, not a promise that fluorocarbon is invisible.
IQ D components
Korda Kurv Shank hooks (Size 6 barbed) (paid link), Korda IQ2 fluorocarbon (paid link), Korda Micro Ring Swivel (paid link), Korda Bait Floss (paid link), 12mm Mainline Banoffee wafter (paid link), Dark Matter putty (paid link) if needed for balance/pinning, anti-tangle sleeve (paid link) and compatible lead-end swivel (paid link). Add the shared scissors, needle and pulla tools; this version also requires a lighter for the non-load-bearing tag blob.
Our compact IQ D tying guide explains the returned-tag version illustrated here and distinguishes it from longer, separately whipped D constructions. Korda's returned-tag explanation describes the underlying idea, with its own hook and silicone variation. Only the short tag is carefully blobbed to prevent it withdrawing; heat must not damage the working hooklink. Tie the bait on with floss, finish the lead end and test the D's movement with the bait fitted. If you are not comfortable working with heat near line, learn the ordinary hair rig first.
A moulded D-rig kicker is a separate shortcut with its own sizing and assembly instructions; it is not an extra part to add to an already finished fluorocarbon D. Nor should IQ2 be treated as an automatically crimpable substitute for Boom.
6. Slip-D: a flexible, collapsing D
Go deeper: Read our Slip-D tying and testing guide for the detailed setup, testing and fishing advice.
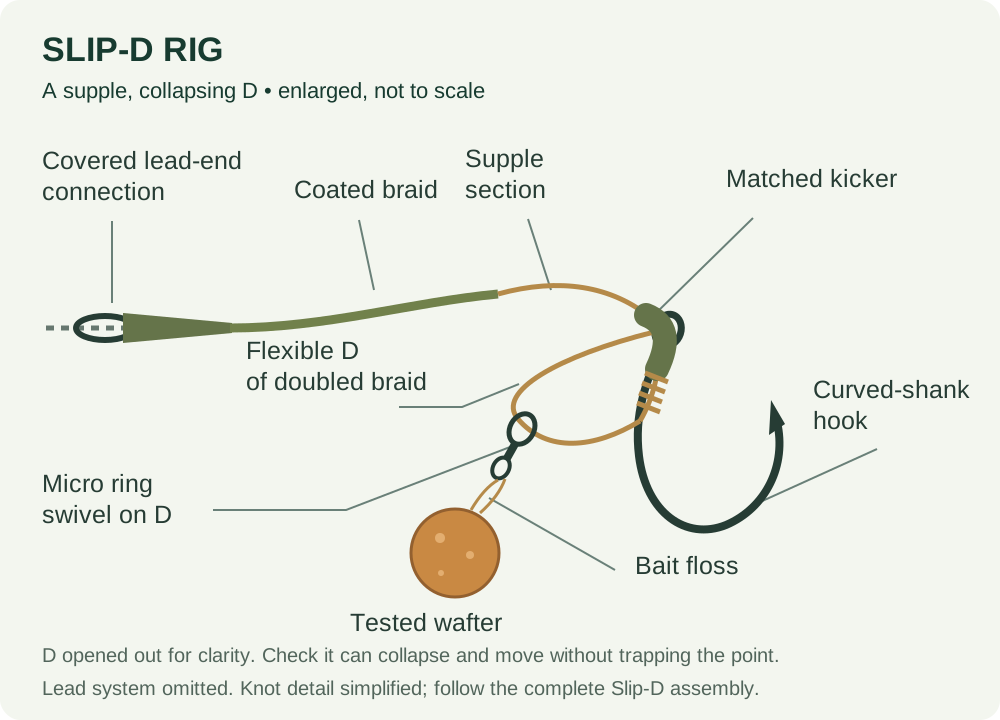
The Slip-D uses a supple doubled section that allows the bait attachment to move back as the D changes shape. It belongs alongside the D-rig, but the construction and behaviour are different. A stiff fluorocarbon IQ D cannot be converted just by pushing its swivel into a different position.
Slip-D components
Korda Kurv Shank hooks (Size 6 barbed) (paid link), N-Trap Soft (paid link), Micro Ring Swivel (paid link), correctly sized Korda Kicker (paid link), bait floss (paid link), 12mm Mainline Banoffee wafter (paid link), sleeve (paid link) and compatible swivel (paid link). Add shared tools and a complete lead system; putty (paid link) is conditional on the bait-balance test.
Build the doubled hook-end section and sliding bait attachment in the order shown in Korda's Slip-D tutorial, using the maker's sizing for a kicker instead of its shrink-tube option. Before fishing, pull the bait attachment back and release it: the D should move as intended without trapping the hook point. This is an intermediate rig to practise at a table, not a shortcut to improvise on a dark bank.
7. German and Turbo German rigs
Go deeper: Read our German and Turbo German guide for the detailed setup, testing and fishing advice.
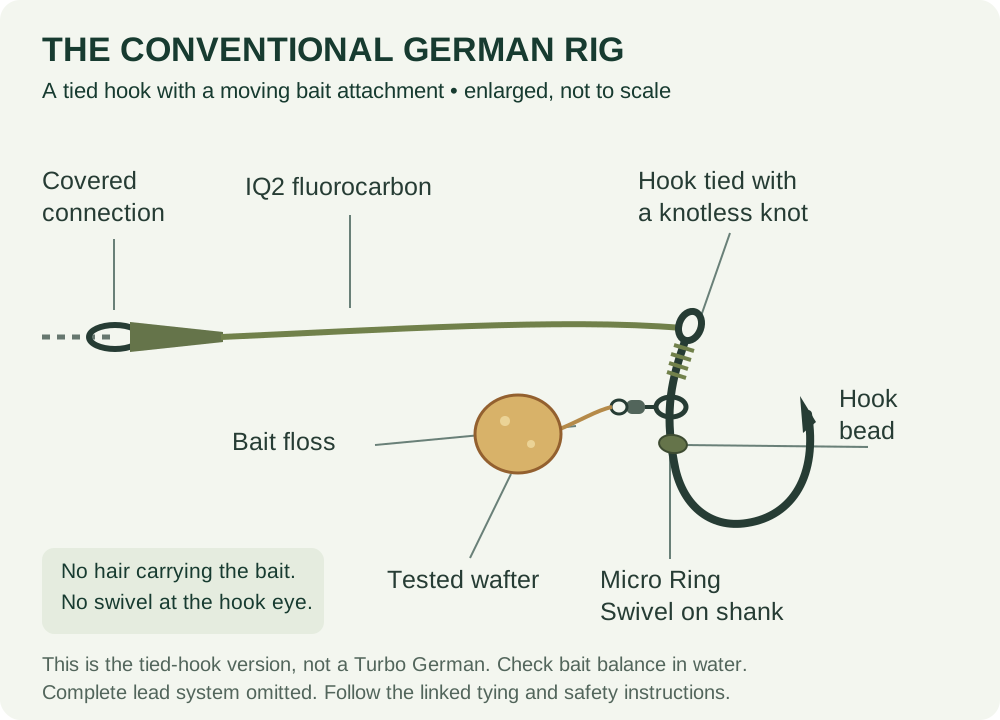
A German rig typically attaches a bottom bait or wafter to a small swivel on the hook shank, retained by a hook bead, with the hook tied to the hooklink. The Turbo German adds a particular articulated connection. Neither name means an ordinary spinner pop-up rig with all its balancing weight removed.
Conventional German-rig components
Korda Kurv Shank hooks (Size 6 barbed) (paid link), IQ2 fluorocarbon hooklink (paid link), Micro Ring Swivel (paid link), Korda hook bead (paid link) sized to grip that hook, bait floss (paid link), 12mm Mainline Banoffee wafter (paid link), sleeve (paid link) and compatible lead-end swivel (paid link). Add scissors, needle, pulla tools and a complete lead system.
The conventional sequence is to tie the hook with a knotless knot without leaving a bait-carrying hair, fit the small bait swivel and then fit its retaining hook bead. Gardner's original German-rig demonstration shows that construction using its own components; our Korda-led list is an alternative, not a claim that their parts have identical dimensions. Set the bead so the bait attachment moves along the intended shank area without reaching the point, attach the wafter with floss, finish the lead end and test the complete baited rig. If the bead cannot hold its position or the swivel binds, change the mismatched part rather than forcing it.
Gardner's separate Turbo German demonstration adds a specified hook-eye swivel and its retaining tubing. It is a specialist follow-on, not the tied-hook rig listed here with a swivel added at random.
8. Combi rig and combi-multi
Go deeper: Read our combi-rig and combi-multi guide for the detailed setup, testing and fishing advice.
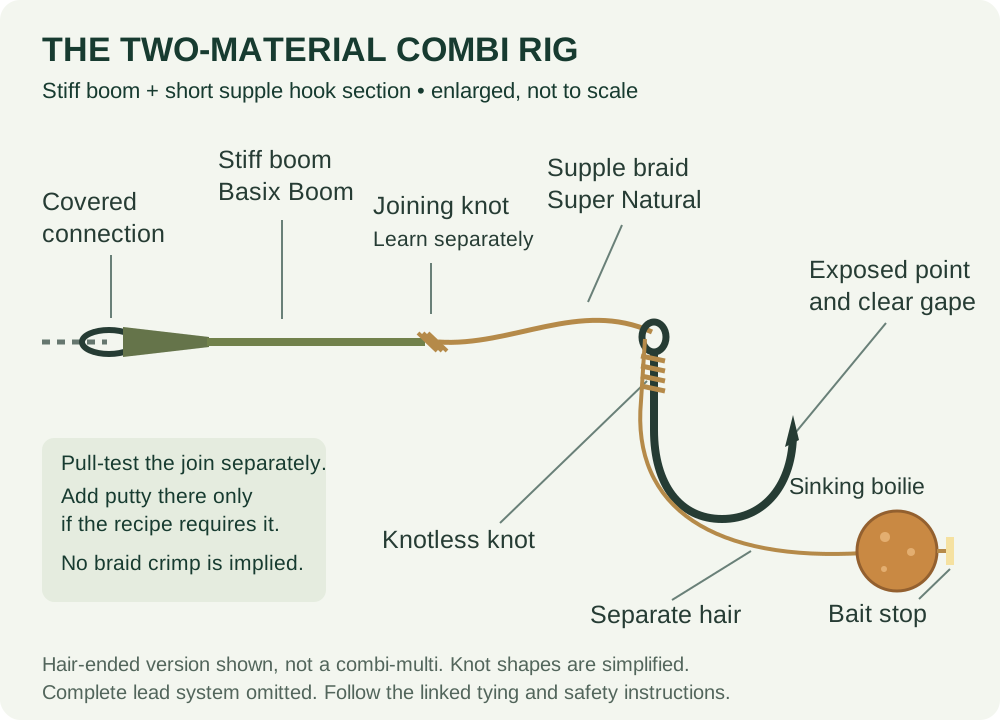
A combi combines a stiffer section with a supple hook section. A stripped coated-braid hair rig already provides a simple version of that idea. A two-material combi takes it further by joining a stiff boom to a short braid section; that adds a connection you must be able to tie and inspect reliably.
Two-material, hair-ended combi components
Korda Basix Boom (paid link), Korda Super Natural braid (paid link), Wide Gape X hook (paid link), bait stop (paid link), 15mm Mainline Banoffee bottom bait (paid link), Dark Matter putty (paid link) where required at the join, sleeve (paid link) and compatible swivel (paid link). Add shared tools. Use the specified knot-joined version; no crimp is implied by this list.
Choose the material diameters and joint from one demonstrated rig, such as the knot-joined approach explained in Korda's combi-rig guide. Its Super Natural material guide also confirms the braid's use in combi presentations. Keep the supple section short enough for the intended presentation, but not so short that the hook cannot move. Pull-test the material junction separately as well as the hook and lead-end connections; this overview is not a substitute for learning the joining knot.
A combi-multi adds a changeable-hook loop arrangement and requires its own braid, kicker and hook combination; a reverse combi puts the supple section in a different position. Neither is a reason to crimp ordinary braid. For a first attempt, the coated-braid hair rig is cheaper, simpler and avoids the extra joint. Learn the two-material version when you can explain what the stiffer boom will improve on your chosen spot.
9. Spinner rig, also called the Ronnie rig
Go deeper: Read our Ronnie/spinner tying guide for the detailed setup, testing and fishing advice.
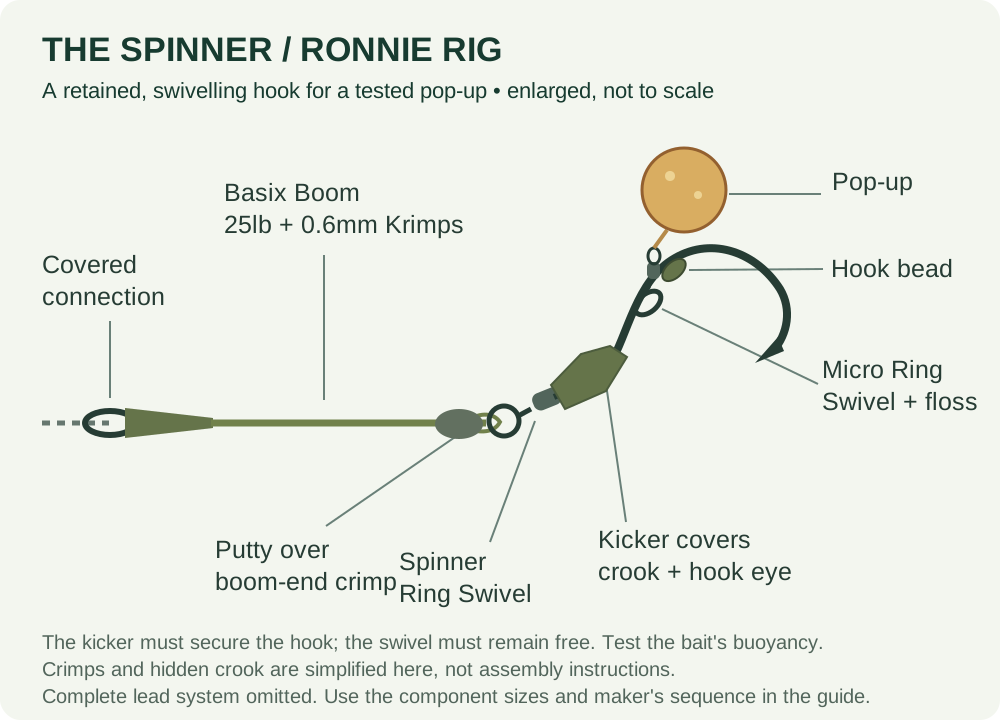
The spinner uses a hook attached to a purpose-made swivel and retained by a correctly fitted kicker. With a tested pop-up and counterweight, it presents the bait low above the bottom. This is a useful pop-up option, but its boom still needs somewhere sensible to settle: the rig is not a licence to cast into dense weed.
Crimped-boom spinner components
Korda Krank hook (paid link) (select size 4 and a permitted barb option for this example), Korda Spinner Ring Swivel (paid link), Korda large Kicker (paid link) for the specified larger hook size, Micro Ring Swivel (paid link), hook bead (paid link), Korda Basix Boom in 25lb (paid link), Korda Small 0.6mm Krimps (paid link), Korda Krimp Tool (paid link), bait floss (paid link), pop-up (paid link), Dark Matter putty (paid link), anti-tangle sleeve (paid link) and compatible lead-end swivel (paid link). Add shared tools and a complete lead system. Match the hook, kicker and bead sizes; do not buy medium kickers just because another rig uses them.
- Build the boom with the spinner swivel at one end and the specified lead-end loop at the other. For the 25lb Basix Boom version, use the maker's Small 0.6mm Krimps and matched tool; other diameters require different crimps.
- Crimp exactly as instructed, retaining the recommended tag, then test both joints firmly with pulla tools. Ordinary pliers are not a substitute.
- Fit the hook to the swivel crook and seat the correctly sized kicker so it fully secures that crook. Check the hook cannot come off while the swivel can still move.
- Fit the bait attachment and retaining hook bead in their intended positions. Tie on the pop-up using floss and check it cannot pull free.
- Counterbalance with putty at the specified connection point, without immobilising the swivel. In water, the boom should stay down and the hook section should settle as intended.
Read our Ronnie/spinner walkthrough alongside Korda's manufacturer assembly and material-to-crimp compatibility guide. The original 360° rig is a different arrangement; its components and hook patterns are not interchangeable with a Ronnie rig.
10. Multi rig: a changeable hook without a spinner swivel
Go deeper: Read our multi-rig tying and hook-change guide for the detailed setup, testing and fishing advice.
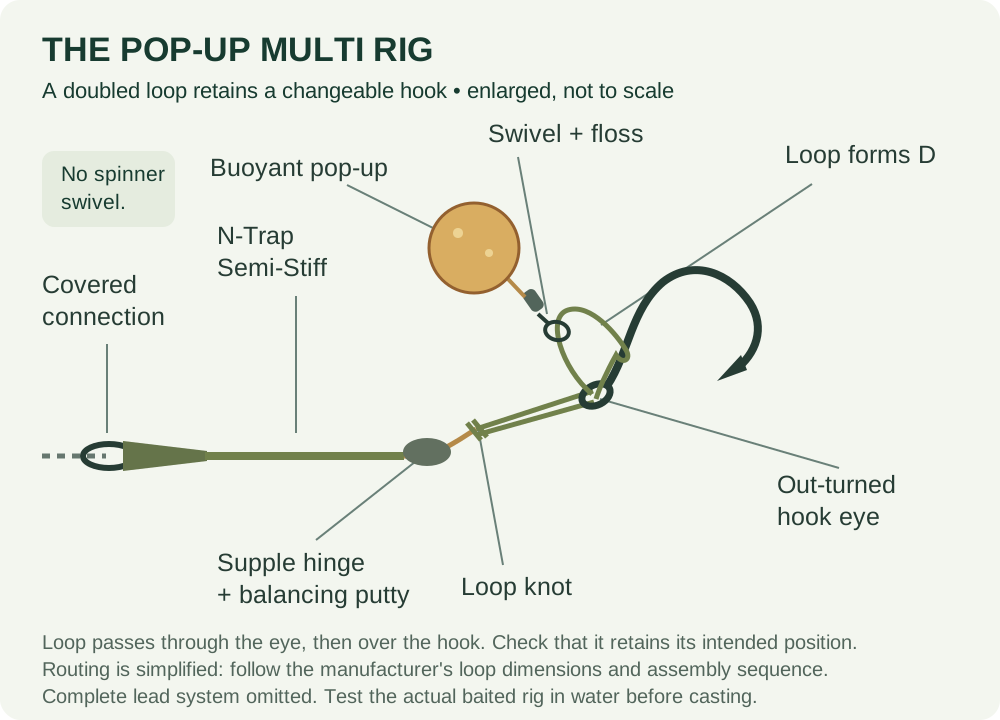
The multi uses a loop passed through an appropriate hook eye to form the bait-carrying D and retain the hook. That makes replacement possible without tying an entirely new hooklink. A damaged loop, however, is not made safe by fitting a new hook.
Pop-up multi-rig components
Korda Choddy hook (paid link), Korda N-Trap Semi-Stiff (paid link), Micro Ring Swivel (paid link), bait floss (paid link), buoyant pop-up (paid link), Dark Matter putty (paid link), sleeve (paid link) and compatible swivel (paid link), plus shared tools and the complete lead system.
Use the loop dimensions and assembly shown in Korda's multi-rig tutorial. The doubled material must pass through the out-turned eye without being crushed. Form the D, attach the bait and place the counterweight at the intended hinge. Confirm the loop retains its position when the rig is handled and when it settles in water. This is the pop-up version; bottom-bait multi variants need their own hook and geometry choices.
11. Hinged stiff rig: a stiff hook section on a boom
Go deeper: Read our hinged-stiff rig guide for the detailed setup, testing and fishing advice.
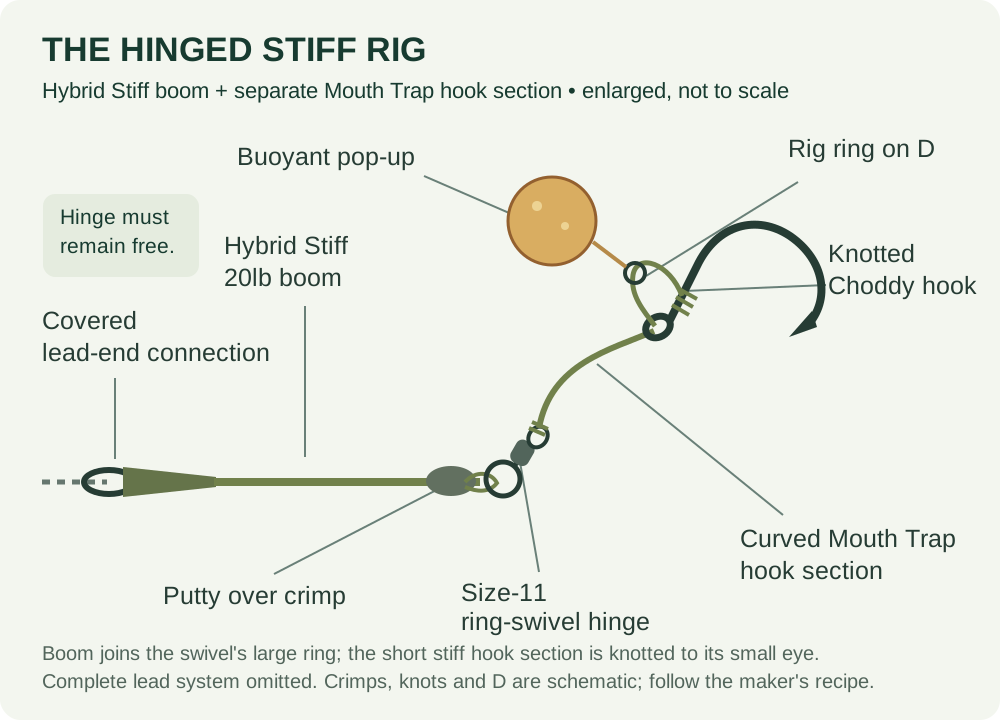
A hinged stiff rig joins a short, shaped pop-up hook section to a longer boom through an articulated connection. That extra hinge is the distinction to understand. The short section resembles a chod section, but a hinged stiff rig is not simply a chod fished anywhere along a leader.
Hinged-stiff components: Hybrid Stiff boom version
Korda Choddy hook (paid link), 20lb Korda Mouth Trap (paid link) for the hook section, Korda rig ring (paid link) for the bait, Korda size-11 ring swivel (paid link) for the hinge, 20lb Korda Hybrid Stiff (paid link) for the boom, Small 0.6mm Krimps (paid link), matched Krimp Tool (paid link), Korda shrink tube (paid link), bait floss (paid link), high-buoyancy pop-up (paid link) and Dark Matter putty (paid link). Add the shared tools and complete lead system. For a compatible quick-change lead-clip finish, add the lead-end swivel (paid link) and anti-tangle sleeve (paid link); a helicopter finish instead requires the full manufacturer-specified helicopter arrangement. A Korda Chod It tool (paid link) helps shape and hold the stiff section but is not an essential purchase.
Follow Korda's hinged-stiff tutorial for the Hybrid Stiff boom, articulated swivel connection and knotted Mouth Trap hook section. It demonstrates both the ring-swivel helicopter end and the option of a standard swivel for a lead clip. Have experienced help confirm the complete version you choose, including its lead-end connection. Hybrid Stiff is approved for this crimped construction; ordinary coated braid is not a substitute. Mouth Trap is a dedicated stiff filament, not IQ2 fluorocarbon. Follow the specified tag-end and shrink-tube operations without heating load-bearing line or exposing your hands to steam. The pop-up must support the intended hook section after soaking; if you cannot obtain that balance reliably, use a simpler presentation.
12. Chod rig: the safety system matters as much as the hook section
Go deeper: Read our dedicated chod-rig guide for the detailed setup, testing and fishing advice.
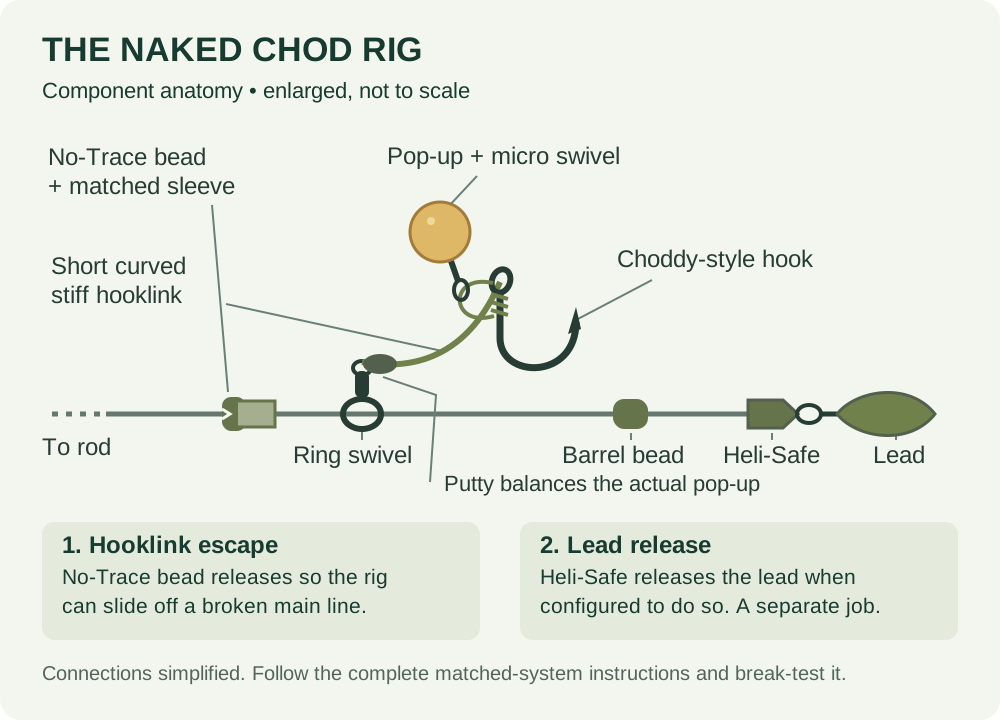
A chod has a short stiff pop-up hooklink that rotates around the main line or permitted leader in a helicopter-style arrangement. It can be useful above certain light debris or soft bottoms, but the bead positions and escape path are critical. It is not our first recommendation for someone still learning terminal-tackle safety.
Naked-chod components
Korda Choddy hook (paid link), Mouth Trap (paid link), Micro Ring Swivel (paid link), size-11 ring swivel (paid link), bait floss (paid link), buoyant pop-up (paid link), Dark Matter putty (paid link), Korda Naked Chod Safety System (paid link) with its matched barrel bead, sleeve and No-Trace bead, Korda Heli-Safe lead-release system (paid link) and Korda swivel lead, 3.5oz — choose a weight suitable for your rod and swim (paid link). Add suitable main line (paid link) and shared tools; a Chod It tool (paid link) is an optional shaping aid. The hooklink swivel is a separate purchase, not assumed to be inside the safety-system pack.
The hook section needs the correct stiff-material knot and a smooth, controlled curve; follow Korda's chod tying demonstration. Have the complete setup checked before using it. The top bead must permit the hooklink to escape after a break, including past any relevant connection knot. A lead-release device does not replace this function.
Our chod-rig article provides further context. For the actual safety parts, follow the No-Trace system instructions and the Heli-Safe instructions, not a diagram assembled from unrelated beads. Korda specifies that Heli-Safe works with the Naked Chod Safety System; the two parts perform different release functions. Do not use a chod as an excuse to fish thick weed from which a carp cannot be landed safely.
13. Solid PVA bag rig: delivery, not a new hook knot
Go deeper: Read our solid PVA bag guide for the detailed setup, testing and fishing advice.
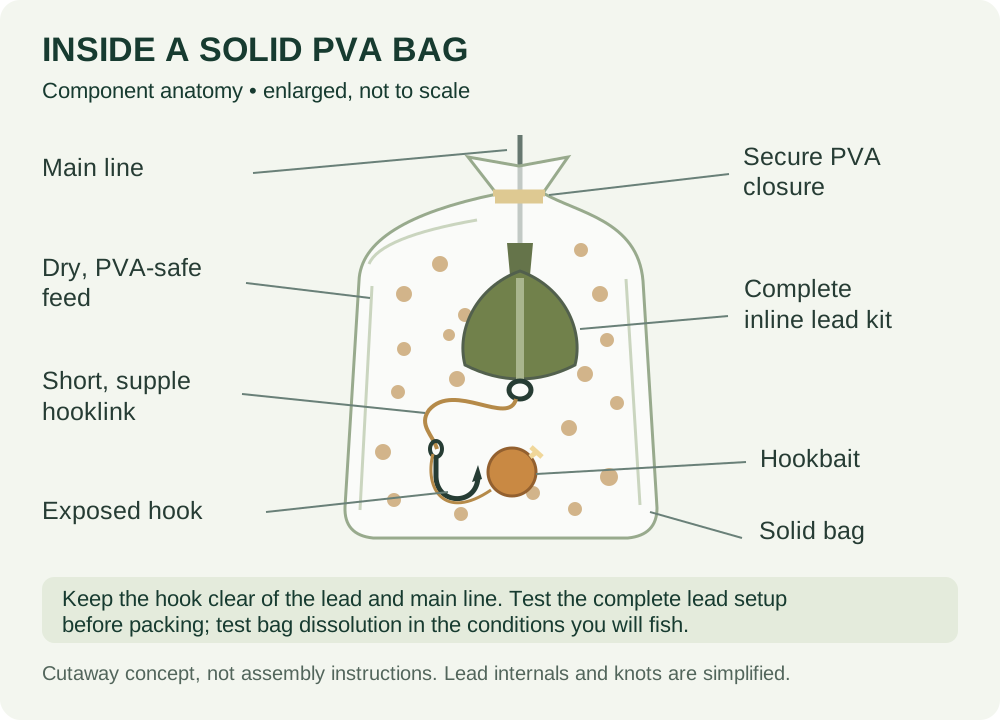
A solid bag encloses the hooklink, lead and a small quantity of suitable dry feed. Once dissolved, it leaves them together. The starting hooklink is usually short and supple so it can fold into the bag, rather than a long stiff boom forced around the lead. A compact bag can help with casting tangles, but cannot make deep weed or a snag safe.
Solid-bag components
Wide Gape X hook (paid link), Super Natural supple braid (paid link), bait stop (paid link), 12mm Mainline Banoffee wafter (paid link) or 15mm Mainline Banoffee bottom bait (paid link), Korda Solidz bags (paid link), dry small feed pellets (paid link) and a Korda Inline Safety Kit, 2.5oz (paid link), which includes the lead, matching insert with moulded-in ring swivel and tail rubber. Add Korda PVA tape (paid link) if using a tied-neck bag, plus shared scissors, needle and pulla tools. Use only PVA-compatible contents.
Tie a short supple hair rig, approximately 7–10cm as a starting point, and check it with the chosen bait. Assemble and break-test the complete inline arrangement before packing anything. Place the hookbait and a little feed in the bag, arrange the hooklink so the hook cannot catch the lead or main line, then pack in the lead and remaining feed. Compress carefully, close securely and test dissolution with the same bag and water temperature where practical.
An inline lead is not automatically a safe drop-off system. With the linked Inline Safety Kit, match the numbers on lead and insert and attach the hooklink to the supplied moulded-in ring swivel as instructed; do not add a different inline lead or substitute a size-8 quick-change swivel. Check the line-break escape path and the total bag weight against your rod's casting capability. Korda's kit specification confirms the included parts and solid-bag compatibility. Read the full solid PVA bag guide and Korda's bag-rig explanation. Damp hands, water-based liquids and wet particles can damage a bag before the cast; conversely cold water can slow its breakdown. An apparently intact retrieve is a reason to check the bag, not add another one.
14. Zig rigs: fixed and adjustable versions
Go deeper: Read our fixed and adjustable zig guide for the detailed setup, testing and fishing advice.
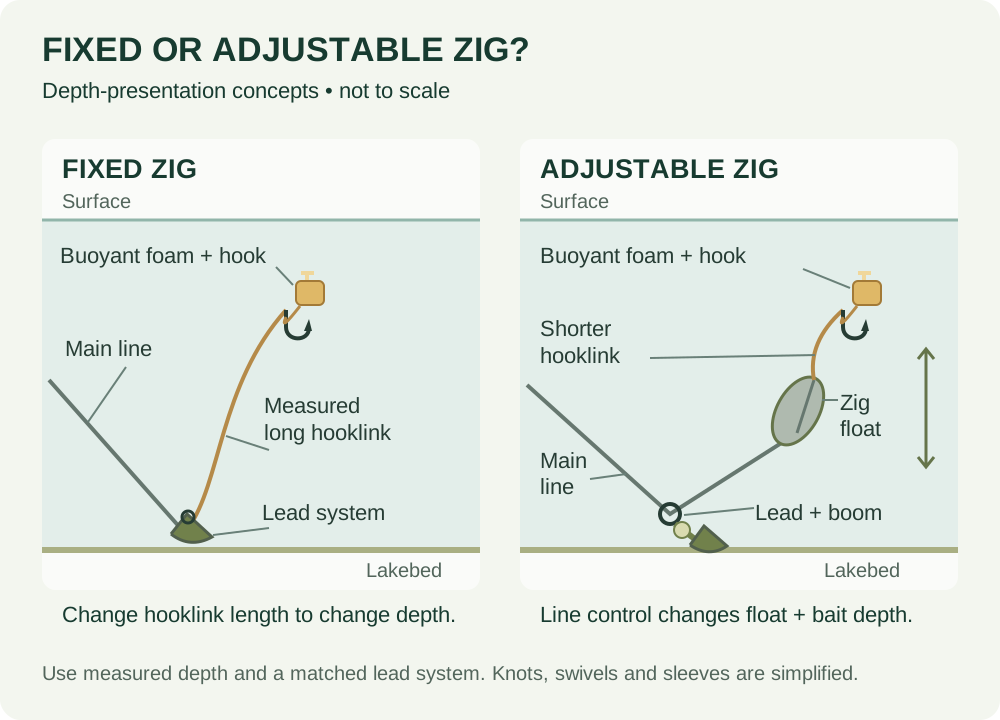
A zig suspends a small buoyant hookbait above the lead to fish partway through the water. It is a depth presentation, not a pop-up rig with a very long heavy fluorocarbon hooklink. Work from the measured depth and safe landing arrangements; do not guess a hooklink longer than the water you are fishing.
Fixed-zig components
Korda Mixa surface hooks (Size 8 barbless) (paid link), Korda Zig Line (paid link), Korda Zig Foam (paid link), Hybrid Bait Stop (paid link) and correctly fitting 0.5mm ESP silicone tubing (paid link) to cover the hook eye and control the hooklink exit, and the maker-specified lead-end swivel/connection. Add shared scissors and pulla tools plus a compatible lead system. This is a short-hair version, not a foam-holder/aligner system; the hair stop is required, but bait floss is not. The small amount of ESP tubing is a verified non-Korda alternative; check its grip on your exact hook.
Additional adjustable-zig components
Korda Zig Float kit (paid link) and its specified lead connection replace the fixed-zig arrangement; retain the appropriate hook, zig line and buoyant hookbait. Check the selected float kit's contents and follow its instructions in full.
For a fixed zig, follow Korda's short-hair zig sequence to secure a small piece of foam on a short hair, then slide correctly fitting tubing over the eye to protect the knot and control the hooklink exit. Then measure the hooklink for the intended depth and check the small bait can lift the full wet hooklink. Keep it away from hooks, bank vegetation and your body during casting. If its length makes casting or netting awkward, get experienced assistance or change the approach.
An adjustable zig uses a submerged float and line control to alter the bait depth; it is not made by adding a surface controller to a fixed-zig hooklink. Our zig fishing guide covers both. Avoid fishing zigs when waterbirds can reach the bait or become entangled in the suspended line.
15. Surface rigs, controllers and freelining
Go deeper: Read our surface and controller fishing guide for the detailed setup, testing and fishing advice.
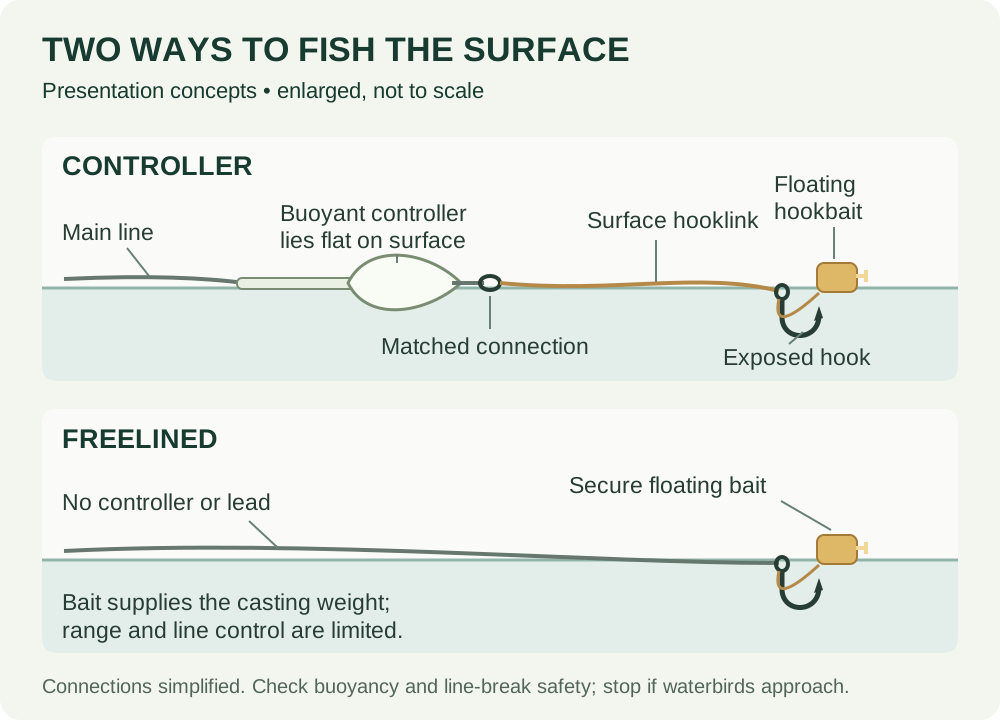
Surface fishing belongs in a complete beginner overview because carp do not always feed on the lakebed. A freelined floating bait uses its own casting weight; a controller adds casting weight and a visible reference. Neither is a bottom rig with its lead removed while every other component stays the same.
Simple hair-mounted surface bait components
Korda Mixa surface hooks (Size 8 barbless) (paid link), Korda Zig Line suitable for the chosen surface hooklink (paid link), bait stop (paid link) and buoyant foam hookbait (paid link). Add the shared needle, scissors and pulla tools. For a controller setup, add a Korda Interceptor controller (paid link) with the matched swivel and anti-tangle parts specified for that exact model. Check that the hookbait itself remains buoyant when attached.
Choose a hookbait that stays secure and floats with the actual hook. Small amounts of permitted Dynamite floating feed pellets (paid link) can help establish whether carp are feeding; feed pellets are not automatically suitable for piercing with a fine needle. Fish close enough to control the line, watch continuously and remove the tackle if birds approach. A controller must not be fixed in a way that leaves it tethered after a line break. See our freelining guide for the limits of an unweighted approach.
Waggler, pellet-waggler and method-feeder fishing are other distinct methods, not missing variations of a specialist bottom hook rig. Their tackle, feeding and bite detection need their own explanation: use the carp float-fishing guide, pellet-waggler guide and method-feeder guide rather than adapting a lead-clip rig by guesswork.
Have we missed any carp rigs?
The main families above cover a much broader range than a first-session angler needs. Rig names are not a fixed official catalogue: anglers change the hook, bait attachment, boom or counterweight and give the result another name. The following names are worth recognising without presenting each as a compulsory new purchase.
Snowman: a sinking boilie with a smaller buoyant bait above it, often on a hair or blowback rig. Use a smaller pop-up above the bottom bait. If using the linked 15mm pop-up (paid link), trim it down before adding it to the listed 15mm Mainline Banoffee bottom bait (paid link), adjust the hair and test the combined buoyancy. Two baits that look right are not necessarily balanced together.
Stiff bottom-bait rig: a stiff-material presentation for a sinking bait, not the same as a hinged-stiff pop-up rig. Use a proven hook-eye/material pairing and complete tying rig; copying the hair-rig knot onto any stiff filament can force an unsuitable angle at the eye.
Maggot, maggot-clip and Medusa presentations: different ways of mounting live or artificial maggots onto an underlying rig. The bait attachment must not jam the gape. Our maggot-fishing guide explains the bait-specific considerations; these are not additional rigs taught by this beginner page.
Withy Pool, original 360°, bent-hook and other specialist arrangements: recognise the names, but do not improvise them from the beginner shopping lists. Hook patterns, curved extensions and fishery restrictions matter. The original 360° is not a synonym for the modern Ronnie/spinner. This guide deliberately does not offer a shopping rig for specialist designs it does not teach.
Helicopter, running, inline, lead clip, naked and leader-based: these describe arrangements or connections, not necessarily different bait-presenting hook rigs. Likewise, a PVA mesh stick is a bait-delivery aid. Count the actual presentation and its components, not the number of labels on a shop shelf.
The before-casting rig checklist
Make this the last part of tying every rig, including ready-tied ones. A neat-looking hooklink is only the start. Check it again after each fish, after contact with weed or a snag, and whenever a hookbait is replaced.
- Rules: hook type, hook size, hooklink strength, lead arrangement, leaders and bait all comply with this fishery's current rules.
- Connections: knots and approved crimps withstand a controlled pull test; no nicked fibres, cracked coating or slipping tags.
- Hook: point undamaged, eye smooth, gape clear. Do not use your skin as a hook-sharpness or “flipping” test.
- Movement: hair, ring, D, swivel or hinge moves through its intended range without sticking or reaching the point.
- Buoyancy: lower the actual baited rig into water, then check again after soaking. Confirm which parts rest on the bottom and which lift.
- Escape: verify the complete system's behaviour after a main-line break, including any bead, knot, tubing or leader in the escape path.
- Landing: an assembled net, wetted mat and unhooking tools are ready before casting. Do not put a bait where you cannot safely land a carp.
What a failed check tells you
| What you see | Check next | Avoid |
|---|---|---|
| Wafter lifts the hook unexpectedly | Bait buoyancy against this hook; trim or change bait and retest | Assuming every bait labelled wafter balances the same |
| Hookbait or hair wraps the hook | Hair gap, casting control and attachment movement | Adding several sleeves without finding the cause |
| Stiff boom arches over debris | Actual bottom, boom material and choice of spot | Calling the rig weed-proof |
| Swivel, ring or D sticks | Part size, burrs, putty position and bead location | Fishing it because it once caught a carp |
| Knot or crimp moves in a pull test | Material compatibility and tying/crimping technique | Hiding the fault under tubing or glue |
| Safety bead will not release | The entire manufacturer-specified assembly and escape path | Casting until an experienced person has checked it |
A recovered tangle tells you the rig is tangled now; it does not prove precisely when that happened. It could have twisted during the cast, on landing or during retrieval. Change one factor, make controlled test casts and compare. Our rig-tangle troubleshooting guide takes that process further.
Beginner carp-rig questions
What is the easiest carp rig to tie?
The basic knotless-knot hair rig with a sinking bait is our starting recommendation on a clean spot. It has few components, clear checks and a useful detailed tutorial. That recommendation still depends on the fishery's rules and having a safe complete lead arrangement.
Which carp rig works everywhere?
None. A rig can be well tied but wrong for the bait, depth or bottom. Knowing where fish are feeding and choosing a safe spot matters more than owning a rig for every name in this guide.
What hook size and hooklink length should I use?
Match the hook pattern and size to the actual bait and venue rules. Around 15–20cm is a manageable starting hooklink length for our clean-bottom hair rig, while a solid-bag hooklink is usually shorter. These are starting points, not universal settings. Read our hook-size guide before substituting a much smaller or larger hook.
Can I use only Korda products?
You can build many established rigs predominantly from Korda components, as the lists above show. Still check compatibility within the range: a Korda size-8 swivel, size-11 swivel and micro bait swivel do different jobs. Brand consistency is helpful but is not a substitute for the right specification.
Are ready-tied rigs a sensible option?
Yes, if the actual hook, material and length suit the water and the complete lead arrangement is safe. Inspect and test them too. They can also be useful physical references while learning, but a packet cannot teach you whether the presentation is right for an unknown lakebed.
Do I need to learn all fifteen presentations?
No. Learn the hair rig, practise the safety checks, then add a presentation that solves a real problem on your water. The wider coverage is here so unfamiliar names do not leave gaps in your understanding, not to turn your first trip into a shopping challenge.
Finish your setup: five practical workshops
The hook section is only one part of the job. Continue with our illustrated lead-system assembly guides, essential fishing knots and hookbait mounting and balancing workshop. For compact bait parcels, use the separate solid PVA bag tutorial or PVA mesh, sticks and stringers tutorial. Each covers components, practical steps and checks before casting.
How this guide was reviewed
This is a researched tying and selection guide, not a claim that CarpAnswers has physically tested every listed product or measured comparative catch rates. The update distinguishes hook-rig families, bait presentations and lead systems, and checks key component combinations against the linked manufacturer instructions. The diagrams are original explanatory schematics, not copied manufacturer photographs. Product evidence is dated; buy the specified variant and recheck changing listings before ordering.
Use the manufacturer demonstrations beside each specialist section when learning a new knot or connection, and ask a competent fishery team member to check an unfamiliar complete setup. A rig you understand, can reproduce and can test is a stronger starting point than a complicated arrangement you cannot explain.