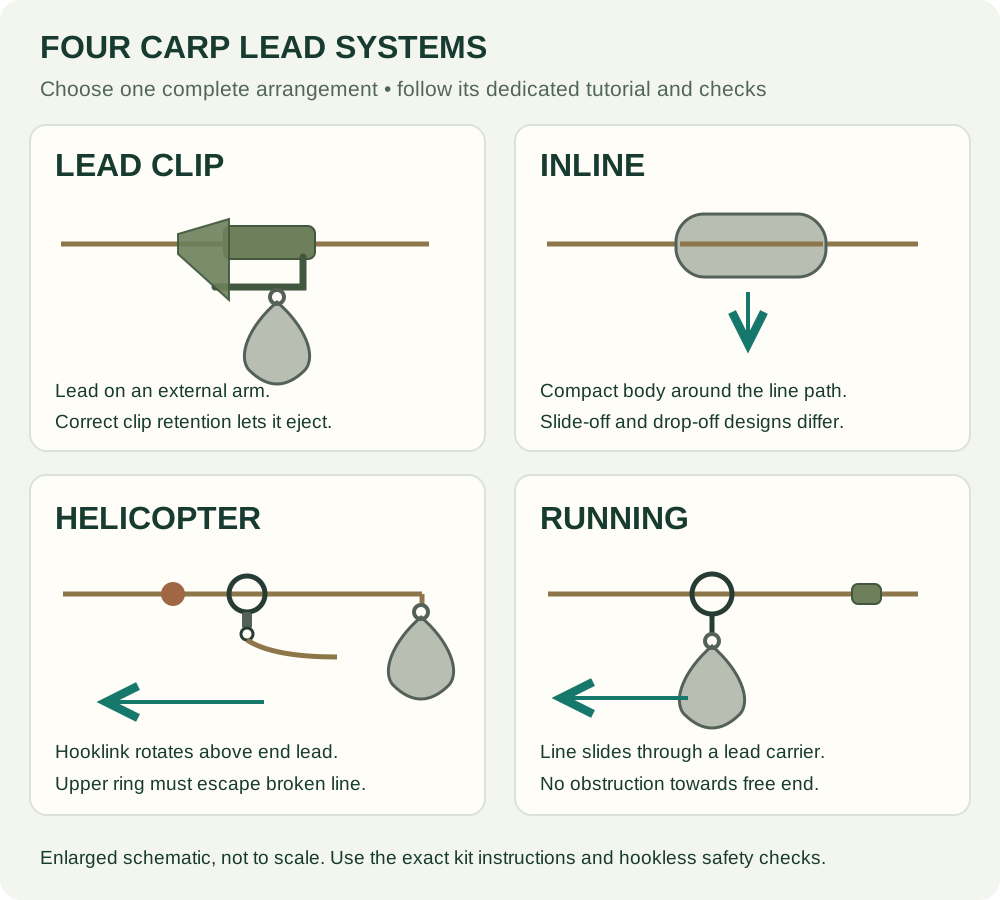
An inline lead setup can retain or release the lead depending on its design. Follow the exact system's instructions and check the escape path before fishing. It makes a compact presentation for a clear bottom or a solid PVA bag. We'll use the Korda Inline Safety Kit and keep its matching parts together, so you can learn how this particular system assembles and releases.
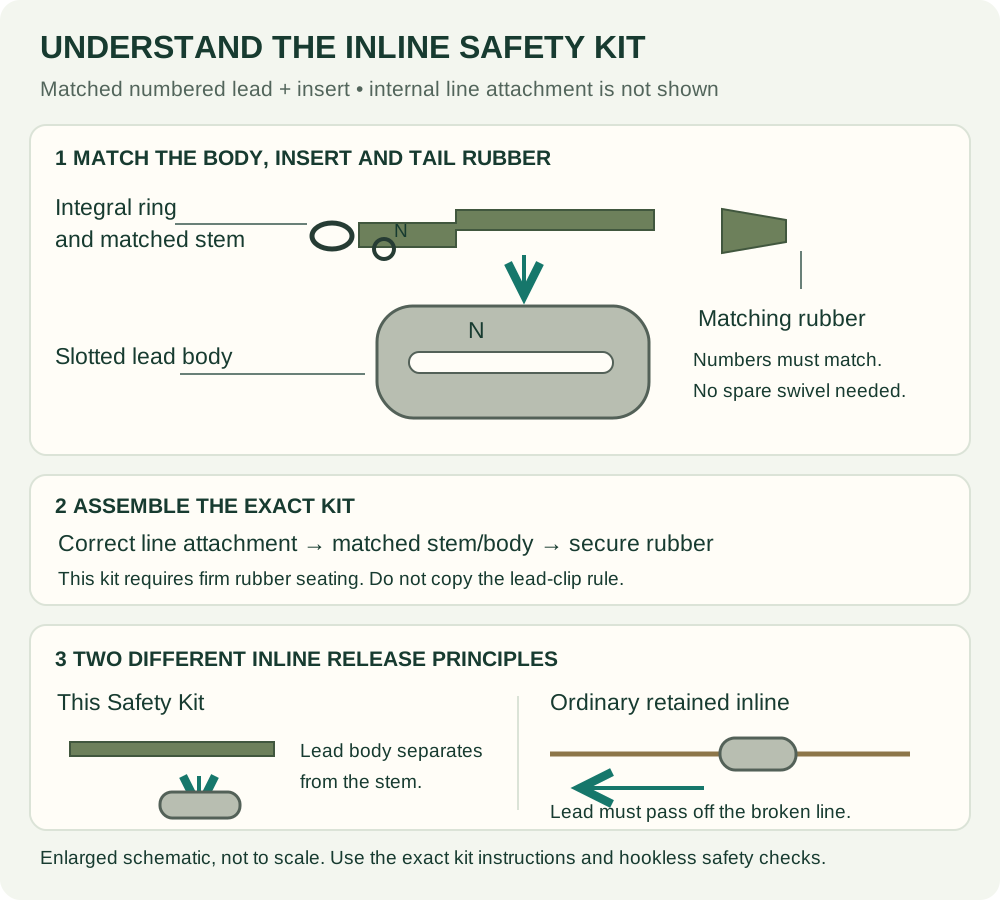
This tutorial uses the Korda Inline Safety Kit, with its matching numbered lead body, insert and tail rubber. It is a separating design: the lead body can leave the stem when required. That is different from a conventional retained inline lead that must slide off the broken line. Understanding which design you have is the first step, before threading anything or tying a knot.
Inline lead setup: what should separate if the line breaks?
With a conventional retained inline, line or leader passes through the lead's central route. The hooklink swivel sits in a compatible insert and provides initial resistance. After a break, the intended connection must release and the lead must be able to travel past every remaining obstruction towards the free end. A large knot, unsuitable tube or extra stop can defeat that escape path.
A drop-off arrangement deliberately allows the lead body to separate from the line path instead. There are several constructions, including versions using a channel on the outside of a particular lead. Don't copy one of those line routes onto an ordinary inline lead with no suitable channel.
The Korda Inline Safety Kit is a purpose-designed matched system. Its numbered lead and insert fit together, its swivel is integral to the insert and its tail rubber secures the assembly as instructed. The lead body is intended to separate when necessary, rather than being discarded automatically on every retrieve. It is not assembled by forcing a spare size-8 swivel into the nose.
These distinctions explain why advice such as “never push a tail rubber firmly on” cannot apply to every lead product. The clip in our lead-clip tutorial and this inline kit have different retention mechanisms. Follow the correct instructions, not a rule remembered from a similarly coloured rubber component.
Where an inline setup makes sense
A firm or reasonably clean patch gives the hooklink room to settle beside the lead. With the weight close to the hooklink attachment, there is little external hardware to pack around when making a solid bag. This can help a beginner see how the feed, lead and short supple hooklink fit into one compact parcel.
Deep soft silt presents a different problem. A heavy lead can bury itself and pull a short hooklink into the bottom. A safety label doesn't keep the hookbait out of sediment. Consider a different spot, lead weight or suitable helicopter arrangement if you can't achieve a clean presentation.
Likewise, “drop-off” is not permission to cast into an inaccessible weedbed. The kit may remove one source of weight or snagging, but the hooklink, main line and fish still have to travel through the swim. If the landing route is doubtful, move the rig rather than relying on lead loss to rescue it.
Components for this exact rig
Required
- Korda Inline Safety Kit (paid link): the linked example is 2.5oz and includes its lead, insert and tail rubber. Check the supplied pieces match; spare leads alone don't make a complete kit.
- Sound, suitable monofilament main line (paid link). This beginner rig has no separate leader; confirm naked-mainline use is permitted at your venue.
- A finished hooklink attached to the kit's integral ring. For a simple sinking-bait presentation, use Korda Wide Gape X (paid link), N-Trap Soft (paid link), Hybrid Bait Stop (paid link) and a suitable sinking boilie (paid link).
Tools
Line scissors (paid link), knot-pulling tools (paid link), a suitable baiting needle (paid link) and a small container of water. A coating stripper (paid link) is useful when tying the coated-braid hooklink.
Optional solid-bag extras
Korda Solidz bags (paid link), small dry feed pellets (paid link) and compatible PVA tape (paid link) if your bag-closing method needs it. These are not required to fish the inline lead without a bag.
Amazon links are affiliate links; we may earn a commission from qualifying purchases. Check the kit contents and compatibility. Don't order a conventional inline lead expecting it to include this separate safety mechanism.
No extra hooklink swivel is required by the kit rig: its ring swivel is already part of the insert. Nor should a generic solid-bag stem automatically replace the supplied stem. Convenience accessories can alter release behaviour even when they seem to seat neatly.
Check the kit before assembly
Open the packet over a clear surface and read its instructions completely. Identify the numbered lead body and insert, then check their correspondence before proceeding. Inspect the lead's opening for casting damage or grit, the stem for cracks and the rubber for splits or distortion.
Dry-fit the matched pieces gently so you understand the intended orientation. The purpose is familiarity, not testing how tightly unrelated parts can be wedged together. If the component numbers or current packet design differ from the illustration, use the supplied instructions and ask the manufacturer or tackle shop to confirm the combination.
Choose the lead weight for the rod, line, distance and complete payload. A 2.5oz example is not a recommendation for every rod. Pellets, hookbait and a compact bag all add casting mass. Practise with a lighter manageable load at a safe distance while learning the packing and casting sequence.
How to assemble the Korda Inline Safety Kit
- Prepare sound main line. Inspect the working section and remove damage. Thread the matching tail rubber onto the line in its specified orientation before tying the terminal connection.
- Attach the line to the insert. Use the insert's designated mainline attachment and exact line route shown on the kit instructions. Don't substitute the external loop arrangement used on a different drop-off lead.
- Finish and test the knot. Use a suitable knot for the actual mono and attachment, moisten it and draw it down evenly. Pull-test with appropriate tools while the lead is still separate and the knot is visible.
- Connect the hooklink to the integral ring. Use a tested compatible knot. Keep the hook protected and confirm the ring can articulate. Don't cut the ring or replace the connection while learning this unmodified rig.
- Fit the matching lead body. Locate the numbered insert in the corresponding numbered lead as designed. It should sit in its intended position without filing, bending or gluing either part.
- Secure the tail rubber. For this particular kit, Korda instructs that the tail rubber is pushed on tightly to hold the assembly. This is not the partial-seating rule used on a conventional lead clip.
- Check the finished assembly. Look for crossed line, pinching, a trapped hooklink or a displaced stem. Repeat the controlled release check below before adding a bag.
- Test the bait presentation. Lower the complete baited hooklink into water. Check point clearance, bait movement and settling separately from the lead-release mechanism.
The packet remains essential at the internal attachment stage: the broad label “inline” doesn't specify that connection. If you can't identify the designated route with confidence, don't invent one. Get the actual kit checked in person before fishing it.
How to test an inline lead setup before using a PVA bag
Make a hookless dummy assembly using the same line and kit. Hold the lead low over a soft surface, keep fingers out of the line path and follow the maker's testing direction. Watch the lead body separate from the stem when the system is made to release. Don't try to pull the integral swivel out of its moulding.
Repeat the check with wet components, then inspect and reassemble them correctly. Damaged or distorted parts should be replaced, not forced back into service. A release check that damages the mechanism is not a successful preparation for casting.
Next trace what remains connected after a break above the setup. Lead ejection removes the heavy body; it doesn't prove that the hooklink detaches from every remaining length of line or any added leader. This is why the tutorial keeps the rig simple and why adding a leader requires a fresh whole-system assessment.
Don't demonstrate release by swinging a lead, putting a loaded rod under extreme pressure or deliberately breaking your fishing line. The useful information is which piece separates and whether anything obstructs it. A careful hookless test is easier to observe and much less likely to injure someone.
Using the kit in a solid PVA bag
Korda lists the Inline Safety Kit as suitable for solid bags but advises against Funnel Web mesh parcels because impact can trigger unwanted release. Keep that distinction clear: a solid bag enclosing the tackle and a mesh stick threaded onto a hooklink are not the same delivery system.
Choose a bag that will hold the lead, hooklink and feed without being stretched over sharp edges. Keep all PVA and filling dry. Set the protected hookbait and hooklink where they will emerge without looping around the insert, then pack the lead and small feed neatly around them. Avoid clumps or air pockets that make the parcel twist or cast unpredictably.
Use our full solid PVA bag tutorial for the filling sequence. Its hooklink rig should remain short and supple enough to settle once the bag dissolves, with the point clear. The bag's presence doesn't make a stiff, overcrowded or tangled hooklink fish correctly.
Test a spare finished bag in water of a similar temperature to the lake and watch what remains after the film has dissolved. Check especially for persistent residue, a trapped hook and the hooklink coiling around the stem. A tidy-looking dry bag is only half the test.
Keep spare parts identifiable
Store spare numbered stems with their matching leads and keep the packaging until you know the system well. Mixing all inserts into one compartment makes an apparently simple change on the bank much harder to verify. A lead of the same stated weight can belong to a different product family, and a similar silhouette is not evidence that the release surfaces match.
When changing a lead, lay the original and replacement side by side before fitting either. Check the number, opening, stem condition and rubber, then repeat the release test. If a required part is missing, change to another complete permitted system that you understand; don't assemble a temporary inline from miscellaneous pieces simply because the fish have started showing.
Troubleshooting the inline setup
The lead comes off when it hits the water
Check the matching numbers, correct stem seating, rubber condition and product-specific retention instructions. Review the added payload and casting impact too. Don't glue the lead to the stem; that defeats the separating design rather than solving the cause.
The lead will not separate during the controlled check
Stop using that assembly. Clean away grit, verify the exact component match and compare the test direction with the maker's instructions. A damaged lead opening or distorted insert may require replacement. Don't force a questionable assembly onto the rod because it feels more secure.
The hooklink disappears into soft bottom material
Change the presentation or spot. A lighter lead or different system may be appropriate, but first find out what the lead is landing on. The release kit solves a mechanical separation problem; it doesn't suspend the bait above silt.
The bag leaks or starts dissolving before casting
Keep wet hands, damp tools and ordinary liquid bait additives away from the dry bag station. Use only products proven PVA-compatible in your own test. Rebuild a damaged bag rather than trying to throw it quickly before it falls apart.
The hooklink catches around the stem
Check the connection, hooklink material and bag packing order. Extra connectors can create additional corners to catch around. Return to the plain, matched rig and inspect a short safe test cast rather than adding more sleeves indiscriminately.
Frequently asked questions
Can a normal inline lead be safe?
Yes, when the complete intended assembly releases and the lead can leave the broken line without being stopped by a knot or component. That must be checked with the actual line and parts. Don't assume the Safety Kit's release instructions describe every ordinary inline lead.
Can I use a shock leader with this tutorial?
This worked rig uses bare main line. Korda describes other permitted configurations, but a shock leader changes the join, diameters and whole-system risk. Obtain the correct full arrangement and follow the fishery rules rather than adding a knot above the lead.
Do I need to change every lead after a fish?
No, but inspect it. Replace any damaged body, stem or rubber and repeat the release check after reassembly. A lead that looks serviceable may still have grit or deformation at its contact surfaces.
Before the next cast
Check the numbers on the parts, the attachment, knots and rubber position, then test that the system separates as intended. Check the baited rig, total casting weight and landing route too. The compact shape is useful, but it doesn't replace those release checks. Get used to inspecting the same points each time you assemble it.