For a closer look at the parts and the Korda component list, see the illustrated hair-rig tying guide in our beginner overview. Check which version you're tying before changing its materials or connections.

The hair rig is a great place to start learning to tie carp rigs. The bait sits below the hook, leaving the point and gape clear, and a knotless knot holds everything together. Let's fit the bait first, then tie and check the finished hooklink.
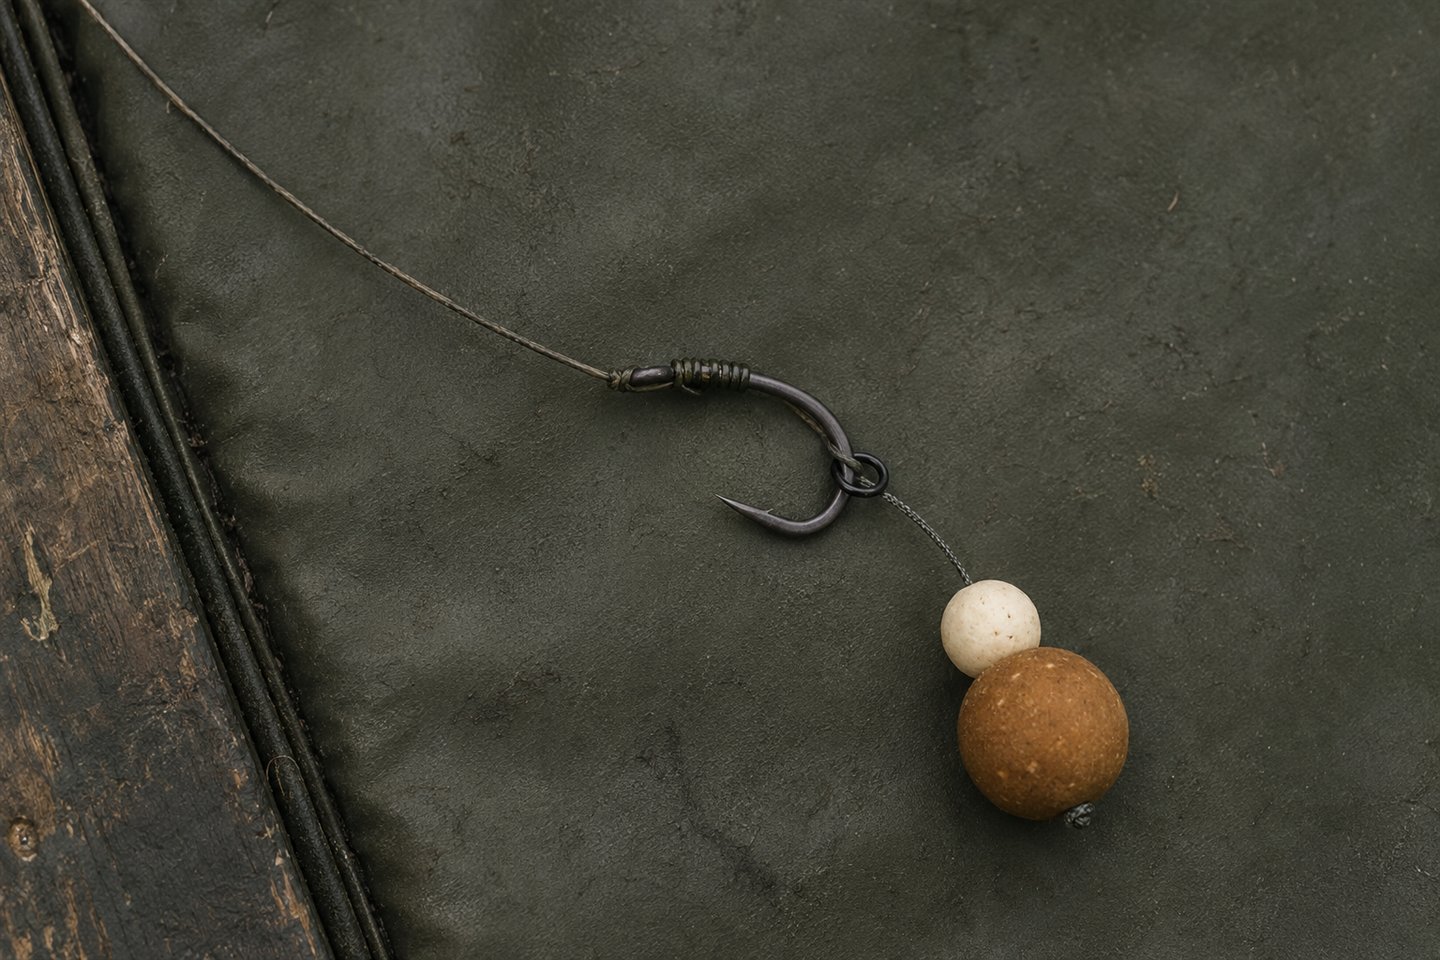
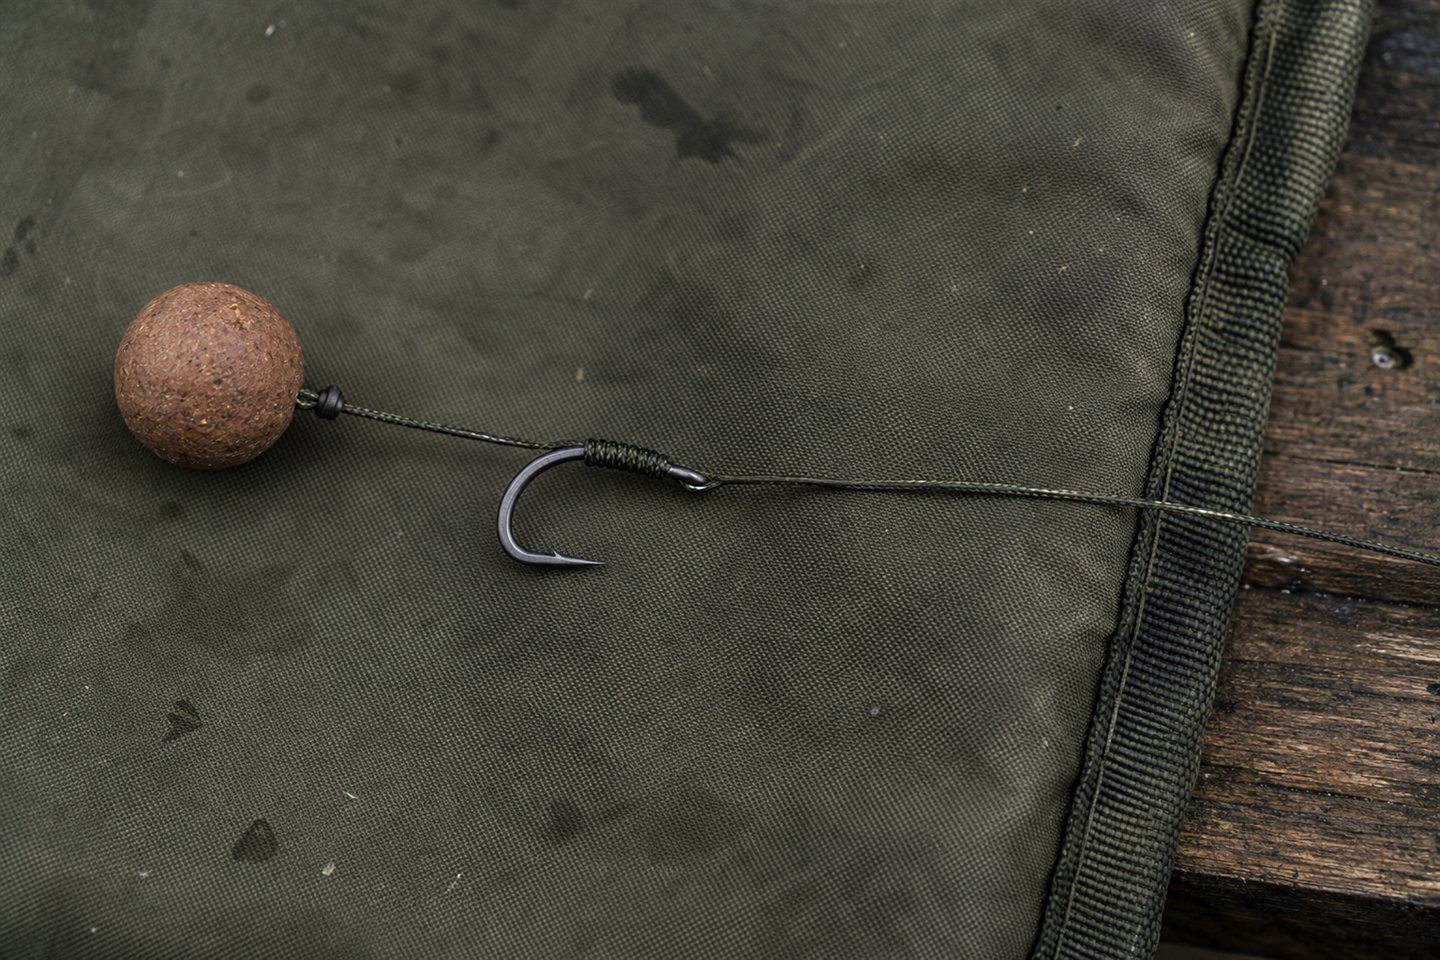
For the version in this guide, begin with about 30cm of coated braid and strip roughly 10 to 13cm at the hook end. Tie a small hair loop, mount the hookbait you intend to use and set an initial gap of around 5 to 10mm between the bait and hook bend. Hold the hair along the back of the shank, make seven to nine tidy turns towards the bend and finish so the hooklink exits the eye on the hook-point side.
What is a hair rig?
A hair rig places the hookbait on an extension of the hooklink rather than threading it directly onto the hook. This keeps the hook point exposed and allows the bait to move separately. When a carp takes the bait into its mouth and tries to reject it, the bare hook has room to follow and take hold.
The knotless knot is the whipping around the hook shank that secures the hooklink without a conventional knot at the eye. The hair is formed from one end of the hooklink before the whipping is made. It is quick to tie once the sequence becomes familiar, but neat turns and the correct exit direction still matter.
When to use this hair rig
The rig described below is a practical general-purpose presentation for a bottom bait or carefully balanced wafter. Coated braid gives a supple section beside the hook while the coated body helps resist tangles and kick the hookbait away from the lead. It is a useful starting point over clean ground and light natural debris. Our beginner carp-rig guide compares other options.
Deep silt, dense weed, soft dying weed or heavy leaf litter may call for a longer, more supple or more buoyant presentation. A pop-up is not a direct replacement for the bottom bait in this guide because its buoyancy can lift the hook and change the way the rig sits. Any change of hookbait must be tested again in water.
Before tying, read the venue rules. Fisheries may specify barbless or micro-barbed hooks, permitted hook patterns, a maximum hook size, minimum hooklink strength and the lead or leader systems that may be used. The local rule takes priority over a general tutorial.
What you need to tie a hair rig
A suitable hook
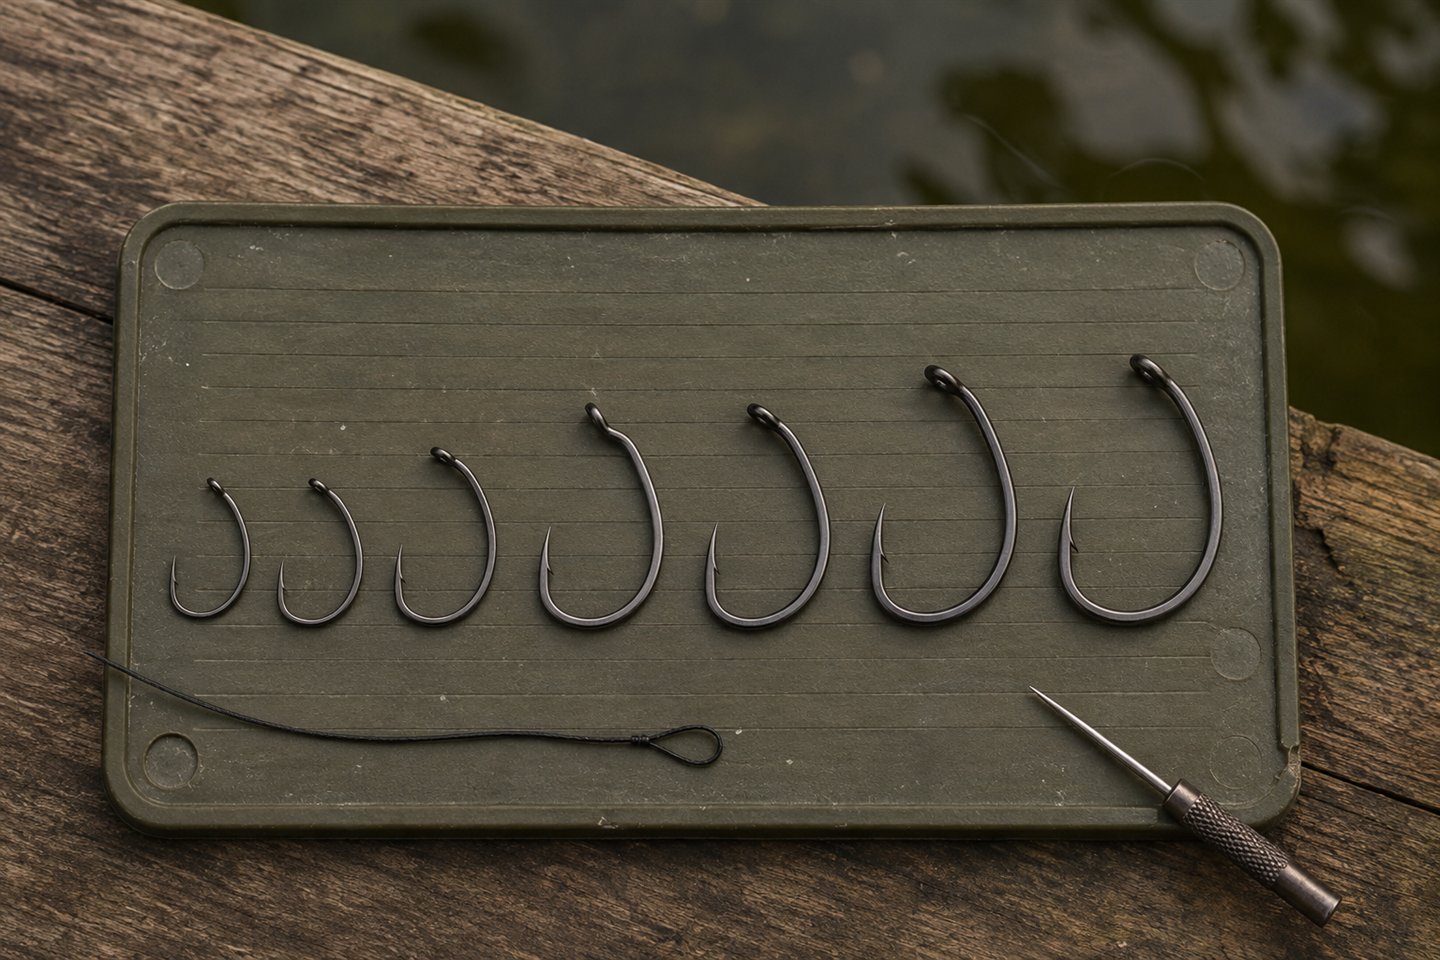
Choose a purpose-made carp hook in a pattern and size permitted by the fishery. The hook needs enough gape for the chosen bait without the bait masking the point. Inspect the eye for a rough join and look closely at the point. If it is turned over, burred or damaged, replace it rather than trying to build a rig around it.
Coated hooklink material
About 30cm of coated braid gives enough material to form the hair, make the knotless knot and finish the lead-end connection without rushing. The coating helps the main section resist tangles, while a stripped portion at the hook creates the movement needed for the hook and bait to separate.
Hookbait, stop and baiting needle
Have the actual bottom bait or wafter ready, together with the correct bait stop and a baiting needle suited to it. A fine needle is helpful with firm boilies, while softer baits may need a different design to avoid splitting. Keep the hook point away from your hands while the bait is being mounted.
Lead-end components and testing tools
You'll normally need an anti-tangle sleeve and a swivel or quick-change component that is designed for the chosen lead system. Use matching parts from a compatible arrangement and follow their instructions. A swivel that almost fits a clip or sleeve is not good enough when the system must work safely after a main-line break.
Sharp scissors, knot pullers and a small container of water complete the basic kit. Knot pullers let you test braid under firm control without wrapping it around bare fingers. Fine hooklink can cut skin, and a loose hook can cause injury if a knot suddenly slips.
How to tie a hair rig with the knotless knot
1. Cut and inspect the hooklink
Cut roughly 30cm of coated braid for a normal rig. That is deliberately longer than the finished hooklink so you have enough material to hold while tying both ends. Check every centimetre for nicks, flat spots and breaks in the coating. If you're not happy with it, discard the short length now rather than trusting it with a fish.
2. Strip the section beside the hook
Remove approximately 10 to 13cm of coating from one end using a purpose-made stripper. Work away from your fingers and use only enough pressure to separate the coating without cutting the braid. The stripped section will form the hair, the knotless-knot whipping and a small supple hinge beyond the hook.
3. Tie the hair loop
Make a small overhand loop at the end of the supple braid. Moisten and tighten it neatly, leaving a safe tag rather than trimming completely flush. The loop only needs to accept the chosen bait stop, so an oversized loop adds unnecessary bulk without improving the rig.
4. Mount the actual hookbait
Push the baiting needle through the centre of the bait, catch the hair loop and draw it back through. Insert the bait stop and pull the loop gently until the stop sits against the bait. If the boilie cracks or the stop pulls into it, replace the bait and use a more suitable needle or stop.
5. Set the starting hair length
Lay the mounted bait beside the hook and begin with about 5 to 10mm between the bait and the bend. Measure the clear gap, not the distance to the hook point. A larger or irregular bait may need more room, while a small bait on a compact hook can work with less.
6. Pass the hooklink through the eye
With the hook viewed from the side, pass the long working end through the eye so it travels towards the hook-point, or inside, side. Pull the material through until the bait sits at the gap you chose. Different guides use front and back inconsistently, so use the hook point as the clear reference.
Lay the hair in a straight line along the back of the shank, on the side away from the point. Check that it has not crossed the point or twisted around the hook. Hold the bait and hair in place as you prepare to make the whipping.
7. Make the knotless-knot turns
Take the long working end away from the eye and wrap it around the shank towards the bend. Make seven to nine close, adjacent turns as a useful starting point. Keep the hair trapped neatly along the back of the shank, but don't overlap the turns or pull so hard that the braid cuts into itself.
Stop before the whipping runs unnecessarily far around the curve of the hook. The exact number depends on the hook pattern, eye and diameter of the material, so neat coverage is more important than forcing nine turns onto a short shank. If the whipping crosses or the hair shifts sideways, unwind it and begin that stage again.
8. Finish through the hook eye
Guide the working end back through the eye so the completed hooklink exits on the hook-point side. Pull it steadily while keeping the turns together. This exit direction encourages the hook to turn as intended and avoids the ambiguity of instructions that only say front to back.
Moisten the whipping and tighten it gradually. The turns should settle next to one another without cutting the coating at the end of the stripped section. Check that the hair still leaves the back of the shank in a straight line and that the original bait gap has not changed.
9. Set the finished hooklink length
A finished length of roughly 15 to 20cm is a manageable starting point on clean ground. Measure from the hook to the lead-end connection, allowing enough material to tie that connection safely. Don't treat the figure as compulsory: the lakebed, casting distance and amount of debris should decide the final length.
10. Fit the anti-tangle sleeve
Slide the correctly sized anti-tangle sleeve onto the hooklink before tying the final loop. The narrow end normally points towards the hook, but follow the component instructions. The sleeve should fit the intended swivel or quick-change connection without being forced onto a part of the wrong size.
An anti-tangle sleeve helps the hooklink kick away from the lead and covers the connection. It doesn't make an untidy cast tangle-proof. The rig still needs to be feathered down and checked after contact with weed or debris.
11. Tie the lead-end loop
Tie a small figure-of-eight loop, or the connection specified for the compatible swivel. Moisten the knot, tighten it evenly with knot pullers and leave the recommended tag length. Never trim a knot so close that the tag could pull back through under load.
Seat the sleeve over the connection as designed and inspect the complete hooklink from both sides. The coated body should be intact, the supple section should begin where intended and neither knot should contain crossed or damaged fibres.
How to test a hair rig before casting
Pull-test both connections
Use knot pullers to apply firm, controlled pressure between the hooklink loop and the hook connection. Keep the hook point protected and directed away from your body. Never wrap braid around bare fingers. If the whipping moves, a loop deforms or the coating splits, discard the rig and tie another.
Inspect the hook point
Look at the point under good light and check that it is straight, clean and free from burrs. Use an appropriate safe method rather than dragging it across a fingernail. A hook can be damaged by gravel, stones or a snag, so inspect it again after every retrieve and replace it whenever there is doubt.
Watch the rig settle in the margin
Connect the hooklink to the complete lead arrangement and lower it into clear water. Let it fall under light tension as it would after a cast rather than placing each part neatly by hand. Watch whether the coated section straightens, the supple hinge lies naturally and the hair remains clear of the hook.
The bottom bait should rest as intended without masking the gape. A wafter should reduce the combined weight without lifting the hook unless that is specifically part of a different presentation. Buoyancy varies between brands, sizes and even batches, which is why every new hookbait needs its own check.
Test the complete lead system
The hooklink is only one part of the terminal tackle. Assemble the running lead, lead clip, helicopter setup or other approved arrangement exactly as its maker specifies. Check that it can behave safely if the main line breaks and that a carp will not be left towing an unnecessary lead or length of tackle.
Don't mix clips, swivels, beads and tail rubbers simply because they seem to fit. Small differences in size and grip can stop a safety feature operating. Follow the fishery rules and the instructions for the whole setup, not just the knotless knot.
How long should a hair rig be?
The 5 to 10mm gap between bait and hook bend is a useful starting point, not a target that must be measured exactly. The correct gap lets the bait move freely while keeping the point and gape exposed. Judge it with the real hookbait fitted and the rig under water.
If the bait is pressed tightly against the bend, lengthen the hair a little. If it can wrap around the hook or sits far enough away to make the presentation awkward, shorten it. A small PVA mesh stick can help control a supple rig in flight, but it should not be used to hide a hair that is clearly the wrong length.
Bait shape matters as well as diameter. Two small particles or a snowman presentation can occupy more space than one boilie and may pivot differently. Change the hair to suit the actual arrangement rather than relying on the size printed on a bait packet.
Make one alteration at a time and repeat the margin test. Changing hook size, hair gap, hooklink length and bait buoyancy together makes it impossible to understand which adjustment improved or spoiled the presentation.
Choosing the hookbait for a hair rig
Bottom baits
A normal bottom bait sinks with the hook and is the simplest option for this rig. It can be a boilie, pellet or suitable particle that the hair and stop hold securely. Make sure the bait remains intact for the time you expect it to fish and doesn't swell enough to jam against the hook.
Balanced wafters
A wafter is designed to counter some of the hook's weight, but the word balanced doesn't guarantee it will suit every hook. Test it in water. If it lifts the hook or stands in a way you don't intend, trim the bait carefully or add only the small amount of approved putty needed for the chosen presentation.
Pop-ups
A buoyant pop-up changes the mechanics and normally needs a counterweight or a rig designed specifically around it. Don't clip one onto this bottom-bait hair rig and assume it will sit correctly. If you want a raised hookbait, choose a suitable established pop-up presentation and test every component.
Coated braid, the hinge and the lakebed
The stripped section beside the hook gives the bait and hook freedom to move, while the coated body helps the rest of the hooklink resist tangles. Leave a small transition beyond the knotless knot rather than stripping the coating from the entire rig by accident.
On clean clay, gravel or a firm polished area, a shorter coated hooklink may settle neatly. Over softer silt, a longer rig or more supple material can follow the bottom with less chance of the hookbait being pulled into an unnatural position. Deep weed and heavy debris may require a different presentation altogether.
Use feature finding to understand the area before changing the rig. A perfect knot cannot prevent the hook gathering weed if it is cast into unsuitable growth, and a stiff short hooklink cannot be expected to lie naturally across deep soft sediment. Our guide on using a marker float explains how to map those changes.
Common hair-rig mistakes
Tying the knot before fitting the bait
Guessing the hair length with an empty loop often leaves the real hookbait too close or too far away. Mount the bait first, lay it beside the hook and set the gap by sight. This one habit removes much of the trial and error.
Overlapping the whipping
Crossed turns are difficult to tighten evenly and can damage the hooklink. Make adjacent wraps under controlled tension. If the turns jump over one another, unwind them instead of squeezing the mistake into place.
Finishing through the wrong side of the eye
The working end should finish so the hooklink leaves on the hook-point side for this basic version. Check the hook from the side before tightening. Using the point as a reference is clearer than relying on front and back, which are described differently across tutorials.
Masking the hook gape
An oversized bait, very short hair or bulky added component can obstruct the point and gape. Look at the presentation from several angles in the margin. The hook needs room to take hold rather than sitting hidden behind the bait.
Skipping the pull test
A rig can look perfect while containing a damaged fibre, poorly seated loop or split coating. Pull-test it with proper tools before every use. If anything moves or looks uncertain, replacement costs far less than losing a carp with tackle attached.
Using the rig over the wrong lakebed
The knotless knot may be tied correctly while the presentation itself is wrong for the spot. Weed can mask the hook and deep silt can pull a short stiff hooklink down awkwardly. Match the rig to what is beneath it and check the result in similar margin conditions where possible.
Safe lead arrangements and fish care
Choose a lead system that matches the bottom, complies with venue rules and is assembled from compatible parts. The aim is to prevent a fish towing a lead or an unsafe length of tackle after a break. If you're unsure how a clip, bead or swivel should release, use the manufacturer's complete instructions or ask an experienced fishery team member before casting.
Prepare for a bite before the rods go out. Open the landing net, wet the unhooking mat or cradle and have forceps, water and a permitted weighing sling ready. Keeping the swim organised means the carp spends less time out of the water while you search for equipment.
Check the hooklink after every fish and every contact with a snag. Braid can be damaged without an obvious break, and a hook point can turn over on gravel. Don't keep using a rig simply because it caught once; inspect it as though it is about to be cast for the first time.
Frequently asked questions
How many turns should a knotless knot have?
Seven to nine neat turns are a practical starting point for many carp hooks and coated braids. The correct number depends on shank length, hook pattern and material diameter. Keep the wraps adjacent and stop before they run unnecessarily around the bend.
Which way should the hooklink leave the hook eye?
For the basic hair rig in this guide, pass the working end through so the finished hooklink exits on the hook-point, or inside, side of the eye. Look at the hook side-on while tying because the words front and back can cause confusion.
Can I tie a hair rig with monofilament?
A knotless knot can be tied with several suitable hooklink materials, but each behaves differently and must be compatible with the hook and presentation. This tutorial uses coated braid because it combines an anti-tangle body with a supple section. Follow the material maker's knot guidance if changing it.
Can I use a hair rig with a pop-up?
Not as a direct swap without further changes. A pop-up may lift the hook and needs controlled buoyancy and counterweighting. Use a presentation designed for a raised bait and test it in water before fishing.
Final thoughts
Start with the bait on the hair, set the gap and hold the hair straight while you make the knotless-knot turns. Check the final exit is on the point side, then tie and pull-test the lead-end connection too. Practise a few at home and the sequence will soon feel much more familiar.
Once you can repeat this simple rig consistently, use it as a baseline and compare it with our carp rigs for different situations. Adjust hair length, hooklink length or bait balance one point at a time and judge the result in the margin. That measured approach will teach you far more than adding components without understanding their purpose.
Further reading and source checks
Compare the sequence with Korda's BASIX hair-rig tutorial, Gardner Tackle's guide to the knotless knot and sharp-hook rig, and Angling Times' knotless-knot hair rig.
Korda also provides broader guidance on carp rigs for beginners and choosing a compatible lead system. Always combine general rig guidance with the rules of the fishery you're visiting.