Should you fish slack or tight lines for carp? Start with the route between your rod and rig, then check the indication you need. We'll compare the options and explain why the same line tension won't suit every swim.
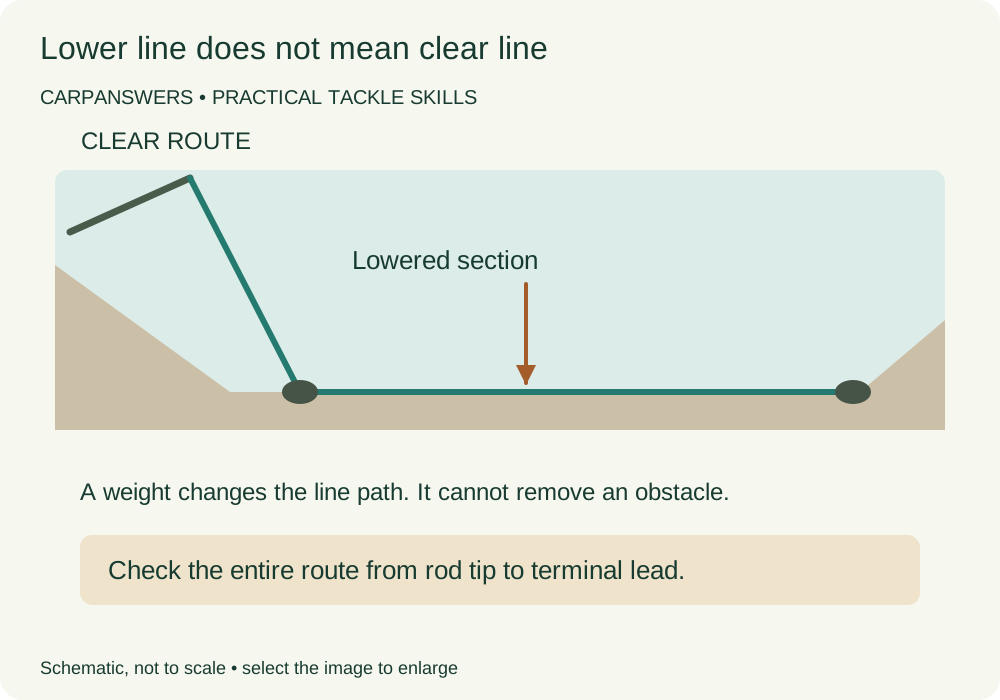
The visible line beside the rod tells only part of the story. Beneath the surface, it may cross slopes, lie against weed, bridge a hollow or pass over an abrasive bar. You can't establish that whole route simply by looking at the bobbin's height. A neat-looking bank setup can still be poorly suited to the water beyond it.
This guide explains the practical differences between slack, semi-slack and tighter main lines. It concerns baited carp rods using bite indication, not the way line is wound onto a reel spool. It also separates line tension from clutch adjustment: a tighter fishing line doesn't mean locking the reel against a taking fish.
Slack or tight lines for carp fishing: what suits the route?
Use a controlled, readily understood line arrangement that suits the bottom, range and hazards. On a clear, relatively even short-range spot, some reduced tension may be reasonable if indication remains useful. With distance, flow, weed, abrasive contours or a demanding response requirement, don't add slack merely to make the line look less conspicuous.
For a beginner, a moderate, controlled connection is usually easier to assess than either a large belly of slack line or an over-tightened setup that moves the lead. Learn what the indicator does in calm conditions, then make small changes for a clear reason. There's no need to adopt an extreme style before understanding the normal behaviour of your tackle.
When unsure about the bottom or a possible snag, choose a safer spot rather than asking line tension to solve the uncertainty. The aim is a presentation from which a hooked carp can be landed responsibly. An arrangement that produces a discreet line but delays warning or exposes it to sharp objects has not achieved that aim.
What slack, semi-slack and tight actually mean
A slack setup contains additional line between the rod and the rig, beyond the most direct practical connection. Some of that line may settle if its material and the conditions allow it. The amount and route are what matter; two anglers describing their lines as slack may have very different arrangements beneath the surface.
Semi-slack usually describes a compromise with reduced tension but not an intentionally large loose belly. It is an informal term, not a measured tackle setting. You still need to examine the bottom, the indicator's working range and the effect of wind or tow rather than relying on the label to tell you whether the setup is suitable.
A tighter line creates a more direct connection after the rig has settled, but it need not be stretched hard enough to bend the rod tip significantly or drag the lead. Tight is relative to the swim. The useful target is controlled contact, not maximum tension applied by winding until nothing else moves.
Don't confuse any of these with a reel's drag. The drag determines how line can leave the spool under load. Line lay describes the arrangement already in the water. Both need appropriate settings, and changing one can affect the other, but they answer different questions.
Start by imagining the underwater route
Picture the rod tip, the point where the line enters the water, every known feature between bank and rig and the final approach to the lead. If you fish over a raised bar, the line may touch its crest. If a weedbed sits in front of the spot, the line may be supported by it before descending towards the hookbait.
Extra line cannot be assumed to follow every contour neatly. It may collect in an unexpected place, settle into plants or remain suspended partly off the bottom. Equally, tightening doesn't guarantee that the entire route stays clear of obstacles. Use your understanding of the swim and actual retrieval checks rather than treating either style as an underwater diagram you can control perfectly from the bank.
Manufacturer guidance on line concealment and line lay highlights the trade-off between lower-tension presentation and bite indication, including problems around bars and weed. That is the important principle: consider the complete route and its risks before choosing how much line to release.
If the route is unclear, a modest bottom investigation or local advice may help. Don't repeatedly drag a lead through visible feeding fish just to confirm an abstract theory. A simpler, known spot can be the better choice, especially when the alternative requires precise assumptions about a hidden bar or dense weed.
When should I fish slack lines for carp?
In some clear, close-range situations, a line stretched through the water can cross the area carp are using. Reducing tension may allow suitable sinking line to sit differently and reduce part of that intrusion. It is a presentation option to test, not proof that the carp will ignore the tackle or that every visible refusal was caused by main line.
The benefit depends on the line material, bottom and angle. A fairly even, unobstructed route offers a more understandable experiment than a spot beyond several changes in depth. Begin where you can observe or reasonably establish what the line is doing, rather than adding slack across an unknown route and assuming concealment has improved.
Consider changing the rod position within your permitted swim first. A different angle may avoid taking the main line directly through a patrol route. That can improve the situation without creating additional slack or adding another component. Small layout adjustments are often easier to evaluate than a new leader, backlead or spool of unfamiliar line.
Remember that fewer line bites don't necessarily prove fish are less aware of the line. The altered setup may simply transmit fewer small movements back to the bank. Evaluate clear fish behaviour, presentation and safe indication together rather than treating a quieter alarm as an automatic tactical success.
What you trade away when adding slack
Additional line must be taken up or rearranged before some movements at the rig produce the same response at the rod end. The practical result can be delayed or reduced information, particularly when a fish moves sideways or towards the bank. The exact effect depends on the setup, so avoid claims that every slack arrangement produces a fixed delay.
This matters most when a fish could reach danger before you establish contact. If prompt indication and control are necessary because of nearby hazards, extra slack is not a useful concealment experiment. Choose an open-water alternative if the swim cannot be fished with a clear margin for response.
Slack can also collect where you did not intend it to settle. Weed, bottom debris and uneven contours may intercept the line. On retrieval, look for vegetation, abrasive damage and changes in feel that indicate a route problem. Repeated trouble is a reason to change the arrangement or spot, not merely to feed out a different amount next time.
Don't assume a more sensitive alarm can recover every piece of information lost along the line. It detects what reaches its sensing system. Delkim's sensitivity guidance describes the relationship between line movement and alarm response; consult the instructions for your own model and test the complete arrangement rather than treating sensitivity as a cure for all line-lay decisions.
When a more direct connection makes sense
At longer range, there is already more line in the water, and wind or tow may create additional curves. Keeping a controlled connection can make the setup easier to read and manage. This doesn't mean pulling so hard that the lead shifts; the rig must remain where it was placed.
In moving water, excessive loose line can increase uncertainty and collect debris. The useful rod angle and tension depend on the flow and the chosen spot. A river arrangement may therefore differ from a quiet margin presentation on a small lake. Avoid transferring a slack-line habit to the river without observing how the line behaves.
When fishing near any hazard, prioritise clear information and immediate control. The snag-safety guide explains why response requirements and safe swim selection come first. A tighter connection is not permission to fish an otherwise impossible snag, and an alarm beside a locked reel doesn't make the setup responsible.
A more direct line can also be useful when a back-of-bar or weed-edge route would otherwise allow line to settle onto abrasive or obstructive material. That judgement requires knowledge of the feature. If you can't establish a safe path, change the cast or swim rather than assuming extra tension will suspend the line exactly where you want it.
Choose main line before debating its tension
Material, diameter, condition and behaviour affect how the line handles in the water. Some lines are designed to sink readily; others serve different casting or presentation needs. Don't buy a new material solely because a description promises invisibility. Visibility is only one part of a line's suitability, alongside strength, abrasion, knot performance and venue rules.
The main-line comparison guide helps with selection, while the breaking-strain guide explains why diameter and conditions matter alongside the label. These buying decisions support line lay, but they don't replace inspecting the route between rod and rig.
Keep the working line sound. Roughness, flattening, damaged knots or excessive twist should be addressed before testing subtle presentation changes. A worn line that handles badly can produce misleading indications and undermine the safety of an otherwise sensible setup. Changing bobbin height cannot repair damage hidden farther down the line.
After any change of line material or diameter, revisit the reel, knots, alarm and indicator settings. Equipment that behaved predictably with one line may not feel identical with another. Start with a controlled test in straightforward conditions rather than introducing the unfamiliar combination on a difficult overnight swim.
Settle the rig before setting the line
Make a controlled cast, allow the lead to settle and avoid immediately winding hard against it. The sequence should preserve the presentation you intended. If the lead is drawn across the bottom during line adjustment, the final hookbait position may differ from the spot you carefully measured.
Allow appropriate time for the line to behave normally in the water, watching for wind-driven bows or unwanted loose coils at the rod. Manage any slack deliberately and in small amounts. Don't repeatedly release several turns without checking what the indicator and the near-bank line are doing.
Attach the indicator according to its instructions and confirm that the rod is secure. Establish the clutch or free-spool setting separately, then test that a movement of line produces the expected indication. Use the alarm and bobbin setup guide for the wider process.
If you're aiming for reduced tension, stop when the intended controlled arrangement is achieved rather than pursuing a particular visual style from a photograph. A bobbin placed close to the ground can look fashionable while offering very limited downward travel. Its usable movement and the swim's needs matter more than matching someone else's bank layout.
How to set bobbins when fishing semi-slack lines
The indicator adds its own pull to the line. A heavier bobbin or swinger may help maintain a controlled arrangement in some conditions, while a lighter one may suit a reduced-tension approach. Weight is one adjustment among several, not a universal measure of sensitivity or quality.
Manufacturer descriptions such as Korda's bobbin range guidance distinguish lighter and heavier configurations for different uses. Use that as a reason to understand the options, not to select the largest weight by default. Check compatibility and the instructions for the indicator you actually own.
Leave appropriate working travel for the expected indications. An indicator already at its upper limit cannot show much further rise, while one resting at its lower limit cannot display the same downward movement as one with space below it. The alarm may still provide information, but the visual part of the setup should be deliberately considered rather than accidentally restricted.
Check the line clip. It should grip and release as the manufacturer intends, without damaging the main line or holding it so tightly that normal pickup becomes awkward. Wet conditions, line diameter and component adjustment can affect behaviour. Test gently with safe, controlled movement and keep hooks secured during any bankside practice.
Rod-tip height and bank angle
Lower tips can change where the line enters the water, while higher tips can clear some near-bank obstacles or reduce line exposed to flow. Neither position is automatically correct. Look at the first few metres of the route, available bank space and how easily the rod can be picked up.
A tip pushed into marginal plants may look discreet but can create friction and unwanted contact. A very high tip may put more line through the upper water and be awkward under branches. Adjust within a stable, safe layout, and keep clear of all overhead electricity hazards.
Rod direction also affects how line runs through the alarm and towards the spot. Avoid forcing a sharp sideways turn at the bank simply to make a pair of rods look symmetrical. Practical alignment and immediate access should determine the layout; matching angles are optional.
After changing the support position, recheck indication and clutch behaviour. The same indicator height can represent a different tension once the rod angle changes. Make one adjustment at a time so you can understand why the setup now behaves differently.
Backleads are an option, not a default
A backlead changes the line's route by adding another point of weight or contact. It may be useful in a suitable clear area, but it also introduces another component whose path, release and possible interaction with debris must be understood. Don't attach one simply because you want the line to disappear near the bank.
Check the venue rules and the maker's instructions for the exact design. Different systems are not interchangeable in how they are attached or retrieved. Inspect the near-margin bottom and ask what happens when a carp moves, the line breaks or the component encounters weed. If that answer is uncertain, keep the arrangement simpler.
A backlead cannot guarantee clearance for passing boats, solve a snaggy line route or make deep slack safe. Nor should it be used to pull the line sharply around an obstacle. The lead-systems guide provides the broader reminder that every added component needs to be considered as part of the complete fish-safe setup.
For a beginner, first learn controlled line lay without extra concealment devices on a clear spot. You'll then have a useful baseline for deciding whether a backlead solves a specific problem. Buying a device before identifying the problem often adds complexity without a measurable benefit.
Slack or tight lines for carp in weed?
On a short, clear margin presentation with an even unobstructed route, you may try slightly reduced tension while watching the near-bank line and maintaining useful indication. Make the adjustment modest, remain immediately beside the rod and compare fish behaviour without assuming a quieter alarm proves better concealment.
On a longer open-water cast in crosswind, first control the wind-created bow and establish a stable, readable connection without moving the lead. Check that the indicator has useful travel and that wind-driven movement can be distinguished from a change at the rig. Adding more slack because the bank arrangement feels too tight may compound the original bow.
On a spot beyond a gravel bar or beside weed, prioritise the known safe line route and prompt information. Don't assume sinking line should be allowed to settle onto everything between bank and bait. If the route remains uncertain or repeatedly damages line, the correct change may be a different spot rather than a different degree of tension.
Troubleshoot one symptom at a time
If the bobbin gradually rises after setup, check whether the line is still settling, the wind or tow is changing, the lead has moved or debris is collecting. Don't automatically keep releasing more line. Observe the pattern and retrieve if presentation or safety is doubtful.
If small indications occur constantly, inspect the whole arrangement before reducing alarm sensitivity to the minimum. Rod stability, line angle and indicator suitability may be involved. The aim is a useful signal from the actual swim, not silence at any cost.
If you receive little warning before finding a fish already moving across the swim, reconsider excess slack and the line route. That experience is a reason to improve indication, not evidence that a discreet presentation is working perfectly. Make a more controlled setup in open water and seek competent help if you can't establish dependable behaviour.
If tightening repeatedly drags the rig, reduce the force used during setup and reassess the bottom and casting position. Don't solve it by adding lead weight without checking the rod's limits and the safety of the rig. The problem may be the sequence of adjustment rather than the weight itself.
Equipment worth considering
A compatible bobbin or swinger with a useful range of adjustment can help you match indication to different conditions. Check line-clip operation, available travel and any optional weights before buying. More adjustment is valuable only when you understand what each change does, so a straightforward system can be easier to learn than a complicated accessory set.
Fresh main line suited to the venue and a compact tackle box for spare indicator parts and rig tools are practical supporting purchases. If considering a backlead, identify the exact problem it is intended to solve and confirm that the design is allowed and suitable for the bottom. Don't buy line-lay accessories as a substitute for choosing a clear route. The most important improvement may be a different rod position or a safer cast, neither of which requires another product.
The Korda Complete Stow indicator (paid link) is an indicator to assess for compatibility with your alarm, line and chosen setup. Korda SUBline monofilament (paid link) is a sinking-monofilament example, not a promise that line will hug every contour. Follow the indicator's fitting instructions and test both forward and backward line movement after adjusting the tension. Buying a different line or indicator cannot remove the need to check what happens at your actual fishing distance.
Frequently asked questions
Do slack lines always catch more carp?
No. Reduced tension may suit some presentations, but it can also compromise indication or place line against hazards. Evaluate the actual spot, line route and fish behaviour. A method that works in a clear near margin should not automatically be copied onto a distant, weedy or abrasive area.
Does tight-line fishing mean a locked clutch?
No. Line tension describes the arrangement between rod and rig; the clutch controls how line leaves the spool under load. Keep the drag appropriate to the swim and your tackle. Don't lock a reel merely because you want a more direct connection for bite indication.
Can I judge line lay from bobbin height?
Only partly. Bobbin position shows the bank-end arrangement, not the full underwater route. Different weights, rod angles, depths and amounts of line can produce similar-looking positions. Use the indicator as one observation alongside bottom knowledge, line condition and the way the complete setup responds.
Choose control before concealment
Choose the line tension for your spot, keep the rig where it landed and test the bite indication. If the setup delays warning near a hazard, change it or fish elsewhere. Make small adjustments you can explain, rather than copying the bobbin position on the next peg. The aim is to know what's happening at your own rods.
Sources and further reading
Manufacturer information checked on 15 September 2026: Korda: line lay and concealment, Delkim: controlling sensitivity and Korda: bobbin configurations. Follow the current instructions for your own equipment and the fishery's rules.