An Albright knot can join the stiff and supple materials in a carp combi rig. The softer material wraps around a fold in the stiffer one, making a compact connection when tied correctly. We'll work through an eight-turns-out, four-turns-back modified version, then inspect and pull-test the join before it goes anywhere near a fishing session.
This tutorial explains an eight-turns-out, four-turns-back modified Albright, following the carp-combi variant identified in Gardner's demonstration. It is not the single-direction version found in some other knot guides, and it is not a doubled-braid combi-multi rig. Follow this version from start to finish, rather than mixing steps from different Albright knots.
Understand the two-material route
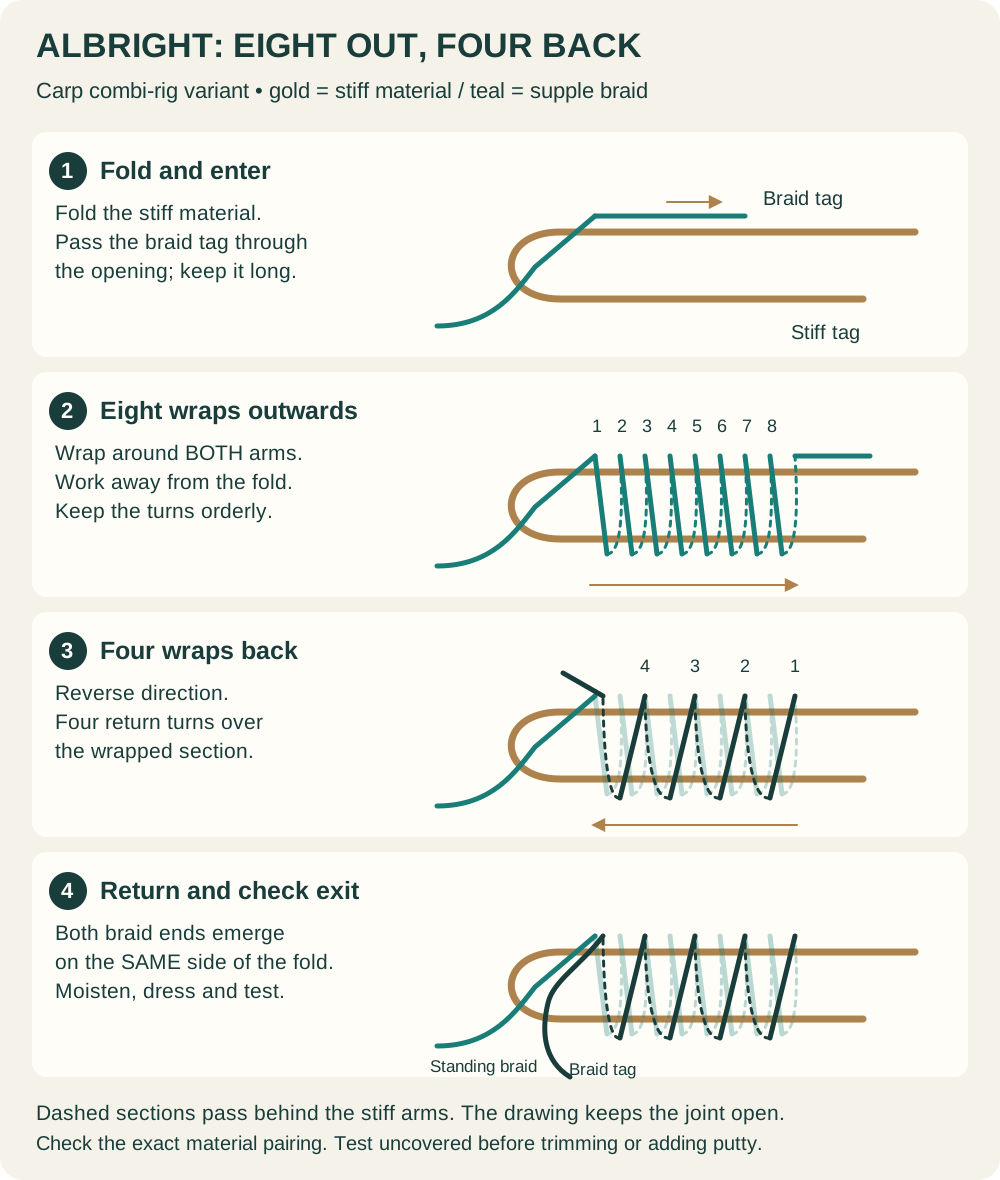
The stiff material is folded, not knotted into a closed loop before you start. That fold provides two arms for the braid to wrap around. The supple braid has its own standing section, which will lead towards the hook, and a working tag that makes the wraps.
Keep those identities clear. The stiff material's short tag is not the working end that makes the coils. If you start wrapping the wrong material simply because it is the nearest loose end, you're no longer following the illustrated construction.
The braid enters through the folded opening, runs out along the doubled stiff section and then returns. At the finish, its standing part and tag emerge on the same side of the opening. They travel through the opening in opposite directions to achieve that. This is less ambiguous than saying only to go back the same way.
Which Albright version are we learning?
Gardner's photographed Albright tutorial shows the carp-combi construction. One caption describes at least six outward wraps; a later instruction explicitly gives eight outward and four return wraps. This guide uses the latter consistently, not a hybrid assembled from different counts.
Other reliable demonstrations use a different Albright arrangement. Orvis, for example, shows a single-direction wrapping version. That difference is not a reason to take the start from one page, the wrap count from another and the finishing route from a third.
Turn count is part of a complete construction with particular materials. Eight and four are not advertised here as a universal solution for any braid and any stiff line. The necessary final step is checking that the exact pairing is suitable and that you can make a reliable joint in it.
Where it belongs in a carp rig
A two-material combi rig is the main context. The longer boom supplies stiffness; the shorter braid section gives movement near the hook. The knot joins those sections without assuming that they are the same material.
Korda's combi-rig explanation distinguishes two-material rigs, coated-braid alternatives and changeable-hook versions. It is a useful reminder that the word combi describes a relationship between material properties, not one universal hook-end assembly.
This joint is not compulsory for a beginner. A suitable coated braid with the required short section stripped can provide a simpler starting point. Learn the basic hair rig first if your hook connection and bait spacing are still inconsistent.
Nor should this hooklink tutorial be taken as a general shock-leader specification. A casting leader has additional material, length, knot-clearance and safety considerations. Don't install a heavy leader or increase casting load merely because you have practised a short combi-rig joint.
Choose materials before counting turns
The stiff section must tolerate the required fold and knot construction. The braid must suit the intended hook section and grip in the chosen joint. Similar breaking-strain labels don't establish either of those facts.
A very stiff specialist filament can behave differently from ordinary mono or a more flexible fluorocarbon. A smooth, fine braid can behave differently from a thicker hooklink braid. If the manufacturer's instructions specify another connection, use those instructions rather than forcing the material into this rig.
Start with fresh, identifiable material. Cut away old creases, damaged coating and frayed fibres. Keep the spool information available so that a repeatable successful practice joint can actually be repeated later. Anonymous offcuts make comparison difficult.
Materials and tools
- Korda Basix Boom (paid link) is a stiff boom option to assess against its knot guidance and the full rig.
- Korda Super Natural braid (paid link) is a supple hooklink option; confirm the actual combination before fishing it.
- Korda Razorblades scissors (paid link) for clean cuts in both working sections.
- Korda Pulla tools (paid link) for suitable testing loops and closed-eye connections once assembled.
- Korda Dark Matter putty (paid link) only where the completed presentation calls for weighting the junction, after the uncovered joint passes inspection.
Check the exact material, current knot guidance and the finished connection. Putty is optional presentation equipment, not a way to make a faulty knot hold.
Practise with longer spare pieces than the short hook section you eventually want to fish. Extra working room allows you to see the route and test the connection without a hook nearby. Once the joint is repeatable, allow for the material consumed by tightening when setting the finished rig length.
How to tie the eight-up, four-back Albright
- Fold the stiff material. Make an open U-shaped fold with sufficient overlap and a visible short tag. Hold the arms together without damaging them.
- Enter with the braid. Pass a generous braid tag through the opening and lay it along the doubled stiff section. Remember which side the braid entered.
- Wrap away from the fold. Make eight orderly turns around both stiff arms, progressing away from the folded opening.
- Return towards the fold. Reverse direction with four wraps back over the wrapped section, keeping the turns controlled.
- Complete the return tuck. Pass the braid tag back through the folded opening so that tag and standing braid emerge on the same side.
- Dress and bed. Lubricate, gather the turns progressively and seat the joint without letting the wraps slip off the fold.
- Test uncovered. Inspect both materials and tags under controlled tension. Only then trim and complete the rig.
The counts describe complete wraps around the paired stiff arms, not eight diagonal marks drawn on one face of the line. In the illustration, dashed portions indicate the braid passing behind the stiff material. Each front-and-back journey makes a turn.
Don't tighten the first group solidly before making the return group. Keep the construction controlled but adjustable until the entire route and exit are checked. If the braid falls into an uncontrolled bunch, start again while there is still enough fresh material to work comfortably.
The same-side exit check
Pause before tightening and look at the opening in the stiff fold. The two braid lengths should emerge together on the same side. One is the standing braid leading towards the eventual hook; the other is the working tag returned after the wraps.
This check is easiest if you keep the fold's orientation unchanged throughout tying. Rotating the joint in your fingers can make the words front and back feel inconsistent. Instead, compare the two braid ends directly at the opening.
If they emerge on opposite sides, don't pull harder and hope the finished knot compensates. Undo the loose return route and correct it, or start again. The exit is part of the construction, not a cosmetic choice.
Once the knot is tight, the opening becomes much less visible. That's why this checkpoint belongs before bedding. A final photograph of a tiny compressed junction cannot teach the same information as tracing the unfinished route.
Dress the joint without damaging either material
Lubricate before drawing the materials together. Ease the turns into an orderly group and watch how they approach the folded end. Keep control of the tags instead of applying a sudden pull that hides what moved.
The braid should not be visibly frayed, flattened into a damaged edge or trapped in a random loop outside the wraps. The stiffer material should not show an unexpected sharp kink or damaged surface beside the joint. If either looks suspect, remove the joint and cut back beyond the damage.
Use your fingertips to guide a loose construction, not to withstand a heavy pull from fine line. For loading, use appropriate smooth contact points and a controlled arrangement. Never wrap fine braid around bare fingers, and practise before a hook is attached.
Don't aim for the smallest possible knot at the expense of inspection. A compact-looking junction that has been trimmed too soon or covered with putty may conceal the very movement you need to see.
Test before covering the knot
Once the joint is bedded, load the two standing sections in the direction the completed hooklink will be pulled. Watch both tags for creeping and inspect the junction after releasing tension. Repeat the observation rather than increasing force each time.
If the tag moves, turns shift or a material begins to fray, reject the joint. Retie with the verified route and the same known materials. If the fault repeats, reassess the pairing and seek experienced hands-on help instead of adding random wraps until it appears to stop.
A pull-test helps you find a slipping or damaged join; it doesn't measure the knot's breaking strength. A home pull test doesn't justify a percentage-strength label or a claim that two brands are equivalent. Its value is finding obvious assembly problems before a fish encounters them.
Gardner's demonstration includes finishing treatment and putty. Neither should be used to conceal a joint that has already failed the uncovered check. Only use a finishing product where the complete rig and material instructions support it. Glue is not a substitute for correct routing, suitable materials and stable tags.
Transfer the joint into a complete combi rig
After practice, measure the actual supple section between the finished joint and hook. Some working material disappears into the knot as it beds. If the first finished section is much shorter than intended, retie it rather than deciding that the accidental length must be a useful variation.
Keep the joint clear of the hook eye and any part that needs to articulate. A stiff boom plus a flexible tip only works as intended if the flexible section has room to move. Check the baited rig in water, not only stretched straight on a table.
Apply any presentation-required putty only after testing the bare joint, and check it remains secure after immersion and handling. Then complete the lead-end connection using the knot or approved fitting specified by the rig. A correctly joined boom doesn't excuse an uncertain connection at its other end.
Read the lead-system safety guide for the complete escape-path check. A hooklink joint is not proof that beads, leaders, tubing and leads can release as intended after a main-line break.
Albright troubleshooting
| Problem | Check first | Next step |
|---|---|---|
| Braid slips under load | Same-side exit, wrap route, bedding and pairing | Retie uncovered; stop if repeated |
| Wraps bunch in one place | Control and spacing before tightening | Use more working length and restart |
| Braid exits on opposite sides | Return tuck through stiff fold | Correct while loose or retie |
| Stiff section kinks beside joint | Material suitability and tightening damage | Cut beyond damage and reassess |
| Supple tip finishes too short | Material consumed while bedding | Retie to the intended final dimensions |
| Putty hides the tags | Whether the joint was tested uncovered | Inspect before weighting or covering |
Albright knot questions
Is every Albright tied with eight and four turns?
No. This page names a specific carp-combi variant. Other demonstrations use different wrapping arrangements. Use one complete version appropriate to your materials rather than combining isolated instructions.
Does the tag return through the same side?
The useful final check is that both braid ends emerge on the same side of the stiff-material opening. They travel through that opening in opposite directions. Inspect this before tightening makes the opening difficult to see.
Can I use it for a combi-multi?
Learn the complete combi-multi construction separately. A doubled braid loop and changeable-hook arrangement alter the working material and hook section. This single-strand joining tutorial is not presented as that complete rig.
Do I need glue?
Don't add glue to rescue slipping. First make a sound uncovered connection. Use any additional finishing treatment only where the chosen complete demonstration and material instructions specify it, and check compatibility.
What if I cannot make it repeatable?
Use a simpler suitable coated-braid rig or a reputable ready-tied alternative while learning with spare materials. An extra joint is not an improvement when you can't inspect and reproduce it confidently.
The useful next step
Make several matching practice joints and note the exact materials, counts and final behaviour. Don't mix your practice pieces into a rig wallet until each has been inspected and tested. Then follow the complete combi-rig assembly with the actual hookbait and lead arrangement.
For simpler connection jobs, return to the essential carp fishing knots guide. For presentation choices, use the illustrated rigs overview. The reason to learn this joint is to build a specific, useful rig—not to add complexity to every hooklink.
Store the combi with its supple section clear of neighbouring hooks and without folding it tightly over the join. Check that section again when you take it out. It's easy to concentrate on the bait and miss damage farther along the braid. A tidy knot and sound boom still need an undamaged hook section beside them.