You don't need to learn twenty carp fishing knots before heading to the lake. Start with the few connections your tackle actually uses, and practise until you can tie and check them comfortably. We'll look at loops, swivel knots, the knotless knot and a combi-rig join, with illustrations and separate tutorials when you want a closer look.
This illustrated guide brings those jobs together: making a fixed loop, attaching line to a closed eye, tying a hair-rig hook and joining two hooklink materials. Each supporting tutorial has its own tying sequence and troubleshooting. Start with the connections on your existing setup rather than adding new tackle just to practise another knot.
Start with the job, not the knot name
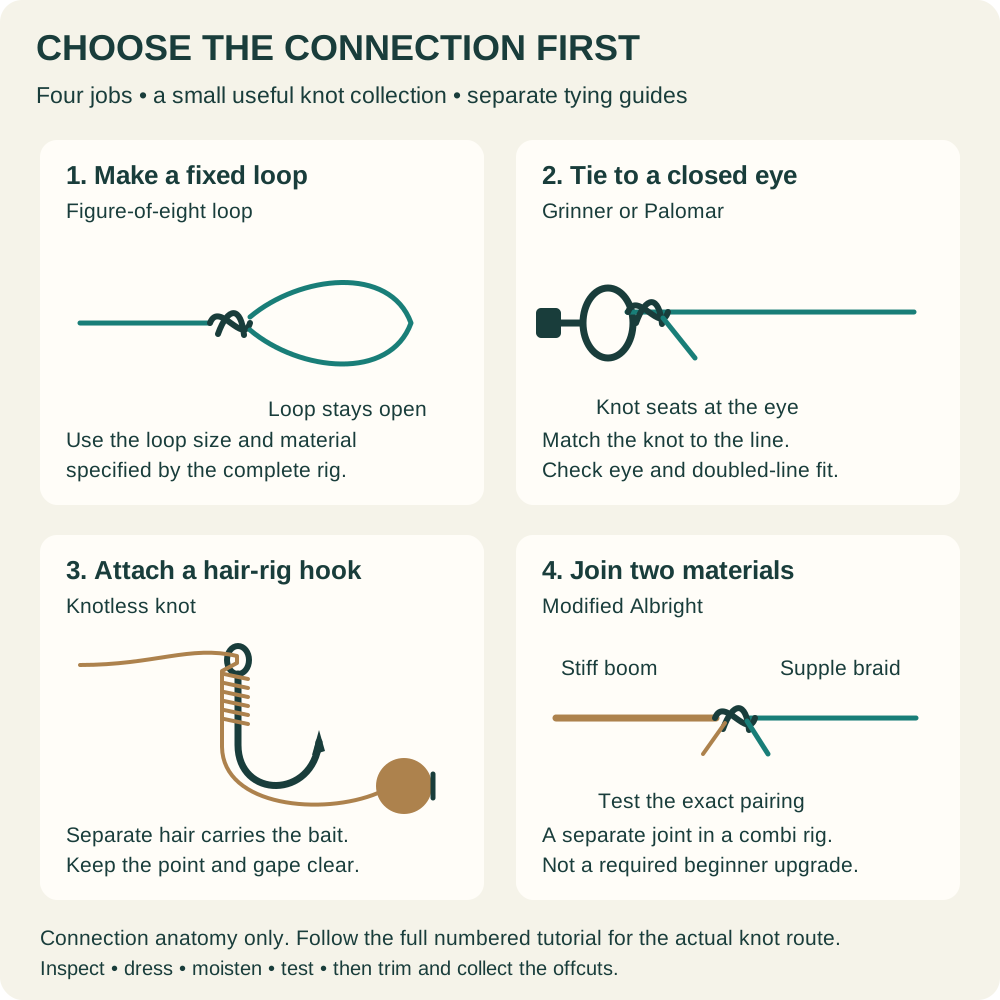
Look at the connection in your hand. Does it need an open loop which will remain after tightening? Is the line being secured directly to a swivel eye? Are you forming a separate hair beside a hook? Or are two different lengths of line being joined? Those questions narrow the options much more effectively than asking which knot is strongest in every situation.
The same setup can legitimately contain several different knots because each has a different job. A simple hair rig may have a small bait-stop loop, a knotless knot at the hook and a larger connection loop at its lead end. That doesn't mean the large loop is appropriate for the hair or that the knotless knot belongs at the swivel.
Equally, not every connection should be improvised with a knot. A purpose-made crimped boom, a spliced leader and a knotted hooklink are different constructions. Follow the material and component manufacturer's instructions. Knowing a reliable knot doesn't make a material suitable for knotting where its specified connection is something else.
The five useful starting points
| Connection you need | Tutorial | Important limit |
|---|---|---|
| A fixed loop in suitable line | Figure-of-eight loop | Loop size and material must suit the actual connection |
| Suitable mono tied directly to an eye | Five-turn grinner | Don't assume five turns suits every braid or stiff material |
| A doubled-line attachment to an eye | Palomar | The whole attachment must pass through its working loop |
| A hair-rig hook connection | Knotless knot | Hair position, hook pattern and final eye exit matter |
| A suitable stiff-to-supple hooklink joint | Modified Albright | Test the exact pairing; variants are not interchangeable |
This is a practical learning sequence, not a claim that these five knots cover every form of angling. Reel-spool attachments, shock-leader connections and specialised stiff-rig knots need their own material-specific approach. The reel-spooling guide deals with the first of those in context. There's no advantage in inserting a heavy leader into a beginner setup simply because you have learned a joining knot.
Before practising, check what is already on the rod. A ready-tied rig may only require a correctly secured quick-change connection. If so, learning the hook knot remains useful, but there's no reason to cut apart a sound ready-tied rig and rebuild it on the bank before your first cast.
Know which strand you're moving
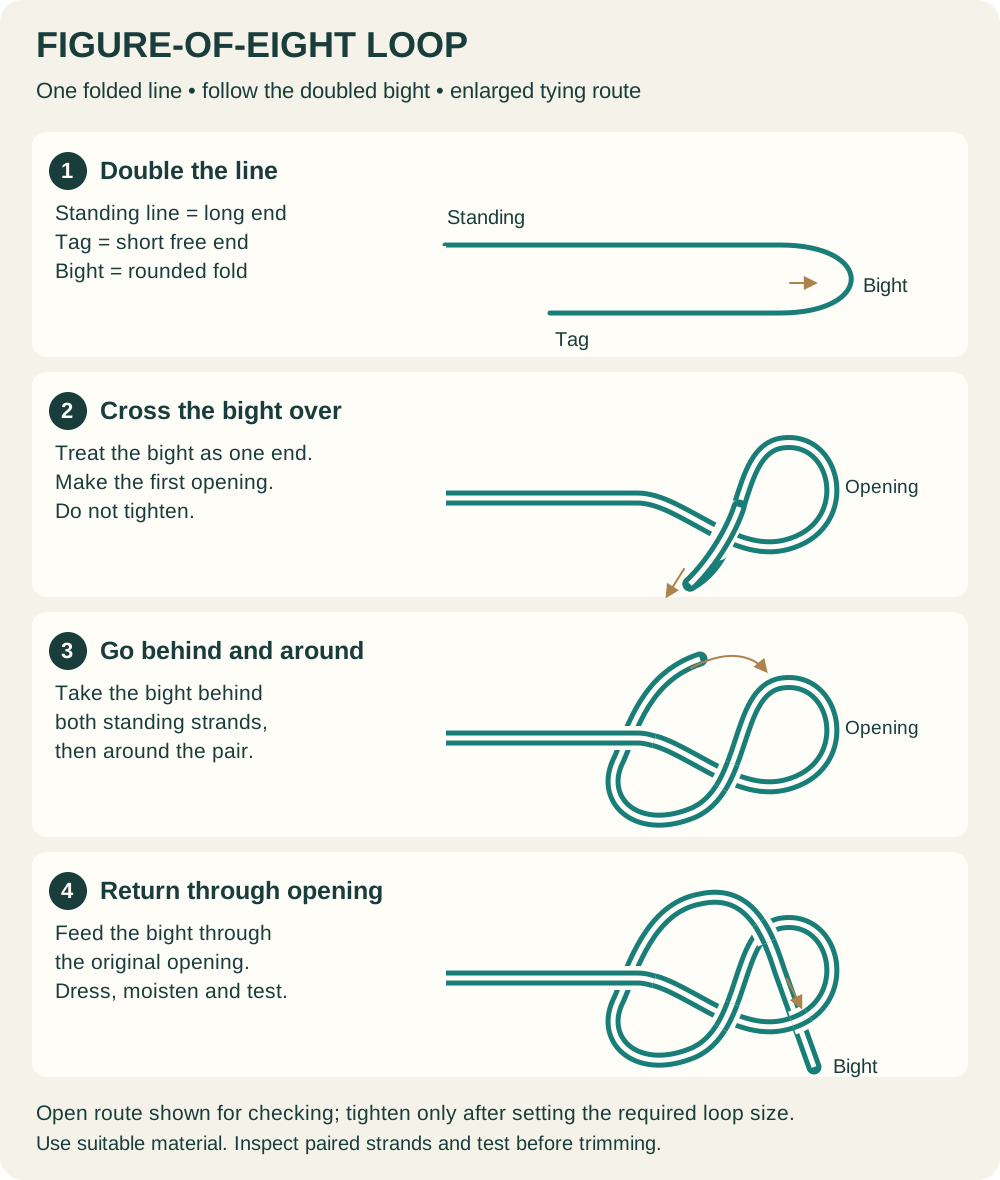
The standing line is the longer, load-bearing part leading away from the connection. The tag end is the free end you manipulate while tying. A bight is a fold in the line; it has two parallel strands and a rounded end, rather than being a separate piece. In a loop knot the bight can act as the working end.
A turn is a complete wrap around the specified strand or bundle of strands. Moving the tag halfway across the front is not a complete turn. A tuck is the final pass through a stated opening. Counting turns accurately doesn't rescue a knot if that last tuck passes through the wrong opening.
Dressing means arranging the strands neatly before the knot is fully tightened. Bedding down is the controlled tightening that draws those parts together. These are separate from the final test. If you immediately haul on an untidy loose knot, you may lock a bad crossing in place before you have checked it.
Use the diagrams as orientation aids. Trace a strand from its named end, through the knot, and out again. At a crossing, a gap or dashed portion represents line travelling behind another part. Don't decide that two strands are joined merely because their paths cross on a flat illustration.
A small knot-tying kit
Buy only what your chosen setup needs
- Korda Razorblades braid scissors (paid link) for a clean finish and collecting tag ends.
- Korda Pulla tools (paid link) for appropriate loops and closed eyes; inspect the contact surfaces first.
- Korda SUBline main line (paid link) as a mono example for the grinner and fixed-loop practice.
- Korda Super Natural braid (paid link) only when a rig calls for a supple braid.
- Korda size-8 quick-change swivels (paid link) only where they are compatible with your chosen complete lead system.
A shallow tray for offcuts, good light and clean water for lubricating knots are just as useful as another packet of terminal tackle. Practise first with spare line and a smooth closed ring rather than an exposed hook. Thick cord can help explain the route, but a neat cord model doesn't prove that the knot works in the fishing line you intend to use.
Amazon links are affiliate links; we may earn a commission from qualifying purchases. Check the diameter, breaking strain and pack contents. Existing suitable tools are entirely adequate.
1. Figure-of-eight loop: a fixed connection
The figure-of-eight loop knot is useful when the rig calls for a fixed loop rather than a direct knot to an eye. You work with doubled line and retain a loop after the knot has been dressed. The loop should remain a consistent size when the completed connection is loaded.
Don't confuse it with putting an overhand knot in a doubled piece of line. The additional route around the standing pair is part of the figure-eight construction. Nor should the resulting loop be confused with the loose working loop in a grinner, which is drawn down as that knot is completed.
Loop dimensions have a purpose. A lead-end hooklink loop may need to fit a specified quick-change fitting and its sleeve. A loop used in a changeable-hook rig has a different job and may need to pass over the hook. Copying one loop size into both places because it looks tidy misses that distinction.
Korda's mono-line guide describes figure-eight loops and grinners in different connection roles. Use that as application guidance, not permission to put a bulky loop anywhere in a lead system. Any knot on a release path must still allow the whole setup to behave as intended.
2. Grinner: a direct connection to an eye
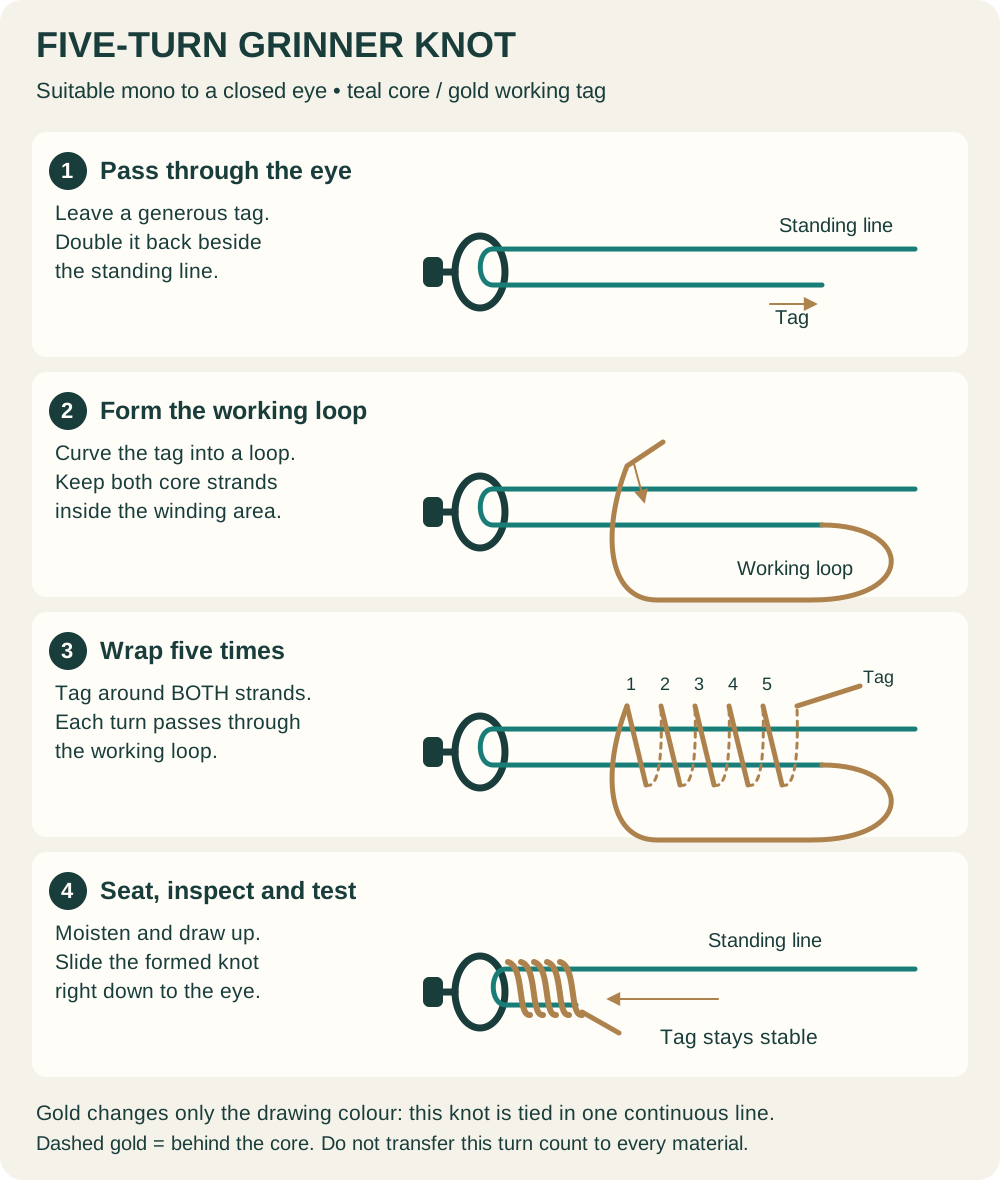
The five-turn grinner tutorial starts with suitable monofilament and a closed swivel eye. Its tag wraps around the specified doubled section inside a working loop. The formed knot is then seated against the eye. Keeping the wraps orderly and completing that final seating are both important.
You may also see the grinner called the uni knot. Don't let alternative names distract you from the version being demonstrated. A double grinner joins two lines with two opposing knots; that is not the same construction as the single eye connection shown here.
Five turns is the stated version for this mono tutorial, not a universal answer for every line on the tackle-shop shelf. Thin slippery braid and thick stiff material can behave differently. If the line manufacturer specifies another connection, learn that complete version rather than adding turns experimentally and assuming the result is better.
The eye itself needs checking. A burr, poorly closed gap or trapped fragment of line can undermine a neatly tied knot. Never tie onto the open hook of a quick-change fitting as if it were its closed eye; the open side has its own intended attachment and retaining sleeve.
3. Palomar: doubled line and a complete attachment pass
The Palomar knot is another way to attach suitable line to an eye. Its distinctive sequence uses doubled line, a loose overhand stage and a loop passed over the whole attachment. That last movement makes a small bare swivel a much easier practice object than an already assembled lead arrangement.
Check whether two strands can pass through the eye without being scraped or crushed. Then check whether the working loop can pass over everything attached. Those practical questions are more useful than choosing the Palomar solely because someone called it easy.
Berkley's knot instructions provide the underlying Palomar sequence. The main checks in our tutorial are keeping the doubled strands orderly, clearing the entire attachment and drawing the knot together without trapping the loop in the wrong place. Follow any different instructions supplied for a specialised line.
A Palomar doesn't create the separate hair shown in the beginner hair-rig tutorial. Tying a hook on securely is only one part of constructing that presentation. Don't replace the knotless knot with a Palomar and assume the same bait arrangement has been preserved.
4. Knotless knot: learn it with the hair rig
The existing hair-rig and knotless-knot guide remains the best place to learn this connection. It explains the hair, actual hookbait and hook together. We have deliberately kept that tutorial on its established page instead of creating a competing article containing the same instructions.
Set the bait and hair before judging the finished rig. A neat series of wraps doesn't tell you whether the bait obstructs the point, whether the hair has been caught under an unintended turn or whether the hooklink leaves the eye on the intended side. These are presentation checks as well as knot checks.
Inspect the line where it meets the hook eye, especially after tightening or replacing a hook. The eye, shank and hooklink must suit the demonstrated rig. A different hook shape is not merely a cosmetic swap if it changes the line's route or how the material bears against the eye.
Once that basic hair rig is consistent, the illustrated carp rigs overview explains what changes in other presentations. There's no need to learn every variation before fishing the simple version on an appropriate spot.
5. Albright: a joint that deserves separate practice
The Albright guide covers a specified eight-up, four-back carp variant for suitable stiff-to-supple hooklink combinations. The folded stiffer material and the braid have different roles. Both braid ends must emerge on the same side of the stiff-material loop after the return tuck.
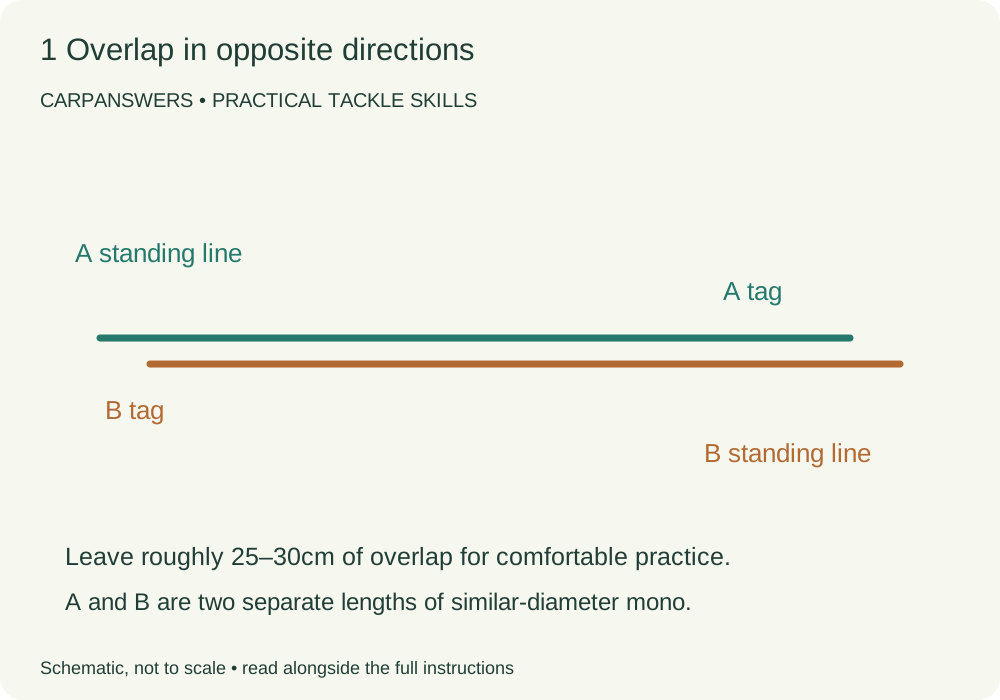
Learn this joint on loose lengths before adding a hook. That lets you see whether the turns group neatly, whether the tag creeps and whether either material is damaged. Once the joint is reliable, the combi-rig guide explains how it belongs in the full hooklink.
Albright is a family name you'll encounter alongside different wrap counts and return arrangements. Our page identifies its chosen construction and links to the primary demonstration. Don't borrow the first half of one version and the final tuck of another, or assume a doubled-braid combi-multi rig is identical to a single-strand hair-ended combi.
Most beginners don't need a two-material join immediately. A suitable partly stripped coated-braid hooklink may already provide the stiffness and flexibility required. Add the joining knot when it solves a clear presentation need, not as a compulsory upgrade from a simpler rig.
A repeatable tie, inspect and test routine
- Identify the full rig. Check material, connection and any sleeve that must be threaded on first.
- Leave working room. A generous tag is easier to control than one that disappears between your fingertips.
- Follow the route slowly. Count complete turns and check the final pass before tightening.
- Dress and lubricate. Arrange strands without unwanted crossings, then draw them together progressively.
- Inspect uncovered. Look for damage, trapped strands, loose coils and a tag that has become unexpectedly short.
- Test the intended load path. Use appropriate tools and controlled pressure with sharp tackle clear of your hands and face.
- Finish and recheck. Trim only after testing, collect offcuts and inspect again after fitting sleeves or other components.
The test is not a competition to break the line in your hands. Don't wrap fine braid around bare fingers or place a hook point against your palm. Use an appropriate tool for the loop or closed eye. A controlled check can reveal slipping and poor seating, but it is not a laboratory certification of the knot's breaking strain.
Keep the tag visible while loading the joint. If it moves into the knot after the knot was supposedly fully bedded, stop and investigate. Trimming the tag flush first removes that useful warning. Leave the finish required by the chosen construction rather than copying a close-trimmed photograph without its context.
When to retie rather than keep checking
Retie when you see damaged line, a disturbed coil, unexplained tag movement or a connection that repeatedly changes shape. Also inspect after a snag, a hard pull, an obvious impact or anything that makes the terminal tackle look different. A knot that passed a test yesterday is not automatically sound after today's damage.
Cut back beyond the affected section rather than rebuilding on a crease or abraded patch immediately beside the failed knot. Check the metal component too. If two fresh knots fail at the same eye, the sensible next step is to examine or replace that component, not to keep blaming your hands.
Store completed rigs so that hooks cannot catch and pull adjacent loops. Keep the material identity with unfamiliar rigs. An unlabelled hooklink that looks tidy in a wallet is difficult to assess if you can't remember whether it is coated braid, fluorocarbon or a stiff specialist filament.
Common knot questions
Which carp fishing knot should I learn first?
Start with the connection you need on your current permitted setup. For tying your own basic hooklinks, the hair-rig knotless knot and a suitable fixed end loop are a useful pair. For attaching mono to a closed swivel eye, learn the five-turn grinner in the specified material.
Which knot is strongest?
There's no useful universal ranking without specifying the material, diameter, attachment, tying method and test. This guide doesn't assign strength percentages. The practical target is a suitable construction that you can reproduce and that passes inspection and controlled testing.
Can I practise with string?
Yes, to understand the route and identify the ends. Then practise in the actual fishing material before using the connection. Thick soft string can hide the friction, stiffness and slipping problems that matter with fine fishing line.
Should every knot be glued?
No. Don't use glue as a repair for poor routing or slipping. Where a specific demonstrated construction calls for an additional finishing treatment, first make and test the underlying joint. Check compatibility and keep the complete rig together.
Does a strong knot make a lead system safe?
No. Strength and release behaviour are different questions. Read the safe lead systems guide and check the complete escape path. A well-tied but oversized knot can still be in the wrong place.
Your first practice session
Example: a first lead-clip setup
Suppose you already have a permitted lead-clip arrangement and a simple coated-braid hair rig. Identify the mono-to-swivel connection, the hooklink's lead-end connection and the knot at the hook. Learn only those jobs first. If the hooklink uses a specified end loop, practise its size against the actual fitting; if it is tied directly to a closed eye, don't add a loop merely because the diagram looks convenient.
Example: progressing to a two-material combi
Later, if a stiff boom and separate supple tip genuinely suit the presentation, add the material-joining lesson. Keep the hook connection familiar while learning the Albright independently. That way, a failed practice joint has a short list of possible causes instead of being mixed with a new hook pattern, unfamiliar bait attachment and different lead system. Once the joint is repeatable, check the completed rig's actual flexible length and water behaviour.
Choose one knot, one material and one connection. Tie three examples slowly, inspect them side by side and test each before trimming. Note any recurring problem: a loop that shrinks, a tag that creeps or coils that pile up. Work on that specific movement rather than changing several things at once.
When the process is repeatable, assemble one complete hooklink and check it again with its actual sleeve, swivel and bait. The useful outcome is a setup you understand and can safely reproduce on the bank. More knots can come later, when your fishing genuinely calls for them.
Keep a labelled practice example beside the spool, with the knot's job written down as well as its name. Is it a lead-end loop, a mono-to-swivel knot or a join between materials? A quick note now will make it easier to pick the right tutorial when you come back to the tackle box in a few weeks.