A figure-of-eight loop knot is a useful one to have in your tackle-tying skills. It makes a fixed loop in suitable line, handy where your hooklink needs a loop connection. We'll use a folded section of line, keep the strands tidy and work on getting the loop the size you want before pulling the knot tight. Practise with spare material first, keeping a finished loop beside you for comparison. When the loops come out different sizes, look at where you hold the fold as you tighten the knot.
This tutorial covers the figure-eight tied on a bight: a fold in the line acts as the working end. It doesn't cover a climbing tie-in, a dropper loop in the middle of a line or a specialised stiff-rig loop. Use it only where your fishing material and complete rig call for this construction.
Read the loop before tying it
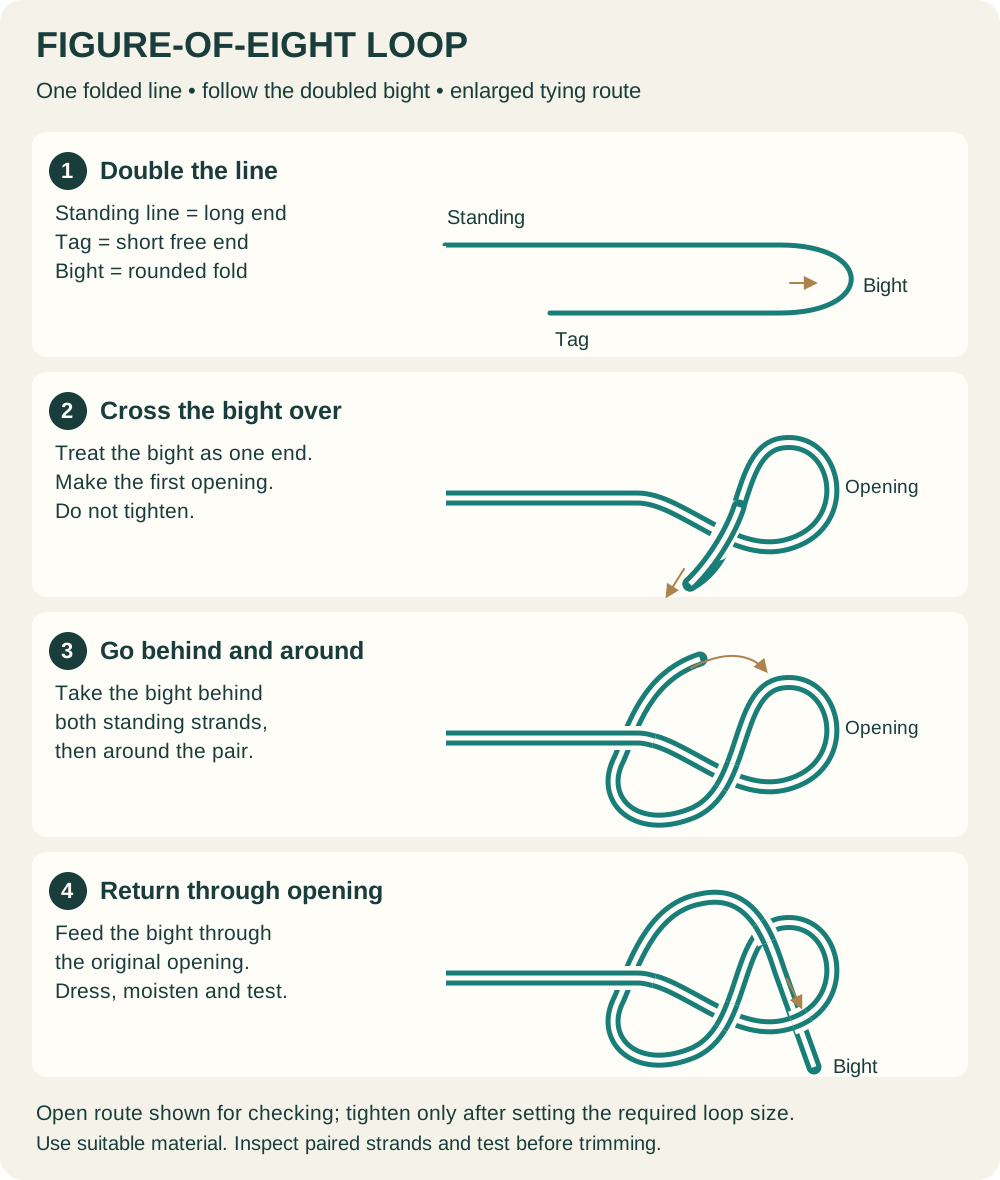
The standing line continues towards the rest of the hooklink or main line. The short free end is the tag. Fold them alongside one another and the rounded fold becomes the bight. During tying, treat that bight as one working end even though it contains two strands.
There are two loops to distinguish. The temporary crossing loop is an opening you make while tying. The final end loop is the piece of doubled line left beyond the completed knot. Confusing those names can make a simple instruction sound more difficult than it is.
In the illustration, trace the paired line rather than chasing the shape of the outside silhouette. A figure-eight requires the working bight to travel around the standing pair and return through the original opening. Passing it straight through the opening without that journey produces a different construction.
Where a fixed loop is useful
A common example is the lead end of a hooklink intended for a compatible quick-change fitting. Another is a permitted loop-to-loop connection specified by a leader manufacturer. These uses share a knot name but don't necessarily share loop dimensions, material or safety requirements.
Korda's monofilament guidance identifies the figure-eight loop as a mono connection option. Its coated-braid rig example also shows why loops of different sizes may be required at different ends of a specific hooklink. Those examples are not permission to transfer the knot to every available braid.
A changeable-hook rig may use a much larger loop so that the hook can be installed and removed. Learn those dimensions in the complete multi-rig tutorial. A small tidy lead-end loop is not a substitute if it prevents the hook-end assembly from working.
If the connection needs to seat directly against a closed eye without an open loop remaining, compare the grinner instead. If you're joining two different hooklink materials, the Albright addresses a different job. Choose the job first, then the knot.
What you need for practice
- A fresh length of the intended material; Korda SUBline mono (paid link) is an example for practising a mono loop.
- Korda braid scissors (paid link) or existing suitable sharp scissors.
- Korda Pulla tools (paid link) for appropriate loop-testing contact points.
- The actual compatible quick-change swivel (paid link) and anti-tangle sleeve (paid link) if that is the connection your rig specifies.
Only the line, cutting tool and appropriate testing arrangement are needed to learn the knot. The swivel and sleeve are application-specific, not compulsory purchases.
Use spare line before working on a baited rig. A hook doesn't make the tying route easier to understand and introduces an unnecessary sharp point during your first attempts. Put offcuts in a tray immediately so that fine loops cannot be lost on the bank or floor.
How to tie the figure-of-eight loop knot
- Double the end. Fold a generous length of line back alongside the standing part, leaving enough tag for adjustment. Keep the two strands parallel.
- Make the first opening. Carry the bight across the front of the doubled standing section, forming a loose crossing loop.
- Go around the standing pair. Take the bight behind and around both standing strands. Don't push it straight through the first opening yet.
- Return through the opening. Bring the bight through the original crossing loop. You should now be able to trace a doubled figure-eight route.
- Set the final loop. Adjust while the knot is loose. Keep the pairs orderly, lubricate, and draw the knot down progressively.
- Inspect and test. Load the intended connection with suitable tools, check that the loop and tag stay put, then trim the tag with a visible margin appropriate to the material.
The route is the familiar figure-eight tied with a doubled working end. Animated Knots explains the on-a-bight distinction, while Gardner provides a fishing demonstration. Follow the fishing material's instructions for the application; don't import climbing-specific dimensions or extra stopper arrangements into a carp rig.
Work slowly enough that you can pause after the third step and still identify the bight, standing pair and original opening. If the loose shape has become confusing, open it and start again. Forcing an uncertain tangle tight doesn't improve it.
Set the loop size before the knot locks
The loop will often become smaller as slack moves into the knot. Account for that while the turns are still loose. On practice pieces, aim for one repeatable finished size and compare the result rather than trying to make the smallest loop possible.
For a quick-change connection, the loop must fit the actual fitting and allow its retaining sleeve to sit properly. An oversized loop can leave unnecessary loose material; an undersized loop can be awkward to install or can force an unintended angle. Use the loop size your rig and connection need; a measurement from a different setup may not fit.
If the knot has fully tightened with the wrong loop size, retie it. Dragging line through a tightly bedded knot to make an adjustment can disturb or damage the material. Don't turn a failed practice dimension into a new rig variation simply to avoid cutting another short length.
Dress the doubled strands neatly
Before bedding down, look for a strand that has crossed over its partner unexpectedly. Keep the paired parts following the same route, with no isolated tag caught across the working loop. Good light and a contrasting background make this much easier than trying to inspect clear line against the water.
Lubricate the knot and tighten progressively. Watch the turns gather rather than pulling abruptly until something stops moving. If the line has kinked, whitened, flattened unusually or developed a damaged surface, remove the knot and the affected material.
A tidy appearance is a starting check, not the final verdict. Two knots may look similar at normal reading distance while only one has followed the intended route. That's why learning to trace the loose construction is useful: you're checking how it was formed as well as how it looks when compressed.
Test the actual connection, not an imaginary one
Use smooth, appropriate testing contact points. Pull on the standing section and the loop along the direction in which the finished connection will be loaded. Keep hooks out of the test when practising; on a finished rig, use a suitable tool and keep the point away from skin and eyes.
Watch the loop size and tag while applying controlled pressure. After the knot has bedded, neither should continue creeping. A changing loop means the job is not finished, even if the knot has not yet broken. Retie and check routing, material and dressing before trying again.
Don't wrap fine braid around your fingers or jerk against an improvised sharp object. Nor should a hooklink test be described as proving the advertised breaking strain. Its practical purpose is to reveal obvious slipping, incorrect seating and damage before fishing.
Once the loop is installed on its intended fitting, inspect again. A sleeve may cover the knot and hide a problem, or installation may have trapped the loop incorrectly. Complete the check before sliding the sleeve into its final position, then confirm the sleeve retains the intended connection.
Loops and lead-system safety
A loop knot adds bulk. Where a lead, bead or hooklink swivel must pass along a line after a break, that bulk becomes part of the safety assessment. A knot that is strong in isolation can still obstruct the required escape path.
Read the complete lead-system guide and the instructions for your exact arrangement. Check it wet and fully assembled, including the actual knots, tubing, leaders and sleeves. Don't assume that testing an empty bore against bare line tells you what happens with the real connection in place.
Where a leader is prohibited, a loop-to-loop instruction doesn't override the rule. Where the system calls for a direct eye knot, adding a convenient loop can change more than appearance. Follow the approved construction rather than treating interchangeability as a reason to add connections.
Figure-of-eight loop troubleshooting
A practical lead-end loop example
Take the actual swivel and sleeve from the intended hooklink arrangement, but leave the hook off while learning. Make a practice loop and test whether it can be installed and fully retained without forcing the fitting. Then remove it and check the contact area. You're checking the whole connection, not simply whether the loop is large enough to pass over the metal.
Now tie a second loop to the same finished size. If one requires substantially more manipulation, compare the knot placement and the length of loose loop left outside the sleeve. Keep notes or use a ruler while learning. Aim for a loop that fits the connection and is easy to tie consistently.
A loop-to-loop example needs a separate check
If a permitted manufactured leader specifies a loop-to-loop attachment, follow its assembly instructions so the two loops interlock correctly. Don't merely push one loop through the other and leave it there. The correct completed join must be secure along the intended load path, and the whole leader system must retain its required release behaviour.
This is also why the leader's own loop and your newly tied main-line loop need to be considered together. An oversized connection might look convenient during assembly but create an obstruction elsewhere. If you can't explain both the attachment and the breakaway path, use the complete manufacturer's demonstration or seek an experienced check before fishing.
| What you notice | What to check | Useful action |
|---|---|---|
| Loop keeps shrinking under load | Full route, bedding and material suitability | Retie; don't trim away the warning tag |
| One strand cuts across its partner | Dressing before tightening | Start again with a larger loose working shape |
| Finished loop is too small | Slack drawn into the knot | Retie with allowance; don't force it open |
| Sleeve will not sit correctly | Loop size, knot bulk and component match | Use the specified combination |
| Line is damaged beside the knot | Old damage, friction or sharp testing contact | Cut beyond damage and inspect the tool |
| Safety component catches at the knot | Complete release path | Don't fish that assembly; correct the system |
Questions about the figure-eight loop
Is it the same as an overhand loop?
No. The bight travels around the standing pair before its final return. Don't substitute a simpler-looking loop and retain the figure-eight name. Learn the route on a large practice piece so that the difference is clear.
Can I use it with every braid?
No universal recommendation is made here. Smooth fine braid, coated hooklink and mono don't all behave alike. Follow the material manufacturer's knot guidance, and test your actual construction rather than relying on a photograph of another product.
How short should I cut the tag?
Don't trim it flush before testing. Keep enough to inspect and follow the finish appropriate to the material and demonstrated rig. If the tag was pulled unexpectedly short during tightening, retie with more working material.
Can I reuse a loop after changing hooklinks?
Only after inspecting the line and knot again. Look for wear at the contact point as well as the knot itself. Convenience doesn't justify reusing a damaged or uncertain connection.
Should I use this for a hair bait stop?
The small hair loop is a separate part of the hair-rig tutorial. Follow that complete rig rather than imposing the larger connection-loop instructions on every loop in a rig.
Before you put the rod out
Confirm the final loop fits its intended connection, the knot has the correct doubled route, the tag is stable and the line is undamaged. Check any sleeve without concealing an unresolved fault. Then assess the complete rig, including its release behaviour, bait position and hook condition.
For your next connection, return to the carp fishing knots guide. The aim is not to use this loop everywhere. It is to recognise the places where a fixed loop belongs and tie it consistently when it does.
Label your stored examples with the material and finished loop size, especially if several rigs look alike. A loop made to pass over a hook does a different job from a compact lead-end loop. Checking that little note now saves threading on a sleeve and assembling the rig before realising you've picked up the wrong one.