Carp rigs can look unnecessarily complicated when you are starting out. The KD rig is a useful one to understand because its defining feature is small and visible: the hair leaves the whipping near the hook eye, rather than being trapped farther down the shank. This guide shows how to tie a wafter version, how to check that it behaves correctly, and how it differs from the pop-up version in the original CarpAnswers article.
You do not need a collection of swivels, rings and kickers to learn it. You need the right curved-shank hook, a sound hooklink, a bait matched to that hook and a safe complete lead system. If you have not tied a knotless knot before, work through our basic hair-rig tutorial first. The complete beginner rigs guide then puts the KD alongside the other main presentations without turning them all into compulsory purchases.
What makes a KD rig different from a normal hair rig?
Both use a hair to carry the bait separately from the hook. With a conventional knotless-knot hair rig, several turns trap that hair against the shank. With a KD, the first two turns hold it, then you move the hair clear before making the remaining turns. The resulting exit is much closer to the eye. That changes the relationship between a buoyant bait and the hanging hook.
The curved-shank pattern is part of this rig, not a decorative choice. The hook, hair exit and bait work together; adding a long kicker because another rig uses one changes that combination. Korda's Kurv Shank specification identifies its curved shank and in-turned eye and includes the KD among its intended uses. Follow the specified pattern while learning instead of assuming any hook with the same size number will behave identically.
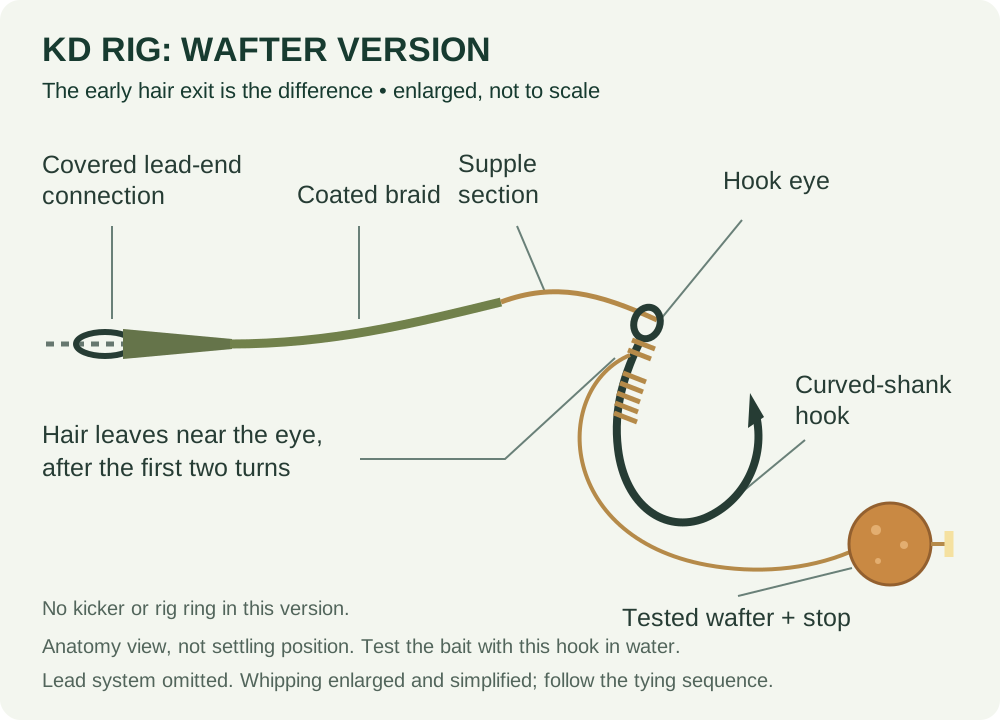
Do not confuse the KD with a blowback rig. A blowback has a moving ring on the shank; this KD does not. Nor is the hair a D carrying a micro swivel. Those other presentations are worth understanding, but adding their components does not automatically improve this one. If you want to compare the construction, see the blowback tutorial after you have made a reliable KD reference rig.
When should you use a KD rig?
The wafter version is a practical option on a confirmed spot where the hook can settle unobstructed. The bait supplies some lift, while the hook still reaches the bottom. A clean area of gravel, clay or suitably firm lakebed is easier to assess than deep weed or heavy debris. It gives you a useful setting in which to understand the rig's behaviour before adding uncertain ground conditions.
A KD is not a licence to ignore what you are casting onto. The original article described it enthusiastically as a rig for weedy lakes; the important qualification is that balancing a bait does not ensure it will sit correctly over a heavy weedbed. A low presentation can be hidden by vegetation, and a hook point can collect debris. Choose a spot you can fish and land a carp from safely rather than expecting the knot to solve the whole situation.
It is also not the automatic answer for a sinking boilie. This guide's version is built around a balanced bait. If you want an uncomplicated bottom-bait presentation, the ordinary hair rig may be a clearer first choice. If you need a reliably raised pop-up, compare the Ronnie or spinner rig with the KD pop-up variation below, rather than swapping baits without changing your checks.
KD rig components: a Korda-led wafter rig
Amazon links are affiliate links; we may earn a commission from qualifying purchases. Check the selected hook size and barb option against your venue rules. You do not need every material mentioned in the alternative versions.
Required for the hooklink
- Korda Kurv Shank hooks (Size 6 barbed) (paid link), with a permitted hook type and size matched to your bait.
- Korda N-Trap Soft coated braid (paid link); this example uses the linked 20lb material where suitable and permitted.
- Mainline Banoffee wafters (12mm) (paid link), tested with the actual hook.
- Korda Hybrid Bait Stops (paid link) for the hair loop.
- Korda anti-tangle sleeve (paid link) and a compatible Korda size-8 quick-change swivel (paid link) for the specified quick-change finish.
Tools and complete lead system
Add Korda RazorBlades scissors (paid link), Strippa tool (paid link), fine baiting needle (paid link) and Pulla tools (paid link). Use a container of water for testing. A complete Korda Lead Clip Action Pack (paid link), appropriate Korda swivel lead, 3.5oz — choose a weight suitable for your rod and swim (paid link) and suitable main line (paid link) are a lead-system example, not parts to omit from a cast-ready setup.
The quick-change swivel must be approved for the actual clip. If it is not, use the supplied standard swivel with its specified knotted connection. No rig ring, bait floss, crimp or kicker is required for this wafter rig.
N-Trap Soft combines a coated exterior with a supple inner braid. The stripped part supplies the hair and flexible hook section; the coating remains on the longer part of the hooklink. Inspect the fibres after stripping. A tool that removes the coating neatly can still damage the inner material if used carelessly. Discard a frayed section rather than hoping the remaining strands will be enough.
This is a knotted construction. Do not crimp N-Trap because another Korda rig uses a crimped Hybrid Stiff boom. Matching a brand name or nominal breaking strain is not a compatibility check. Equally, do not replace the coated braid with stiff filament and expect the same hair movement. Learn one complete material-and-knot combination before investigating alternatives.
Set the hook size and hair with the bait fitted
There is no universal KD hook size. Start with a sensible relationship between the bait and a permitted curved-shank hook, then check the actual combination in water. A hook that is too small can have its gape masked by a bulky bait; one that is much heavier than needed changes the balance. Our hook-size and pattern guide explains why size numbers alone are a poor shopping shortcut.
Mount the bait before setting the hair. Hold the bait just below the hook bend with a small clear gap, leaving the point and gape unobstructed. That is more useful than trying to copy a photograph's apparent measurement: perspective, bait size and hook pattern all change what the gap looks like. Once the rig is tightened and wet, check that the bait can move without catching across the point.
For the first practice rig, leave spare hooklink material rather than aiming for the finished length immediately. Roughly 30cm before tying gives room to work; a finished length around 15–20cm can be a manageable clean-bottom starting point. Neither measurement is a rule for every fishery or lead arrangement. The aim is to make a repeatable reference, then adjust for a reason you can explain.
How to tie a KD rig, step by step
Work in good light, with the point directed away from your fingers. The key moment is moving the hair after the first two turns. Count deliberately, and check it again before tightening; a beautifully neat ordinary knotless knot is still the wrong construction if you meant to make a KD.
- Cut the hooklink. Cut around 30cm of the specified coated braid. Remove approximately 8–10cm of coating at one end as a working allowance for the hair, whipping and short supple section. Look for damaged fibres.
- Tie the hair loop. Make a small overhand loop in the exposed braid. Tighten it neatly and keep it large enough for the chosen bait stop without leaving an unnecessarily bulky knot.
- Mount the wafter. Use the baiting needle to draw the loop through the actual bait, then fit the stop. Seat it carefully; forcing a stop into a soft bait can split the bait or hide a problem with hair length.
- Position the hook. Pass the long end through the eye so the finished hooklink exits on the hook-point side. Hold the hair along the shank and set the bait just below the bend with the gape clear.
- Make the first two turns. Wrap the working hooklink twice around both shank and hair. Keep these turns adjacent and controlled, rather than crossing them over one another.
- Move the hair clear. Hold the hair away from the shank and continue with about five further turns around the shank alone. Do not accidentally trap it again under those later turns.
- Finish the whipping. Return the working end through the eye with the finished hooklink leaving towards the point. Moisten and tighten steadily, maintaining the hair position while the turns bed down.
- Inspect the hook end. Confirm that the hair exits near the eye and a short supple section remains beyond it. Check the point, the unobstructed gape and the bait's freedom to move.
- Finish the lead end. For an approved quick-change connection, slide on the sleeve before making a neat figure-of-eight loop. Attach to the compatible swivel and cover the open connection. Use the supplied swivel's specified knotted finish when required instead.
- Test, then test in water. Apply controlled pressure with suitable tools, inspect the knots again and lower the baited hooklink into water. Complete the separate lead-system safety check before fishing.
Korda's KD tying demonstration shows the early hair exit in photographs. Its rig uses N-Trap Semi-Stiff and describes added shot, whereas the primary wafter example here uses N-Trap Soft without an extra shot. Those are specified variations, not a claim that the component lists are identical. If following the manufacturer version exactly, follow that entire rig and its material selection.
What should the wafter KD look like in water?
The hook should settle down while the bait's buoyancy reduces its effective weight. You are not trying to make the hook hover unsupported or stand awkwardly upright under the bait. Put the actual rig into a container with room for it to settle naturally, then view from the side. Do not hold the hooklink so tightly that your hand creates the position you wanted to see.
If the wafter lifts the hook, change the bait or trim a little bait where appropriate and retest. Keep the hook suitable for the fishing, rather than fitting a needlessly heavy hook solely to sink an unsuitable bait. If the bait drops like a heavy bottom bait, it is not performing as the balanced example described here. That is a reason to reconsider the combination, not proof that the rig cannot catch.
Test after soaking as well as immediately after baiting. The same named bait can vary with size, absorbed water and preparation, and a hook change alters the balance. Write down the combination that worked in your test rather than remembering only the brand on the tub. There is little value in carefully balancing one rig and then replacing its bait with a different size just before casting.
Optional Korda Dark Matter putty (paid link) can help manage the hooklink's position when used appropriately, but it must not be treated as a universal fix for every buoyancy problem. Keep any added weight secure and clear of the hair and whipping. Recheck the whole presentation after adding it. More putty is not automatically better, and a lump that slides changes the setup you thought you had tested.
The original CarpAnswers pop-up KD variation
Original author note: the first version of this guide included this genuine fishing memory:
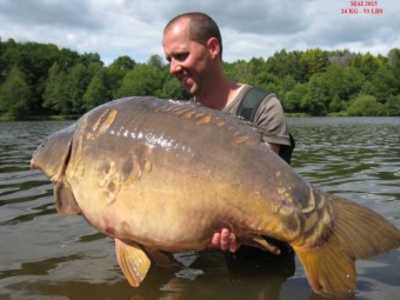
“I have used this carp rig for many years and still use to this day, in fact, it was this very carp rig that I caught my PB carp at Oxford Linear Fisheries. I clearly remember the fishing was very slow that day but I managed to land a stunning mirror carp over 30 lbs.”
That account is retained as the original author's experience, not as a new test of today's linked products. The original construction used a pop-up and a split shot on the hair. The main lesson here is now a wafter version, so do not combine the new shopping list with the old pop-up photograph and assume nothing changes.

For that alternative, the additional relevant components are a suitable pop-up hookbait (paid link) and NGT non-toxic split shot (paid link). The shot is positioned on the hair beneath the bait to counter its buoyancy. This is not the same job as adding weight to the main hooklink. Pinching shot too tightly can damage braid; insufficient grip can let it move. Check the correct placement, secure fit and baited behaviour rather than selecting a shot by appearance alone.
Korda's linked demonstration distinguishes the pop-up's hair-mounted counterweight from its wafter variation's weight near the coating boundary. Do not use putty loosely smeared on a thin hair as a substitute for a secure, tested arrangement. If the pop-up cannot be balanced close to the bottom without an awkward or unreliable fitting, choose the simpler wafter version or learn a purpose-built pop-up rig.
The KD hooklink still needs a safe lead system
The hooklink is only part of what you cast. Use a complete matched lead arrangement and confirm the permitted swivel, clip, tail rubber and tubing combination. A quick-change swivel has to be approved for the actual system; forcing a similar-looking swivel into a clip can defeat its intended behaviour. Cover an approved open quick-change connection with the correct sleeve.
Test what happens if the main line breaks. Do not glue components, jam a tail rubber on permanently or add a stop that blocks the escape route. Ask an experienced angler or fishery team member to check a setup you do not understand. The safe lead-systems guide separates lead release from other escape requirements, while Korda's lead-system overview explains why running, inline, lead-clip and helicopter arrangements are different choices.
The venue's current rules come before the shopping list. Hook restrictions, leader restrictions and acceptable lead arrangements can change what you should buy. Carrying a familiar brand does not override those rules, and flattening a barb is not necessarily accepted as equivalent to buying the required barbless hook.
Casting and inspecting the retrieve
Before the cast, check that the hair has not looped around the hook and the bait stop is still seated. Extend the hooklink and confirm that any sleeve covers its connection without trapping unwanted line. Keep the exposed hook away from clothing and vegetation. Check the lead and any added bait load are within the rod's capability, and use controlled practice rather than immediately chasing maximum distance.
Inspect a retrieved rig before pulling it straight. A hair wrapped around the bend, putty displaced along the hooklink or debris on the point can tell you which part needs attention. None proves exactly when the problem occurred. Change one variable, make another controlled cast and compare; shortening the hair, lengthening the hooklink and changing the bait together makes the result difficult to interpret.
Our tangle troubleshooting guide develops that process. Retie frayed braid or a slipping knot, and replace a damaged point. A rig that caught a fish earlier in the day still needs checking afterwards. Store spares so the hairs cannot wrap around neighbouring hooks and label tested bait-and-hook combinations clearly.
KD rig troubleshooting
| Problem | Check | What to change |
|---|---|---|
| Hair exits well down the shank | Whether later turns trapped it | Retie, moving the hair clear after the first two turns |
| Wafter lifts the hook | Actual bait buoyancy against that hook | Adjust or change the bait and repeat the wet test |
| Bait masks the point | Hair gap, bait size and hook pattern | Reset with the bait fitted; keep the gape clear |
| Hooklink is frayed beside the coating | Damage during stripping or use | Discard the affected section and retie |
| Pop-up counterweight moves | Shot grip and hair condition | Remake a secure compatible arrangement; do not conceal damage |
| Loop slips or open connection is exposed | Knot formation, approved swivel and sleeve | Correct and load-test before fishing |
KD rig questions
Does a KD rig need a kicker?
Not in the version taught here. The specified curved-shank hook and early hair exit already define the construction. Adding an extension changes it and creates another compatibility question. Make and understand this version before deciding whether a different rig would better suit the job.
Can I use a wafter without a split shot?
Yes, the primary example here does, provided the actual bait and hook settle as intended. The manufacturer demonstration also teaches a variation with additional hooklink weight. Do not confuse that with the hair-mounted counterweight needed for its pop-up alternative; the two weights perform different jobs.
Is the KD better than a normal hair rig?
“Better” needs a situation. The KD offers a particular relationship between a curved hook and balanced bait. An ordinary hair rig is straightforward for a sinking bait. Neither guarantees a bite or a secure hook hold, and changing the rig cannot compensate for fishing a spot the carp are not using.
Should I test it on my hand?
No. Do not drag a sharp hook across your skin to see whether it turns. Inspect the construction, use suitable tools for controlled connection tests and check the baited presentation in water. A skin test is neither necessary nor a substitute for those checks.
What should I learn after the KD?
Learn a presentation that addresses a real need on your water. That might be a blowback for comparison or a spinner for a raised pop-up. You do not have to progress to a more elaborate rig every time you fish. Reproducing a safe, tested KD is a worthwhile skill in its own right.
The useful idea from the original guide remains: practise at home so your first attempt is not rushed at the bankside. Keep the early hair exit visible, match the bait to the hook and treat the complete lead system as a separate safety check. This update preserves the original author's fishing history while making the current rig, alternatives and limitations explicit.