The Slip-D rig carries the hookbait on a flexible braided D behind the hook. That loop can change shape as the bait attachment moves, unlike the stiff D on a fluorocarbon rig. This version uses coated braid, a Kurv Shank hook, a micro ring swivel and a kicker. We'll tie it step by step, then check it with the wafter you're going to use.
This is a useful intermediate rig when you already understand a sound knotless knot and want to learn a different bait attachment. As with a hair rig, check the bait balance, hook point and lead system before fishing. Start with the complete beginner rigs guide if you're choosing between presentations, or practise the ordinary hair rig before taking on the doubled-braid construction.
What makes this a Slip-D rig?
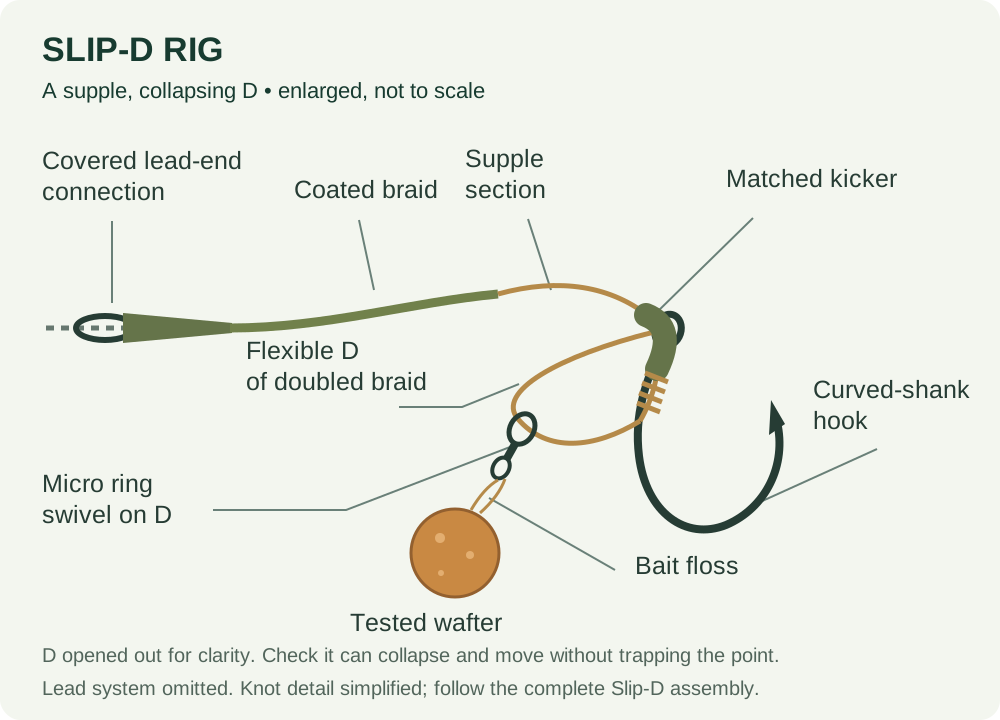
The important feature is the supple doubled material around the hook and bait attachment. The small swivel sits on that loop rather than directly on the metal shank. As the attachment moves, the D can collapse and alter its shape. This is different from a micro swivel retained on a bare shank by a hook bead, and different again from a rig ring tied into an ordinary hair.
The coated portion of the hooklink and stripped hook-end section have separate jobs. The coating provides more control along the main hooklink; the exposed inner braid gives the hook and D their local flexibility. Leaving the entire assembly stiff because the package says coated braid prevents the hook-end arrangement behaving as the demonstrated rig intends.
Rig descriptions sometimes promise perfect resetting or an impossible-to-eject hookbait. Those claims are not guarantees you can rely on. A moving attachment can still jam, a supple section can still tangle and a blunt point is still blunt. Your useful test is whether the actual rig moves freely, carries the chosen bait securely and presents properly on the spot you have selected.
Slip-D versus IQ D, blowback and multi rigs
An IQ D holds its bait attachment on a shaped fluorocarbon D. The Slip-D's braided loop is deliberately more flexible. Simply replacing IQ2 with coated braid in a returned-tag IQ D rig doesn't produce the same construction, and ordinary braid must not be treated as a material that can be melted into a retaining tag.
A blowback rig has a small ring on the hook shank connected to the hair. That ring moves on the metal hook. On the Slip-D described here, the micro ring swivel travels on the braided D. The difference matters when deciding where the bait is secured and which part needs to remain free.
A multi rig also involves a loop and a D, but its changeable-hook construction is a different arrangement. Don't assume that the hook on this knot-secured Slip-D can be swapped without untying anything. If replacing hooks without remaking the hooklink is your priority, learn a complete demonstrated multi rig instead of changing the Slip-D's assembly order.
Where a wafter Slip-D makes sense
A confirmed clean patch is the best learning situation. The wafter and hook should be able to settle without leaves, weed or other debris restricting the D. A little local flexibility doesn't allow a bottom presentation to ignore the ground beneath it. If the hook returns repeatedly masked, investigate the spot before trying another swivel.
The rig can be considered when you want a bait attachment with more movement than a fixed hair and are prepared to check that movement carefully. That is a reasoned choice of construction. It is not evidence that a plain hair rig has stopped working or that every pressured lake requires a complicated hook end.
Use a different approach when you specifically need the bait held well above the bottom, when venue rules exclude the selected hooklink or when an unfamiliar setup cannot be checked before fishing. Dense weed and dangerous snags remain landing problems, whatever rig you use. Being able to place a bait there is not the same as being able to land a carp safely.
Slip-D components: the complete hooklink
Core parts
- Korda Kurv Shank hook (paid link), using a permitted barb choice and a size appropriate to the actual bait.
- Korda N-Trap Soft coated braid (paid link) for the hooklink and supple doubled D.
- Korda Micro Ring Swivel (paid link), correctly sized to move freely on the braided loop.
- Korda medium Kicker (paid link) for a compatible size-6 or size-8 hook example. Check the hook pattern and current maker sizing; change the kicker if you change beyond its intended hook range.
- Korda Bait Floss (paid link) and a suitable Mainline wafter (paid link).
- Korda anti-tangle sleeve (paid link) and compatible Korda size-8 quick-change swivel (paid link) where approved for your complete lead system.
- Korda Dark Matter putty (paid link) only where the actual bait-balance or pinning check requires it.
Tools
RazorBlades scissors (paid link), Korda Strippa (paid link), a suitable baiting needle (paid link), a pair of Pulla tools (paid link) and a container of water. The matched-kicker version avoids the shrink-tube heating stage.
Amazon links are affiliate links; we may earn a commission from qualifying purchases. Check the exact hook, strength and component size before buying.
You don't need a hair stop for the floss-mounted wafter, a separate hook bead to trap the swivel on the shank or a spinner swivel at the hook eye. A bait screw is another attachment option in some Slip-D rigs, but this guide specifies the micro swivel and floss version. Buy the components for one understood rig rather than all the alternatives.
Check the small parts before tying
The doubled braid needs to pass through the hook eye without damage. Inspect the eye for rough edges and check that the actual ring on the bait swivel can travel along two strands without pinching them. If the attachment drags or the material bunches up, stop and review the component size rather than assuming that tension will solve the problem.
Fit the kicker to a spare example of the intended hook if you need to confirm its size. It should not split, float loosely over the eye or obstruct the gape. A larger hook may need a different kicker, while a thicker wire pattern can fit differently from another hook bearing the same numerical size.
Our hook-size guide explains why those labels are only a starting point. Fishery rules also come first: if the linked product page defaults to a micro-barbed variant on a barbless-only water, that is the wrong purchase even if the product name otherwise matches the rig.
How to tie the Slip-D: sequence and checkpoints
Korda's Slip-D tutorial provides the visual assembly sequence. Its shrink-tube option and bait-screw option differ from the purpose-made kicker and micro swivel chosen here, so identify those substitutions before starting. The loop route and securing knot must remain a demonstrated construction.
- Prepare the material. Cut sufficient N-Trap for the finished hooklink and knots, then strip the hook-end portion without damaging its fibres.
- Form the doubled section. Fold the supple braid and pass the fold through the hook eye from the point side towards the back.
- Add the attachment. Slide the micro ring swivel onto the projecting braid loop.
- Locate the loop on the hook. Pass it over the hook point and around the bend in the demonstrated route, with a strand on each side.
- Set the D. Draw the two ends carefully to position the attachment behind the shank, then secure the construction with the demonstrated knotless knot.
- Cover the eye correctly. Seat the matched kicker over the connection, leaving a short supple section outside it.
- Finish the lead end. Fit the sleeve before tying the approved loop or knot for your compatible swivel.
- Bait and test. Attach the wafter with floss, check movement and security, then water-test the complete rig and separately test the lead arrangement.
There are three useful pauses within that sequence. Before securing the knot, inspect whether the loop is following the demonstrated route rather than crossing the point. Before fitting the kicker, inspect and test the uncovered knot. Before mounting the bait, move the micro swivel through its intended range so that a basic obstruction is not hidden by a large wafter.
A slightly longer working piece of braid is easier to handle than one cut to the exact imagined finished length. Don't compromise the knot because you have left too little tag to work with. Conversely, don't leave a long loose end beside the D after finishing: follow the demonstrated trimming allowance and inspect the knot again.
Pull-test with suitable tools and controlled pressure, keeping the point away from skin. Check the lead-end connection separately from the hook knot. A successful pull on one part doesn't establish that another knot is secure, and the rubber cover must not be treated as the part holding the hook together.
How big should the flexible D be?
Begin with the proportions in the complete manufacturer demonstration for the chosen hook. The D needs room for the micro swivel to move, but not so much loose material that the bait attachment routinely catches around the point. Because the braid is flexible, measuring an empty loop while holding it taut doesn't tell you everything about its baited position.
Fit the actual wafter before deciding whether the result is sensible. Gently move the bait backwards and let it return. Watch both strands of the D and the hook point. If the loop pulls into a position it cannot recover from without being picked apart, remake or adjust the construction before casting.
Don't compare the diagram's enlarged D directly with a ruler beside your hook. Its purpose is to identify parts. The real proportions depend on the hook, the attachment and the complete tying sequence. Copying the shape of an illustration while ignoring the demonstrated assembly is an easy way to create a rig that looks familiar but behaves differently.
Mount the bait and check its movement
The micro swivel carries the bait through a floss attachment. Use a needle suitable for the hookbait rather than forcing a fine needle into a hard, dry bait. Secure the floss in the manner demonstrated for the selected bait and inspect the hole for splitting. The bait should not be able to slide away from its retaining attachment during a controlled check.
Keep spare floss ends from wrapping around the D or the point. A large knot of floss jammed beside the ring defeats the reason for using a moving attachment. After mounting, turn the bait gently and move the swivel along the loop while looking for any place where the connection binds.
There must still be useful clearance around the hook. Choosing a very large hookbait and then hiding the hook beneath it doesn't necessarily create a better disguised presentation. If the bait repeatedly fouls the point during handling or testing, change the bait-to-hook combination rather than accepting the tangle as normal.
The wafter balance test
A wafter is not a standardised weightless object. It supplies some buoyancy, but the real result depends on its size and condition, the hook, swivel, floss and wet braid. Lower the baited rig into a clear container with enough slack to settle, then watch which components come to rest and whether the hook remains accessible.
If the bait pulls the hook upright or lifts more of the hooklink than intended, change or carefully trim the bait and test again. Avoid solving every imbalance with a heavy blob of putty beside the hook; that can stop movement or change the presentation in another way. Putty is useful only when you can identify the part of the rig you want it to pin or counterbalance.
Try several lift-and-settle movements. This can expose a loop that folds around the point or a floss attachment that catches when the bait turns. Repeat the check after soaking a sample when practical, particularly with a bait you have not used before. An initial dry-tackle test cannot account for every later change in the hookbait.
A pop-up Slip-D is a different balancing exercise. It requires a properly buoyant bait, sufficient counterweight in the intended position and a complete tested presentation. Don't replace the wafter with a bright pop-up and cast the otherwise unchanged rig. If your goal is a raised bait and you're still learning, compare the complete spinner rig instead.
Complete the rig with a safe lead arrangement
Lead-clip example
Use a Korda Lead Clip Action Pack (paid link) with its matched parts, a suitable swivel lead (paid link) and appropriate main line (paid link). The lead weight and total cast weight must suit the rod. Check the actual pack contents and whether a proposed quick-change swivel is approved for the specific clip.
The Slip-D is the hook-end construction, not a complete main-line safety system. Follow our safe lead-system guide and the maker's explanation of lead arrangements when putting the complete tackle together. A leader is optional and may be restricted by the fishery.
Check whether the lead can release as designed and whether a fish can escape the remaining tackle after a main-line break. Those are separate tests. Don't over-tighten a tail rubber, glue a connection or add a stop that obstructs the escape route. If any part is unfamiliar, get the assembled arrangement checked before fishing rather than relying on the hook-end illustration.
Casting and preventing avoidable tangles
The Slip-D contains supple material near the hook, so casting control still matters. Start at a manageable range, with clear space around the hookbait and lead. Watch how the rig travels and how it lands. A controlled extension of the hooklink is preferable to a collapsed cast in which bait and lead fall together.
Check that the anti-tangle sleeve covers the intended lead-end connection rather than merely sitting nearby. If it is incompatible with the swivel or pushes the loop off its seat, change the parts. More force is not a substitute for a matched connection.
If you repeatedly retrieve tangles, check the amount of stripped braid, D size, bait attachment and casting technique systematically. Change one factor at a time and record the result. Our tangle troubleshooting guide also explains why a tangle on retrieval doesn't conclusively show whether it formed during the cast, on the bottom or while winding in.
Checks after a fish or a difficult retrieve
Look at the uncovered hooklink for frayed fibres and at the coated section for cuts or crushed areas. Examine the D where the small ring contacts the braid. A damaged loop is not repaired by replacing the hookbait or pushing the kicker back over the eye.
Check the hook point without using your skin as a testing surface, and inspect whether the kicker has split or shifted. Then repeat the bait-movement check. If the D now behaves differently from the rig you tested at the start of the session, find the cause or remake it.
Store prepared hooklinks without stretching or tangling the D around neighbouring hooks. Keep sharp points secured and avoid crushing the hook-end assembly under tackle-box lids. A labelled example showing the hook and bait combination is more useful than a collection of rigs whose components you can no longer identify.
Slip-D troubleshooting table
| What happens | Likely check | What to change |
|---|---|---|
| D will not move freely | Loop route, doubled braid and ring clearance | Remake with a demonstrated, correctly sized combination |
| Bait attachment catches the point | D proportions, bait size and floss ends | Correct the fouling part and test again |
| Kicker slides or splits | Hook-eye and kicker sizing | Use the appropriate matched part |
| Braid frays at the eye | Rough eye, excessive crowding or damaged fibres | Discard the affected rig and inspect the hook |
| Wafter lifts the whole hook | Buoyancy against the actual wet rig | Change or trim bait; don't assume its label guarantees balance |
| Coating has been stripped too far | Remaining control along the hooklink | Retie to the intended rig rather than guessing |
| Lead connection fails a pull test | Knot, sleeve and swivel compatibility | Remake and retest before fishing |
Slip-D questions
Does the Slip-D need a hook bead?
Not in this rig. The bait swivel is carried on the braided D, not trapped between the eye and a bead on the bare shank. Adding a bead without a defined purpose can obstruct the assembly.
Can I use a bait screw instead of floss?
Some manufacturer rigs do use a bait-screw swivel. That changes the bait attachment and its weight, so check the actual screw, bait security and balance. This guide's shopping list and diagram intentionally use one consistent micro-swivel-and-floss version.
Can I use an ordinary uncoated braid?
Don't treat a material substitution as identical. An entirely supple hooklink changes handling and casting behaviour. Learn the specified coated-braid arrangement first, then follow a complete demonstrated uncoated version if there is a reason to choose one.
Is the hook replaceable like a multi rig?
Not by assuming the same loop mechanics. The Slip-D here is secured with a knotless knot. A changeable-hook multi rig is a separate construction with its own material route and checks.
Do I need to steam the kicker?
The purpose-made kicker is selected to avoid the shrink-tube shaping stage. Follow its own instructions. Don't heat rubber over a load-bearing connection with a naked flame, and don't copy shrink-tube treatment onto a different component.
Is this a better beginner rig than a simple hair?
It is a useful next rig when you can explain why you want the flexible D and can tie it consistently. For a first clean-bottom session, an ordinary hair rig has fewer opportunities for assembly mistakes. More parts are not a substitute for confidence in the basics.
Before the rig goes in the water
Check the hook, knots and doubled-braid route, then make sure the bait attachment moves freely and the wafter is secure and balanced. Test the lead system separately and check the venue rules. Have the net, mat and unhooking tools ready before choosing a clear spot where you can present the rig and control a fish safely.
Check the manufacturer demonstrations below when practising the tying sequence. The illustration is original component anatomy; use the linked manufacturer sequence for the actual loop and knot. A rig worth learning is one you can inspect and reproduce, not just recognise by name.