The grinner knot, also known as the uni, is a useful way to attach suitable line to a closed eye. For this tutorial we'll use five turns in monofilament and practise on a swivel. Take it slowly at first: being able to see how the loose knot forms makes it much easier to spot a mistake before tightening it.
This guide teaches a five-turn, single grinner in suitable monofilament. You may also know the knot as the uni. It is not the double grinner used to join two lines, and five turns is not a blanket recommendation for every braid, fluorocarbon or stiff hooklink material. Practise with the mono setup shown here, then check the maker's advice before changing materials.
The grinner route in four stages
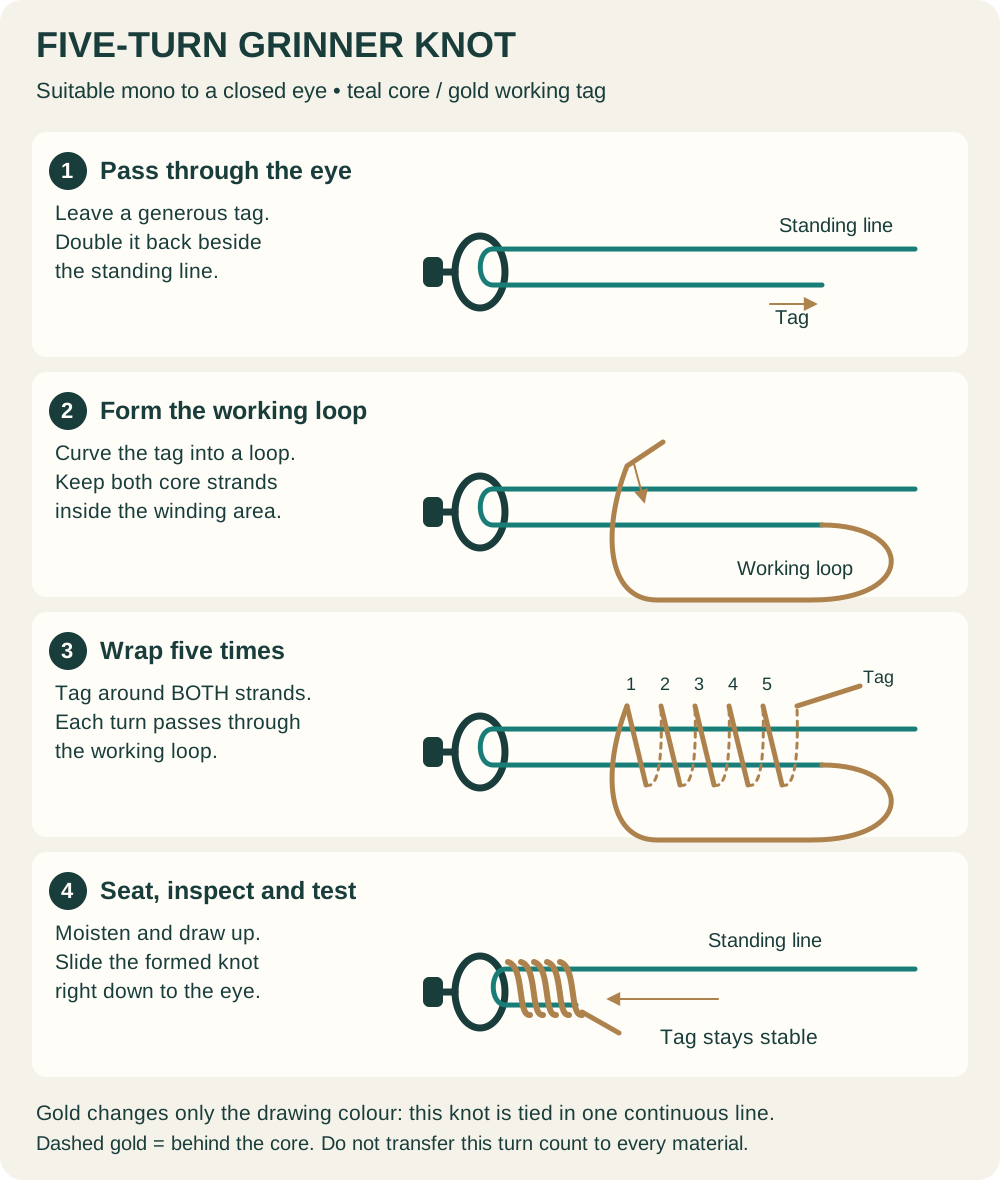
The standing line is the long part leading back towards the reel or hooklink. The tag end is the free end you pass through the eye. After it doubles back, you form a working loop beside the standing line. The tag makes its turns inside that loop around the two strands running through it.
That last detail separates the grinner from a vague instruction to twist the line several times. The wraps must enclose the correct pair of strands. Don't rotate the swivel and hope a recognisable knot appears, or wrap only the standing line while ignoring the intended loop.
The diagram keeps the turns spread apart so their route is visible. The finished knot will be much smaller. Learn the structure while it is open; judging only the final compressed shape makes it easier to miss an incorrectly routed turn.
When this connection is a sensible choice
Korda recommends the five-turn grinner for suitable mono-to-component connections in its monofilament main-line guide. This tutorial focuses on that everyday role: a single length of mono terminating at a smooth, closed eye.
The main advantage for learning is that the steps have visible checkpoints. You can inspect the eye pass, working loop and five turns before committing to tightening. You can then watch the formed knot seat against the attachment instead of concealing it immediately beneath a sleeve.
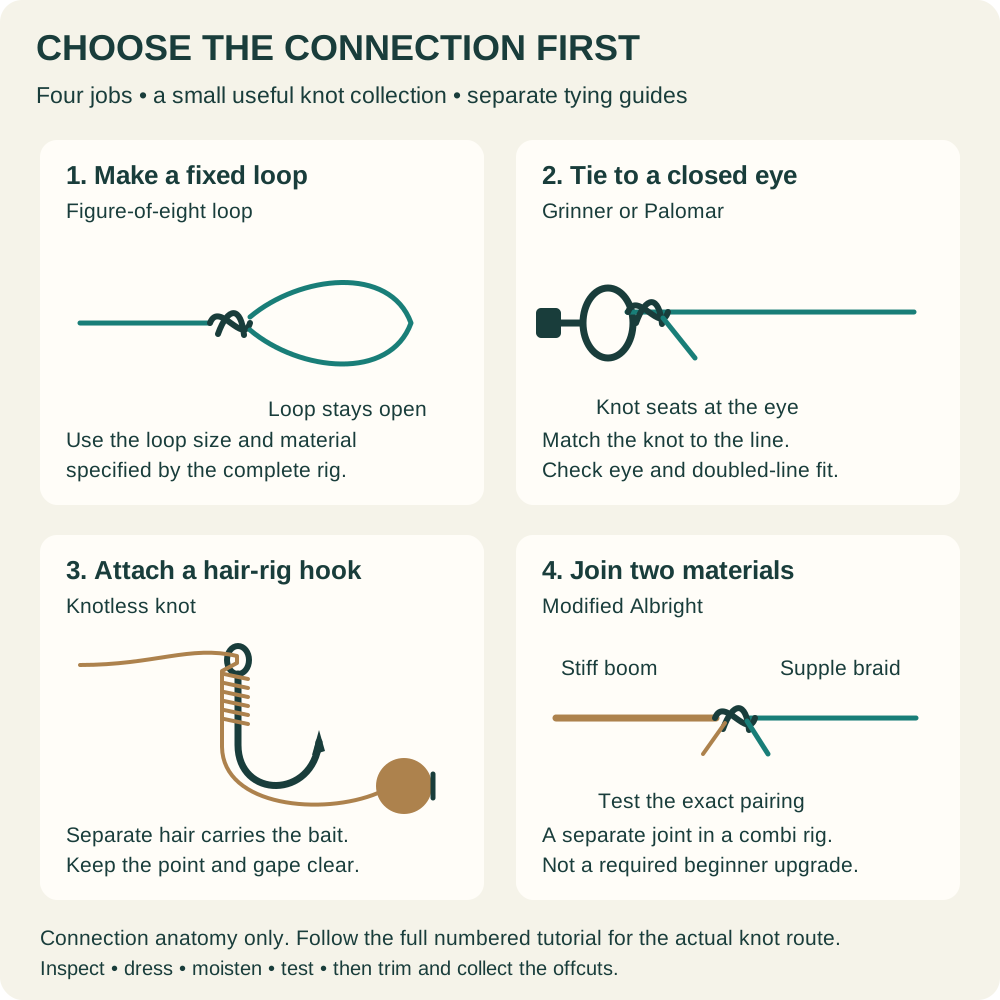
If you need a fixed loop remaining at the end of the line, use the figure-of-eight loop guide where the material permits it. Leaving a partly tightened grinner away from the eye is not the fixed-loop construction taught here. If you need a stiff-to-supple material joint, use the separate Albright tutorial.
A grinner is not a replacement for the hook connection on every carp rig. The basic hair rig has a different bait-carrying arrangement. Decide how the complete presentation works before substituting a familiar eye knot at its hook.
Choose and inspect the eye first
Use a smooth closed eye that is intended to take the line. Look closely for burrs, corrosion, rough edges, an open gap or old line caught against the metal. Discard a suspect component rather than trying to compensate with a different knot.
On a quick-change swivel, distinguish its closed eye from the open hook-shaped fitting. This guide ties to the closed eye. The open fitting receives the hooklink in the way its manufacturer specifies, normally with an appropriate retaining sleeve. The two ends are not interchangeable simply because both look like places to attach line.
Also consider assembly order. If the lead system requires tubing, a tail rubber or another component on the line before the knot is tied, put those parts on in the correct order first. Avoid learning the knot perfectly only to discover that the next component cannot pass over it.
Components and practice tools
- A fresh piece of suitable mono, such as Korda SUBline main line (paid link), selected for the whole fishing setup.
- A smooth closed eye; the closed end of a Korda size-8 quick-change swivel (paid link) is one example when that swivel matches the lead system.
- Korda Razorblades scissors (paid link) for a clean finish.
- Korda Pulla tools (paid link) for appropriate controlled testing points.
You don't need a hook or a lead to learn the movement. Practise with spare line and a suitable closed ring or swivel. Water for lubrication, a contrasting work surface and a container for offcuts make the session easier and tidier.
Amazon links are affiliate links; we may earn a commission from qualifying purchases. Choose the exact material and component size for the system you're assembling.
How to tie a five-turn grinner knot
- Pass through the eye. Feed the tag through once, leaving a generous working length, and lay it back alongside the standing line.
- Form the working loop. Curve the tag back to make a loop beside the doubled section. Hold the crossing so that the opening remains visible.
- Make five complete turns. Take the tag around both core strands and through the working loop five times. Keep the turns orderly rather than piling them on one spot.
- Draw the turns together. Lubricate and ease the tag so the working loop closes into a neat coil. Keep the standing line controlled.
- Seat the knot. Draw the formed knot down to the eye using steady tension on the standing line, checking that it travels and settles cleanly.
- Finish the inspection. Bed the knot securely, test along the intended load path, then trim the tag only after it remains stable.
The five-turn routing is independently demonstrated in Animated Knots' uni tutorial. Gardner's grinner demonstration provides another fishing reference. Where your line manufacturer specifies a different knot or turn count, use its complete instructions rather than mixing versions.
It helps to count aloud while practising. Count a turn only once the tag has gone all the way around the core and returned through the working opening. If you lose your place, open the loose wraps and restart. Guessing whether you made four or six is a poor way to learn a specified five-turn version.
Keep enough tag to control the knot
An excessively short tag makes each pass awkward and encourages pulling on the wrong strand. Leave comfortable working material while learning. You can reduce waste once the movements are repeatable; saving a tiny offcut is not worth making the knot difficult to inspect.
Don't cut the tag before the knot is seated and tested. It is a useful indicator of movement. If the tag disappears into the turns during what should be a final test, the connection needs attention, not a tidier cut.
After testing, leave the finish appropriate to the material and rig. Don't advertise a single tiny tag length as correct for every diameter. Collect the offcut immediately, and make sure the cutting tool has not nicked the standing line beside it.
Separate forming, seating and testing
There are three useful moments in completing this knot. First the loose wraps form a controlled coil. Then that coil reaches its intended position at the eye. Finally the completed connection is tested. Trying to do everything with one hard pull makes it difficult to see where a fault occurred.
Lubrication and progressive tension help the turns move into place. Watch the line immediately above the knot as well as the knot itself. A curl, damaged surface or severe kink after tightening is a reason to cut back and start again, not something a sleeve should hide.
The knot should not remain suspended above the eye on a loose loop in this direct-attachment version. Before trimming, gently move the swivel and check where the load bears. If the connection changes shape as soon as you pick it up, go back to inspection and proper bedding.
A very tight-looking bundle is not automatically a correct grinner. Wrongly routed coils can compress too. The strongest practical check is a consistent tying sequence followed by a visible inspection and a controlled load test, not appearance alone.
Testing without putting a hook in your hand
Use a smooth, suitable tool through the swivel eye or other intended test point. Apply controlled tension along the line while keeping sharp tackle clear of your hands and face. For practice there should be no hook attached at all.
Don't wind fine line around bare fingers and jerk it tight. Don't use your teeth to grip the tag. The object is to find obvious slipping or damage under controlled conditions, not to create an improvised breaking-strain test with your hands as the fixture.
Watch the tag, then release tension and inspect again. Check that the eye has not cut or pinched the line and that the coils remain compact. If the same eye damages repeated fresh knots, replace or examine that component before blaming the line.
After the knot passes, finish assembling the complete lead system and check its safety behaviour separately. A knot test answers whether this connection appears sound. It doesn't answer whether a lead will release or whether a bead can pass the required obstruction after a break.
Five turns doesn't mean one rig for every material
Two lines bearing the same breaking-strain label can differ in diameter, stiffness and surface. A mono tutorial therefore should not be presented as a universal braid tutorial. Smooth braid may require a different approved construction, while a thick specialist filament may have another recommended termination entirely.
Coated braid creates another question: should its coating remain at this particular knot or be removed? Answer that from the complete rig and material guidance, not by stripping random sections because it makes tying easier. Damage to the underlying fibres is not cured by retaining the outside coating.
If you move to a new material, practise fresh examples and inspect the results before fishing. Keep its packaging or a clear note of the specification. An anonymous offcut from the bottom of a tackle box is a poor basis for deciding whether a knot is suitable.
Grinner knot troubleshooting
Example: a knot that looks sound but moves at the eye
You have made five tidy turns and trimmed the tag, but lifting the swivel reveals a small loop between the coil and the eye. In this version, that is an incomplete seating problem, not a feature to preserve. On the next practice piece, leave the tag intact and watch the formed coil travel to the eye before applying the final test.
If seating takes excessive force or damages the line, stop and inspect the whole process. Check that the turns wrap the correct core strands, that lubrication was applied before friction increased and that the mono diameter suits the eye. Don't solve the visible loop by hiding it under tubing. A short sequence of repeatable observations is more informative than pulling harder at every attempt.
| Problem | Likely check | Action |
|---|---|---|
| Turns bunch unevenly | Tag route and crossed wraps | Retie with a larger working loop |
| Knot sits above the eye | Incomplete seating | Seat progressively; retie if damaged |
| Tag keeps moving | Routing, bedding and material match | Reject the connection and start again |
| Line curls or whitens near knot | Damage during tightening | Cut beyond the affected section |
| Repeated failure at one swivel | Rough or defective eye | Replace the component |
| Sleeve cannot cover the connection | Wrong component order or fit | Rebuild the specified system |
Grinner knot questions
Is a grinner the same as a uni knot?
The names are commonly used for this knot family. Read the demonstrated construction, because a single terminal connection and a double-line joining version do different jobs even when their names overlap.
Can I add more turns for extra strength?
Don't assume more is better. More turns can also make bedding difficult. Follow the complete rig appropriate to the material, then inspect and test it. This page intentionally teaches one five-turn mono version.
Can I leave it as a loop?
Not for the direct eye connection taught here. Seat the knot against the attachment. Where a fixed loop is required, learn the appropriate loop construction and material guidance instead of stopping partway through this sequence.
Why does it fail when the line looks new?
Check routing, a rough eye, crossed turns, old damage at the cut end and friction during tightening. Appearance alone doesn't establish a cause. Inspect a freshly tied example step by step rather than repeatedly pulling harder.
Should I retie after a snag?
Inspect the entire affected section and retie if there is damage or uncertainty. A severe pull can affect more than the knot. Cut back past abrasion and check the eye before making the new connection.
Where to go next
Practise until you can form, seat and test three consistent knots without changing the material or eye. Then learn the whole lead arrangement around that connection. A sound knot is one part of a safe, correctly assembled setup.
The essential carp fishing knots guide compares the other connection jobs. For the hook end, the illustrated beginner rig guide helps you choose a presentation before buying or tying additional components.
When you try a different mono diameter, practise on the same smooth eye for the first few knots. That makes it easier to see what the line has changed. Then test the actual fishing component. Keep the turn count consistent too; changing everything at once makes an awkward knot much harder to troubleshoot.