The Palomar knot uses doubled line and a complete pass of the attachment through the loop. Keep that route clear before dressing and tightening the knot. You double the line, form a loose knot and pass the loop over the whole attachment. We'll start with a small bare swivel so you can see the route clearly, then check that neither strand is crossed or trapped.
This guide starts with a small bare swivel so that the route is easy to follow. Learn it before adding a hook, lead or long completed rig. The knot is a connection method, not a complete carp presentation, and it should be used only where the line and tackle instructions allow it.
Palomar knot: where should the doubled line and attachment go?
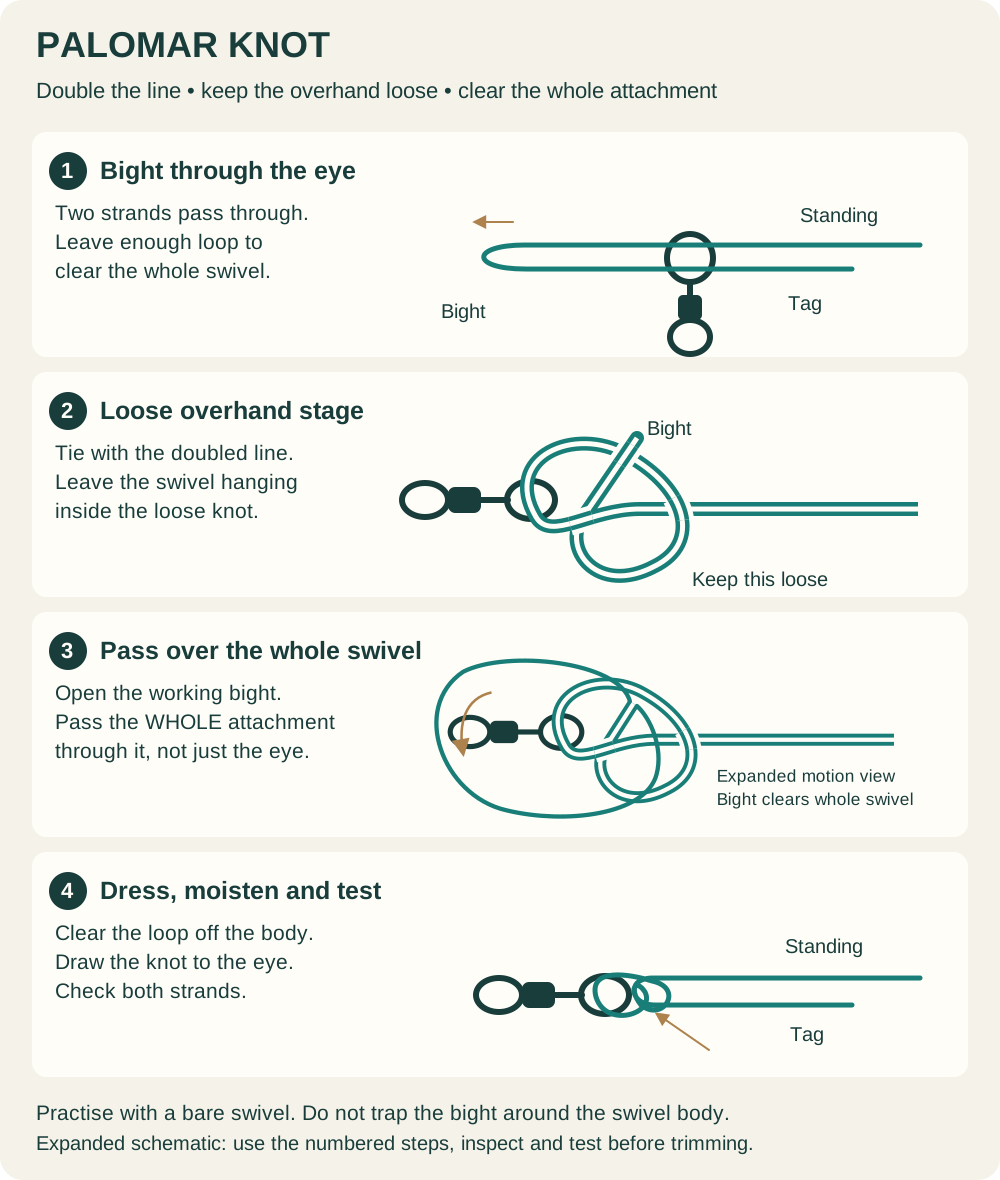
The long line leading away from the knot is the standing line. Its short free end is the tag. Fold that end back and the rounded fold becomes the bight. The bight passes through the attachment's eye and later over the entire attachment.
The temporary loose overhand knot is not the final connection on its own. It holds the developing structure while the bight makes that second journey. Don't tighten it first and then attempt to force the swivel through a tiny opening.
The eye should finish within the properly dressed connection, with the strands clear rather than one strand caught across the point of a hook or around the swivel body. The illustration uses generous spacing so those movements can be followed; it doesn't imply that a large loose loop should remain after finishing.
When the Palomar fits the job
Berkley's fishing-knot instructions give the doubled-line, overhand and complete-loop-pass sequence, and identify the Palomar as useful with braided fishing line. That is an application reference, not a guarantee for every specialist braid or every stiff material sold to carp anglers.
Check the line manufacturer's instructions first. Some materials have their own recommended knots or modified versions. A familiar name on an internet diagram is not a reason to ignore that guidance. If your existing mono setup specifies a grinner, you don't need to change it simply to use a different knot.
The Palomar is particularly straightforward to practise on a small bare attachment. It becomes less convenient when a large item or lengthy assembled rig must pass through the working bight. Plan the order of assembly rather than making an enormous loop and dragging hooks through loose line.
It is also worth distinguishing a direct hook attachment from a hair-rig construction. A Palomar doesn't automatically create the separate hair in our knotless-knot hair-rig guide. Follow the complete rig design instead of replacing its hook knot without considering bait position.
How to check doubled line fits a swivel eye
Two strands must fit through the eye without forcing or scraping them. If they do not, don't flatten the line with pliers or damage it to make the diagram possible. Choose an approved connection and compatible component for the actual material.
Look for a rough edge or incomplete closure at the eye. The line should bear on a smooth intended surface. A sharp gap can damage either strand regardless of how carefully the rest of the knot has been tied.
With a quick-change swivel, use its closed eye for the direct knot, not its open hook-shaped end. The other end has a separate connection and sleeve arrangement. On a hook, protect the point during practice and confirm that this knot is appropriate to the specific hook and presentation before fishing it.
Simple practice kit
- The line specified for your actual connection. Korda Super Natural braid (paid link) is a supple hooklink material example, not a recommendation to replace your reel's main line with hooklink braid.
- A smooth closed eye, such as the closed end of a compatible Korda quick-change swivel (paid link).
- Korda Razorblades scissors (paid link) for cutting the tag cleanly.
- Korda Pulla tools (paid link) for suitable controlled testing points.
Use your existing suitable tackle where possible. You don't need to buy a hook, lead pack or bait to practise a terminal knot. A clear work area, spare line and a small offcut container are enough to start.
Amazon links are affiliate links; we may earn a commission from qualifying purchases. Check the selected material and follow its knot instructions.
How to tie the Palomar knot
- Make a working bight. Double enough line to pass the whole attachment through the loop later. Keep a usable tag.
- Pass the bight through the eye. Keep the doubled strands orderly and leave the attachment hanging below them.
- Form a loose overhand knot. Work with the doubled line, allowing the attachment to hang within the developing knot. Don't pull it tight.
- Pass the bight over everything attached. Move the working loop over the entire swivel or hook, not merely through the eye again.
- Dress and lubricate. Bring the loop clear above the eye, remove unwanted crossings and moisten the connection.
- Draw down and test. Take up slack progressively with both standing line and tag controlled, inspect, then test before trimming.
Keep this sequence together. If the overhand stage has already tightened before the attachment passes through, undo the loose attempt or retie with fresh line. Don't try to produce the same finish by poking the tag through a convenient opening after the structure has closed.
The large working loop can be reduced as slack is taken up, but avoid pulling one strand so aggressively that it slices across its partner. Watch where the line moves. The final knot should seat at the eye rather than leaving an unexplained loop around the body of the swivel.
Does the whole swivel go through a Palomar loop?
This is the step most worth isolating during practice. Lay the bare swivel below the loose knot, open the bight and pass the entire swivel through it. Afterward, you should not have one part of the swivel outside the loop and another part trapped inside.
With a hook, the loop must clear the whole hook, including the bend and point. That's why the first practice attempts should use a harmless closed ring or bare swivel instead. A hook snagged in one strand can create a misleading shape and an avoidable injury.
With a completed lead system, the task can become awkward. If the manufacturer allows the Palomar at a bare component, tying that connection before completing the system may be more manageable. However, components that must already be threaded onto the line still need to be installed in the correct order.
Don't force an impractical assembly into a knot demonstration. Choose a permitted alternative terminal knot when the attachment cannot be passed through cleanly. The best choice is one you can assemble and inspect reliably with the actual tackle, not just with a drawing.
How to keep the strands from crossing in a Palomar knot
At the eye and through the loose knot, inspect for one strand laid awkwardly over the other. The doubled-line idea is easy to recognise, but it doesn't excuse uncontrolled crossings. Arrange the strands before the final tightening makes them difficult to move.
Pay attention to a twist introduced while threading the bight. It can travel into the overhand stage unnoticed. If the working shape looks different each time, slow down and preserve the orientation of the bight as it moves through the eye and over the attachment.
Use enough line that you can hold the parts without pinching the actual knot into a tiny bundle. Fine braid can become hard to distinguish against dark clothing; a pale work surface helps. Conversely, clear mono may show better against a dark background.
If you discover a trapped or damaged strand after tightening, cut the knot off. Don't scrape it open with a hook point and then trust the disturbed line. The purpose of practice is to make the route repeatable, not to salvage every short length used.
What a useful pull test checks
Test after the knot has been dressed and fully seated, while the tag is still long enough to observe. Apply controlled tension using an appropriate smooth testing arrangement, with any hook point clear of your hands and face.
Look for continued tag movement, a loop that changes position, damage at the eye or a knot that rolls into a different shape. Those are reasons to stop and retie. A connection doesn't have to break during the test to reveal that it is unsuitable.
Don't use fine braid as a cord wrapped around bare fingers. Avoid sharp or rough makeshift pullers, and don't bite the line. A controlled check is intended to reveal assembly faults; it doesn't give a defensible percentage of the material's rated strength.
Once the test passes, trim carefully without nicking the standing strand. Keep the tag finish appropriate to the material rather than cutting blindly flush. If you cover the connection with a sleeve afterward, inspect first and confirm the sleeve has not disturbed the attachment.
Common Palomar mistakes
A useful practice comparison
Try the route first with a small bare swivel, then consider the same eye after a sleeve and long hooklink have been added to its other end. The knot itself has not changed, but the object that must pass through the working bight has. That explains why assembly order matters even when two finished connections look identical.
Don't attach a hook simply to prove you can make the second exercise harder. Instead, map the actual system before tying: identify components that must go on the line first and components that can be added later. If there's no sensible order that preserves the specified setup, select another approved eye knot. Ease of assembly is useful only when the completed arrangement remains correct.
| Problem | Check | Correction |
|---|---|---|
| Attachment will not pass through | Working bight too small or setup too bulky | Retie at a suitable assembly stage or choose an approved alternative |
| Loop remains around swivel body | Incomplete attachment pass or poor dressing | Retie and clear the whole attachment |
| Doubled strands twist at eye | Orientation during threading and tightening | Keep strands orderly before bedding |
| Line is scraped at eye | Eye size, roughness and forced doubled fit | Replace the damaged line and unsuitable component |
| Tag creeps after bedding | Routing, finish and material suitability | Reject the connection and review the full rig |
| Hook catches a strand | Working loop did not clear the point | Retie; practise first with a bare swivel |
Choose by material, not by reputation
Claims that one knot is always the strongest are not helpful without the line, diameter, attachment and test method. This guide deliberately provides no breaking-strain percentage. Good construction is necessary, but it doesn't make the behaviour of every material identical.
If changing from mono to braid, or from supple braid to a stiff hooklink, revisit the instructions instead of relying on muscle memory. The difficulty of getting two strands through an eye is itself a useful signal that you need to check the pairing.
For a two-material combi rig, the material joint is a separate task from tying one material to an eye. Don't attempt to turn a Palomar into a joining knot by treating the other line as an improvised attachment. Follow the appropriate joining construction.
Palomar knot questions
Is a Palomar only for braid?
It is widely associated with braid, but the useful decision is whether your exact material and connection support it. Follow the line maker's instructions rather than using a broad label as the only compatibility check.
Can I use it on a hook?
Where the hook, material and intended presentation permit that connection, yes. Practise on a smooth ring or swivel first. A direct hook knot doesn't by itself create a hair, bait attachment or safe complete rig.
Do I tighten the overhand knot first?
No. Keep that stage loose until the working bight has passed over the complete attachment. Tightening early prevents the intended sequence from being completed cleanly.
Can I tie it without passing the whole attachment through?
Not using the Palomar sequence taught here. That pass is part of the construction. Choose another approved knot if the real assembly makes it impractical.
What should I do after a hard pull or snag?
Inspect the line, eye and knot, and replace anything damaged or uncertain. A knot that passed inspection before casting may have been affected afterward. Cut back beyond damaged material before retying.
The final check
You should be able to explain where the doubled line passed, where the complete attachment passed and where the finished knot now bears. The strands should be orderly, the tag stable and the material undamaged. If any of those points is unclear, retie before fishing.
Return to the carp fishing knots hub to compare connection jobs, or use the beginner rigs guide to see how a hooklink fits the wider presentation. Always check the complete lead system separately; a secure terminal knot is not proof of safe release behaviour.
Make a note of the working loop size that passed comfortably over your attachment. A bare swivel needs less room than some larger parts, so check again when you change components. It helps you leave enough line on the next attempt and avoid tightening too soon. The note is a tying aid, not a measurement of knot strength.