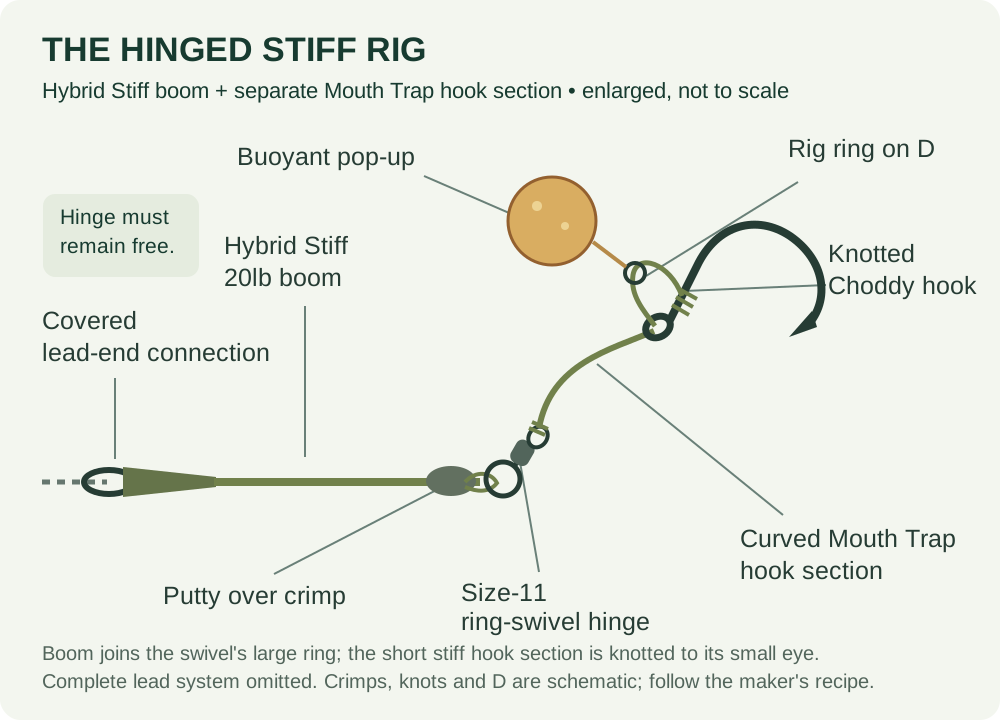
A combi rig gives you a stiff boom with a short, supple section at the hook. The boom helps separate the hookbait from the lead, while the softer end lets it move. We'll tie a two-material version for a sinking boilie, paying particular attention to the join. That extra connection needs to be as dependable as the rest of the rig.
This guide covers a two-material, hair-ended combi for a sinking boilie. It explains the parts, the assembly order, how to assess the joint and what changes in a combi-multi. Check that the two materials can be joined securely; not every stiff line and braid will work together. If you can't yet produce a dependable basic hair rig, that is the better first project; stripping part of a suitable coated braid already gives you a simpler stiff-and-supple arrangement.
Combi rig anatomy: identify the actual change
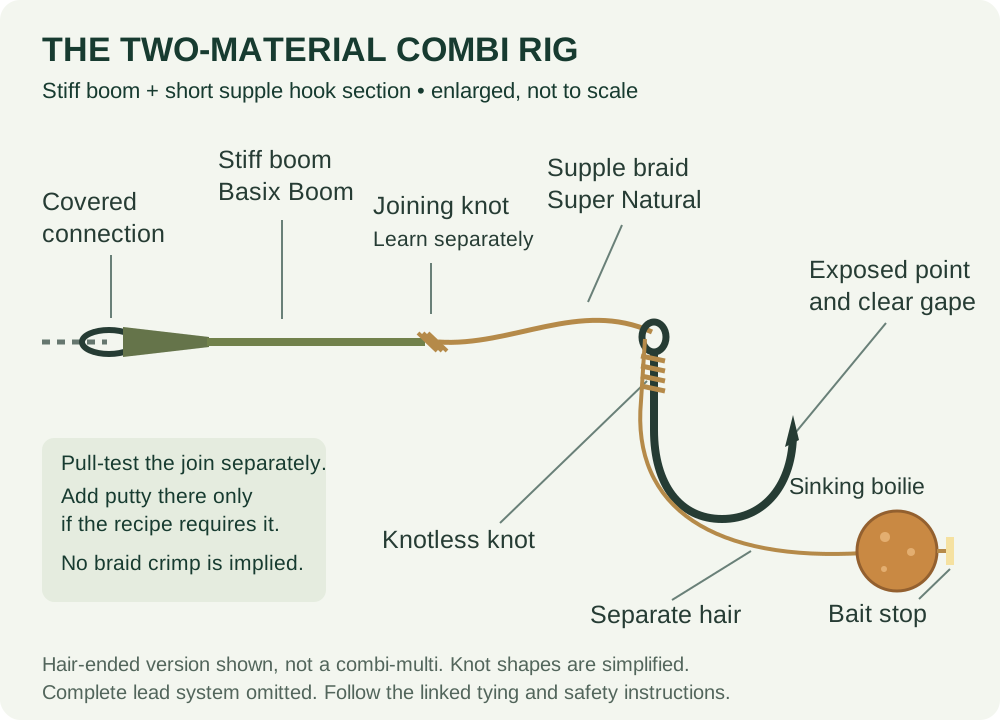
Read the diagram from left to right. The lead-end connection belongs to the complete lead system. The longer boom leads to the material junction. Beyond that junction, the braid supplies the short flexible hook section, the whipping at the hook and the separate bait-carrying hair. No spinner swivel is hidden at the hook eye.
Those distinctions are useful when reading a tackle list. “Combi” describes a combination of material properties, not one universal hookbait attachment. You can encounter combis with hairs, rings, bait swivels and changeable-hook loops. A product suitable for one doesn't automatically belong in all of them. This page deliberately starts with the familiar hair so that the material joint is the main new skill.
Two lengths deserve separate attention: the total hooklink and the supple section between the joining knot and hook. Changing the latter can change how much movement is available without substantially changing the total length. Record both when comparing rigs. Otherwise, two hooklinks that look the same beside a ruler may have quite different proportions.
When a two-material combi makes sense
A reasonable starting situation is a confirmed clean patch where a stiff boom can settle, with a sinking bait presented among similar feed. You should be able to explain why you want the boom before tying the rig: perhaps you're comparing how different materials behave during controlled casts or how the hooklink lies on a relatively even spot.
That doesn't mean that stiffer is always better. Put a stiff material across an obstruction and it may bridge it. The same property you wanted for separation can leave the hook end poorly positioned when the landing area is unsuitable. A supple tip doesn't make the entire boom follow every contour of the lakebed.
If you don't know what is on the bottom, spend time finding out before choosing a complicated connection. Repeated lead feel, retrieved debris and fishery advice are useful together, but none makes an unseen spot certain. Where weed or snags would prevent safe landing, the decision is to move or change the approach, not to ask a hooklink to solve a landing problem.
A combi is less attractive when your only reason for changing is that a simple hair rig has not produced a bite. Location, feeding activity, timing and presentation all matter. A quiet session is not a controlled test of the hooklink. First check whether the existing rig is intact, untangled and placed where carp are likely to feed.
For a compact solid PVA bag, a short supple hooklink is usually the more straightforward starting choice. Folding a long stiff boom into a small bag introduces a different problem. For a raised pop-up, consider the dedicated options in the beginner rigs guide rather than adding a buoyant bait to this sinking-bait rig.
Components for the hair-ended combi
Two materials, one familiar hair rig
- Korda Basix Boom (paid link) for the stiffer section.
- Korda Super Natural braid (paid link) for the supple hook section and hair.
- Korda Wide Gape X hook (paid link), in a permitted variant matched to the bait.
- Mainline sinking boilies (paid link) and Korda Hybrid Bait Stops (paid link).
- Korda Dark Matter putty (paid link) only where required at the joining knot by the chosen presentation.
- Korda anti-tangle sleeve (paid link) and a compatible size-8 quick-change swivel (paid link) for the lead-end finish.
Shared tools and complete lead arrangement
Use sharp braid scissors (paid link), a suitable baiting needle (paid link), a pair of Pulla tools (paid link) and water for presentation checks. Add suitable main line (paid link), a complete Lead Clip Action Pack (paid link) and a matched swivel lead (paid link) if choosing that permitted system. Confirm the actual swivel and clip combination before substituting any parts.
Amazon links are affiliate links; we may earn a commission from qualifying purchases. Check the selected strength and hook size, and follow the fishery rules before buying any barbed-hook option.
This is a knot-joined rig. The list doesn't imply that Super Natural braid can be crimped. Equally, an unfamiliar piece of metal is not made suitable simply because another rig uses a crimp at its boom end. A crimped-loop construction is a separate version requiring approved material, the correct crimp size and the matched tool.
Korda's Basix Boom specification is the material reference, while its Super Natural guide identifies the supple braid and its use in combi presentations. Don't infer identical behaviour from two spools simply sharing a breaking-strain number.
Learn the material joint before tying complete rigs
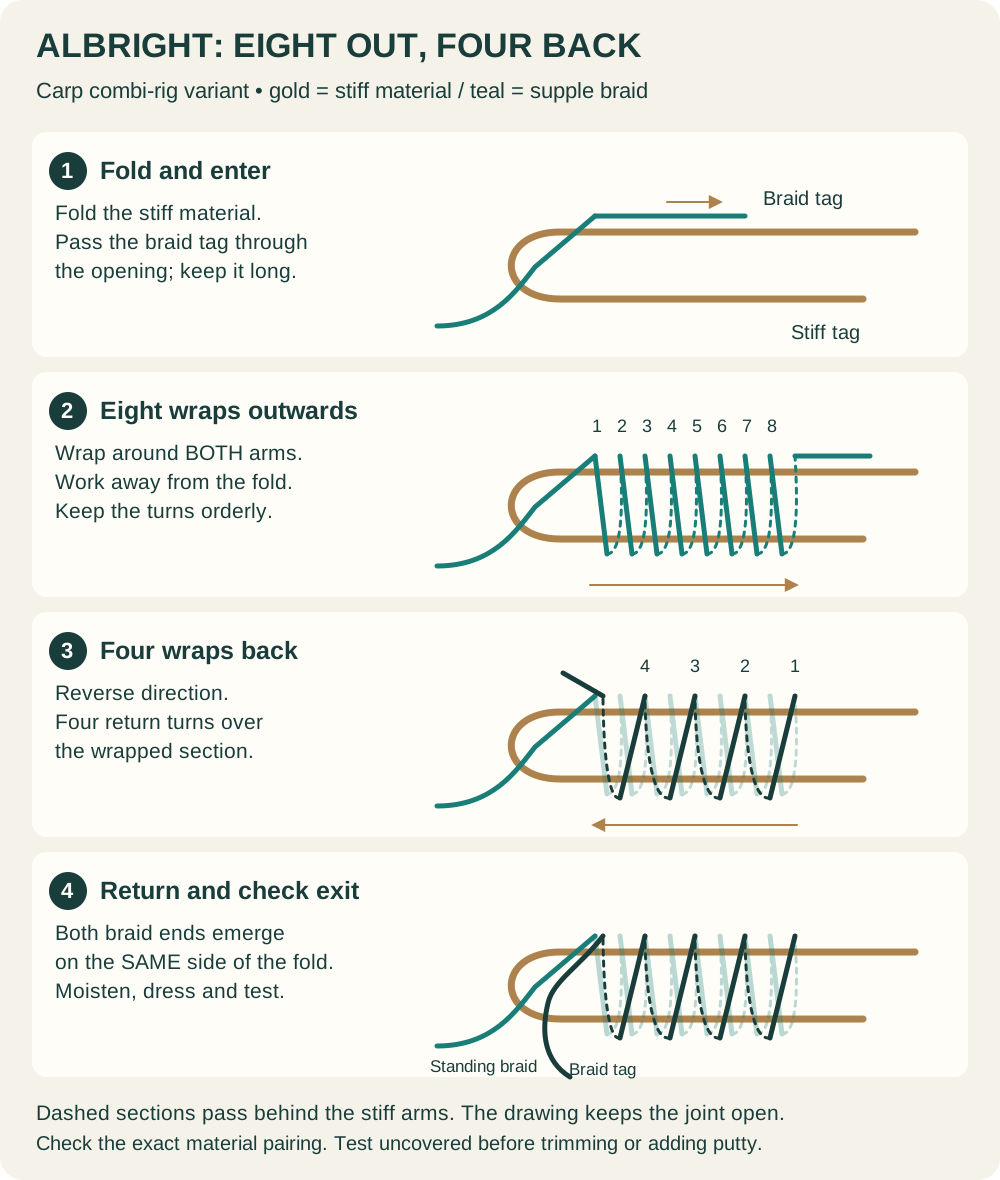
The joining knot is the skill to practise separately. Korda's combi-rig guide identifies the Albright approach and distinguishes a single-strand hair-ended connection from doubled-braid, changeable-hook arrangements. Use the single-strand construction appropriate to this rig rather than copying only the most convenient-looking part of a different version.
Practise on spare lengths before a hook is involved. That lets you concentrate on keeping the turns orderly, following the correct entry and exit route, tightening evenly and watching for movement under load. Use one complete manufacturer demonstration for the material pairing; don't combine a turn count from one version with the finishing route from another.
This page provides the assembly and checking sequence, not a new text-only Albright knot specification. Gardner's photographed Albright demonstration is another primary visual reference. The examples use their specified materials. If you can't follow the routing or make a repeatable joint in your chosen combination, obtain experienced help or use the simpler coated-braid alternative.
A compact knot is only useful if it is sound. Don't aim for the smallest possible junction by trimming tags prematurely, using too little working material or pulling so violently that the line overheats or damages itself. Tighten in a controlled way, with the point safely out of reach once a hook is fitted.
Putty is not a repair for a slipping knot. Inspect and test the uncovered joint first. If the turns cross badly, the braid frays, the stiff material kinks sharply at the joint or a tag creeps during testing, start again. The cost of those short offcuts is insignificant beside the reason you need a reliable connection.
Assembly order for a hair-ended combi rig
- Set up the hookbait first. Form a small loop in the supple braid, mount the actual sinking boilie and fit its stop. Keep ample spare braid for the hook and material junction.
- Set the hair beside the hook. Leave a practical gap between the bait and bend, with the point and gape unobstructed. Avoid setting a gap against an imaginary bait of a different size.
- Tie the familiar knotless knot. Follow the hair-rig sequence, retaining the hair behind the shank and checking the hooklink's final point-side exit.
- Join braid to boom. Use the separately learned, material-appropriate Albright construction. Allow for the supple section's finished length after the knot beds down.
- Test the junction before covering it. Check both the hook connection and the material join with controlled pressure, watching for tag movement or damaged fibres.
- Complete the boom's lead end. Add the sleeve before making the specified loop, or use the direct knotted connection required by the complete lead system.
- Check the actual presentation. Fit any rig-required putty, lower the baited rig into water and confirm that the boom can lie down while the hook end moves without wrapping itself.
The order gives you a useful quality-control point after each job. You should not reach the final water test still wondering whether the hair was the right length or whether the joining knot slipped. Deal with each uncertainty while it is easy to see and before another component covers it.
Make your first few rigs to the same intended dimensions. If one ends up with a much shorter supple tip because the joint moved during tightening, don't quietly redefine that as an experimental variation. Find out why the process changed. Consistency is a better early target than filling a rig wallet with many subtly different versions.
Choosing the supple-section length
There's no universal millimetre setting that suits every hook, bait and boom. The short flexible section needs to allow the movement intended by the rig, but excessive loose braid can create more opportunity to wrap around adjacent tackle. A very short section can also make the joint and hook interfere with one another.
With the bait attached, gently move it through a modest range while holding the lead-end connection steady. Observe where the braid bends, whether the joining knot bumps against the eye, and whether the hair can fold across the point. This is not a simulation of a carp's mouth. It is a simple way to identify obvious restrictions before casting.
Then lay the entire assembly in water. Check the junction as well as the hook. It is easy to admire a neatly sitting bait and miss that the boom is propped above the bottom by its lead-end angle. Conversely, a boom lying flat doesn't excuse a hookbait that masks the point.
If you alter the supple-section length, keep the remaining parts constant while checking the effect. Write down the result in plain terms: more clearance, less wrapping during a controlled test, or a joint that now gets too close to the hook. Those observations are more useful than deciding that a centimetre must be “more aggressive”.
Baits, putty and the difference between sinking and balanced
The simplest reference for this article is a sinking boilie. That doesn't mean the bait can be ignored once the hair is tied. Check the stop seats securely, the bait is not cracked by the needle and the hair remains separate from the point and gape. Recheck after a hard cast or when changing to a different bait size.
A wafter version needs its own balance check. Changing only the bait can change which parts of the hook section lift, how the supple section lies and whether putty is needed. Don't assume the boom's weight automatically balances everything at the far end of the braid.
Where a proven presentation calls for putty at the joining knot, inspect that knot before covering it and mould only what is required. Check that the putty is secure after handling and immersion. A loose lump that comes off during casting means the baited setup may no longer behave as you tested it.
For a true pop-up presentation, follow a complete appropriate rig. The distinction is not just how brightly the bait is coloured or what its tub says. The rig must support its intended bait position after soaking, while keeping the necessary connections and hook geometry free to work. Our Ronnie guide gives a separate low pop-up example.
What changes in a combi-multi?
A combi-multi changes the hook end as well as combining stiff and supple materials. Korda's combi-multi demonstration uses a doubled braid arrangement, a particular hook and kicker combination, and a bait attachment on the loop. The hook can be replaced without retying the whole boom.
That convenience is not a reason to remove the knotless knot from the diagram above and improvise a loop. The loop dimensions, braid, eye fit, kicker and bait swivel form a complete design. Learn that design together. The single-strand hair-ended shopping list on this page is not advertised as a complete combi-multi kit.
Nor is a combi-multi automatically the same as the coated-braid pop-up multi rig. They share a changeable-hook idea, but their hook sections, intended bait and supporting material can differ. A familiar name is useful for recognising relationships, not for skipping the component specification.
A reverse combi places the stiffness in a different part of the hooklink. Before trying one, decide whether your actual problem calls for that arrangement. A spot unsuitable for the stiff boom illustrated here might suggest another presentation entirely; turning the materials around without a demonstrated hook section is not a tested solution.
Lead systems and controlled casting checks
Choose a complete lead arrangement separately from the hooklink. A lead clip is one possible finish, not an inseparable part of the word “combi”. Follow the instructions for the actual kit and venue rules. If using a compatible quick-change swivel, cover its open connection with the intended sleeve; otherwise use the system's supplied connection.
Test the whole escape path after a main-line break. A lead releasing is not the only question: no remaining bead, sleeve, knot or leader should defeat the designed release behaviour. The safe lead systems guide separates those checks. Don't add a stop or glue a fitting because it seems to make casting tidier.
Begin casting checks at a manageable distance, with the area clear and the actual bait fitted. Inspect after retrieval rather than relying on the promise of a stiff boom. If the hair repeatedly catches the hook, look at bait spacing and the supple tip. If the whole rig wraps the lead, investigate the full arrangement and casting control.
Don't draw too much from one retrieve. The rig can change position during casting, settling and retrieval. If a problem repeats, change one variable and compare. Our tangle troubleshooting guide provides a practical sequence that is more useful than buying another small sleeve at random.
Combi rig troubleshooting
| Problem | Useful inspection | Next decision |
|---|---|---|
| Joining knot creeps | Routing, tightening, material pairing and tag movement | Retie and retest uncovered; don't conceal it |
| Braid frays near the junction | Damaged fibres, sharp kinks or an unsuitable joint | Replace affected material and review the construction |
| Hook end cannot move freely | Supple length and contact between knot and eye | Retie to the demonstrated proportions |
| Hooklink bridges debris | Actual ground and stiffness of the boom | Find a suitable spot or change the presentation |
| Hair catches the point | Bait size, hair gap and casting behaviour | Change one factor and make controlled checks |
| Putty detaches | Clean attachment point and secure moulding | Restore and repeat the balance test |
Combi rig questions
Do I need two different spools?
For this particular two-material version, yes. But a partly stripped coated-braid hair rig is the simpler way to explore a stiffer body and supple hook end. You don't need to buy a separate boom merely to use the word “combi”.
Should I knot or crimp the boom?
Use the complete demonstrated version you have chosen. This page's material junction is knotted. A crimped finish requires a material expressly suitable for it, the correct crimp dimensions and matched tool. Ordinary braid must not be trapped in a crimp because another section of the rig can be crimped.
Can I change the hook quickly?
Not in the same way as a loop-retained multi. The illustrated hook is knotless-knotted into its hair section. Replacing it means retying that section and checking the resulting dimensions, or learning a separate combi-multi construction. Don't continue using a damaged hook to avoid the job.
Is a combi rig invisible underwater?
No rig should be treated as invisible. Material, colour, lighting, bottom and line position all affect appearance. More importantly, an unobtrusive-looking connection can still be damaged or badly presented. Inspect mechanics and strength before worrying about whether a colour name precisely matches the gravel.
What is the best beginner progression?
First tie a consistent hair rig. Then learn to create and test a controlled supple section in coated braid. Next practise a material joint independently, before combining it with a hook and bait. Move to a combi-multi only when its changeable-hook arrangement solves something you actually want to improve.
What a successful practice session looks like
Aim for a few rigs you can tie neatly and check confidently, rather than filling the wallet in one evening. Pull-test the joins, set the hairs with your bait and note the materials and finished lengths. If a joint looks doubtful, retie it. A short cast isn't a reason to fish with a connection you don't trust.
Choose the parts for the rig you're tying, and test the finished assembly before fishing. It provides a way to understand and check a construction. For the wider choices, return to carp rigs for beginners; if your main interest is a moving bait attachment instead of a two-material hooklink, compare the conventional German rig.