The German rig gives a wafter or sinking hookbait some movement on the hook shank without using a conventional hair. A small swivel carries the bait and a bead limits its travel. The hook itself is tied to the hooklink, which is the key difference from a Ronnie rig. Let's lay out the parts and work through the tied-hook version first.
This guide concentrates on the conventional tied-hook version, with a Korda-led component list and checks you can repeat at the kitchen table. We'll also look at the Turbo German, which has a different hook connection and needs its own assembly checks. If this is your first attempt at tying any carp rig, begin with our simple hair rig, then return when your knots and complete lead arrangement are dependable.
German rig anatomy: what moves and what stays fixed?
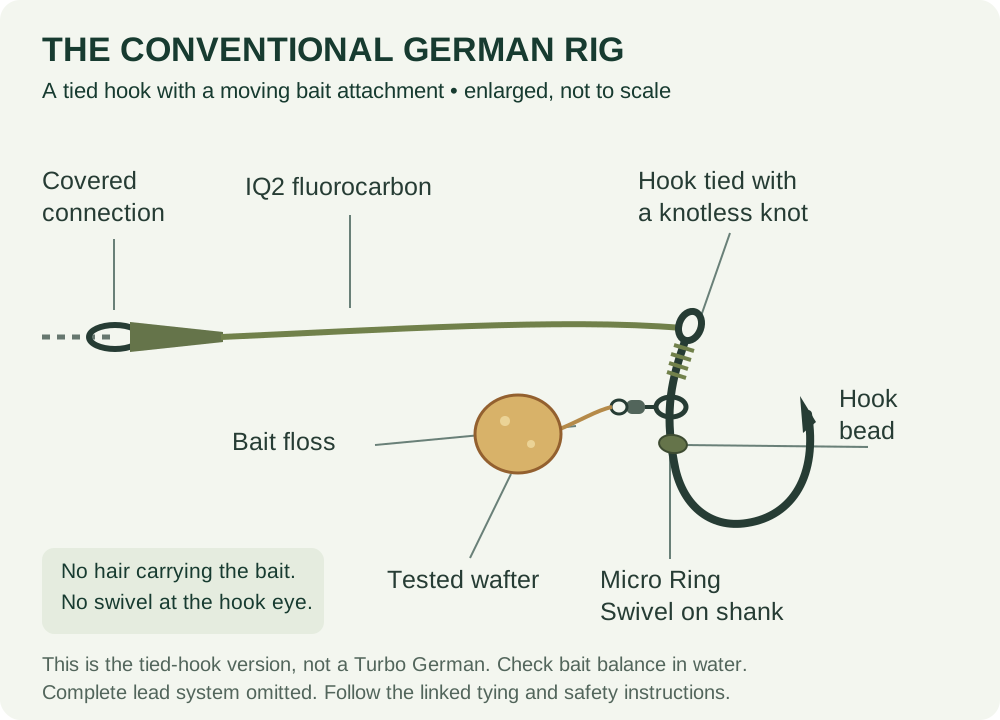
Think of three separate jobs. The hooklink connects the hook to the lead arrangement. The knot holds the hook in its intended relationship to that material. The little bait swivel carries the hookbait while allowing some movement along the shank. The bead is a stop for that bait attachment, not a device for fixing the hooklink to the hook.
It is tempting to describe every moving component as making a rig “impossible to eject”. Don't use that as a buying or tying test. What you can actually inspect is whether the swivel moves freely, whether its stop stays where it belongs, and whether the hookbait leaves the point and gape clear. Those are useful observations. A claim about what every carp will do is not.
Our diagram shows the parts apart enough to identify them. It doesn't prescribe the gap between a particular bait and swivel, the exact bead position on every hook pattern, or how high your chosen wafter will sit. Work those out with the real components and a water test, following the demonstrated rig rather than scaling measurements from the illustration.
When is a German rig worth using?
Consider it when you have a reasonably clean spot and want a wafter or bottom bait on a shank-mounted attachment. The decision should start with the presentation, not the rig's name. If fish are feeding over scattered sinking boilies on a firm patch, there is a straightforward reason to consider a bait that stays close to that patch.
A familiar hair rig may already do everything you need. Changing to a German rig makes most sense when you want to compare the bait attachment deliberately and can tie both versions consistently. There is little learning value in simultaneously changing the hook, hooklink length, bait flavour, buoyancy and lead system, then crediting the new rig for the next bite.
A clean spot is not necessarily a whole lakebed of gravel. You might have found a small firm area among softer ground. The important question is whether the complete hooklink can settle where you intend to place it. A firm feeling through the rod is useful information, but not a camera view. Look at retrieved debris, repeated casts and the fishery's knowledge together.
Choose something else when your intended spot is thick with weed, littered with snagging debris, or cannot be fished and landed from safely. A stiffer hooklink can bridge obstructions. Adding a buoyant bait doesn't automatically turn this tied-hook rig into a suitable pop-up rig. Our beginner carp-rig comparison helps separate those different jobs.
German rig components: a Korda-led shopping list
For the conventional wafter version
- Korda Kurv Shank hooks (paid link), with a size and barb option permitted by the fishery and matched to the actual bait.
- Korda IQ2 fluorocarbon (paid link) for the hooklink.
- Korda Micro Ring Swivel (paid link) for carrying the bait on the shank.
- Korda hook beads (paid link) that grip the selected hook securely; the linked medium component must suit your actual hook and swivel.
- Korda bait floss (paid link) for the hookbait attachment.
- Mainline wafters (paid link), tested with the complete hook assembly.
- Korda anti-tangle sleeve (paid link) and a compatible Korda size-8 quick-change swivel (paid link) for the specified lead-end connection.
Tools and the rest of the setup
RazorBlades scissors (paid link), an appropriate baiting needle (paid link), a pair of Pulla tools (paid link) and a shallow container of water. Add suitable main line (paid link), a complete Lead Clip Action Pack (paid link) and a swivel lead (paid link) within the rod's safe casting capability, where that complete arrangement is suitable and permitted. Check compatibility before substituting the supplied swivel.
Amazon links are affiliate links; we may earn a commission from qualifying purchases. Check that the bead grips the chosen hook and any replacement swivel fits the actual clip.
You don't need a kicker, spinner swivel, rig ring or hair stop for the listed conventional version. Buying everything labelled “rig components” can make a simple arrangement harder to understand. There's no separate bait-carrying hair to extend, and the bait swivel should not be confused with the much larger swivel at the lead end.
Check the fishery rules before ordering hooks. A micro-barbed option doesn't become acceptable on a barbless-only water because its product page is well reviewed. If the permitted replacement has a different wire thickness or shank shape, repeat the bead and swivel checks; changing the hook can change those fits too.
How to assemble the conventional German rig
Use Gardner's original German-rig demonstration as the construction reference. It uses Gardner components, so our Korda-led list is not a claim that the fittings have identical dimensions. Lay the parts out in order and inspect them before starting.
- Prepare the hooklink. Leave working length for both connections, rather than cutting immediately to the desired finished measurement.
- Tie the hook. Follow the demonstrated knotless-knot arrangement, without retaining a long tag to carry the bait. Moisten and tighten neatly, checking the finished exit direction.
- Add the bait swivel. Pass its attachment ring carefully over the point and onto the shank. Keep your fingers clear of the point.
- Fit the retaining bead. Position it to limit travel to the intended shank area. Check that it holds while the bait attachment remains free.
- Attach the wafter with floss. Secure the actual bait and check the attachment cannot pull out or slide loose.
- Finish the lead end. Fit the sleeve before tying the required loop, or use the appropriate direct knotted connection for the chosen system.
- Inspect, pull-test and water-test. Check the hook connection, lead-end connection and bait mounting separately before testing the assembled rig.
If the hooklink springs into an awkward shape, don't try to hide that with a tight sleeve at the hook. Examine whether the material, eye angle and tying direction suit the intended rig. The hook should be securely attached without the line being pinched by an unsuitable eye or damaged as the wraps tighten.
Leave enough time to practise in good light. A successful first knot is useful, but the better test is whether you can repeat it. Compare several unbaited hooklinks side by side: connections should sit consistently, tags should not slide under a controlled pull, and nothing should depend on a bead concealing a poor knot.
Hook size, bead position and hooklink length
Select hook size against bait size, hook pattern and venue rules, not simply the largest carp in the lake. A large bait on a very small hook can obscure the gape. A smaller bait with a heavier hook may lose the balanced behaviour you expected. Our hook-size and pattern guide explains why the number on a packet is only part of the choice.
With the bait fitted, move the attachment through its available range. It should not reach the sharp point, bind on the shank or pull the retaining bead out of position. Test that range with the hook facing different directions. A component that only appears to work when held perfectly upright at a table is not ready for casting.
Don't assume a bead is secure because it was difficult to push over the barb. Its useful grip is on the shank after fitting. If it tears, visibly deforms or slides without resistance, replace it with a suitable component. Likewise, don't force an undersized swivel ring around a hook curve; a binding attachment defeats the reason for fitting it.
Start with a manageable hooklink length suited to the demonstrated clean-bottom presentation, then evaluate the whole setup. An extremely short version is not automatically more efficient, and a longer one is not automatically more natural. Extra length changes how the material can lie, move and tangle. Record the finished length you actually used so any later comparison means something.
When judging that length, include the lead arrangement. A tall, stiff lead-end connection can affect how the hooklink leaves the bottom, even if the last few centimetres look fine in isolation. Lower the complete terminal setup into clear shallow water where permitted, rather than testing only a hook and bait held between two fingers.
Balancing a wafter without guessing
A wafter is meant to counteract some weight, but the label cannot know which hook and swivel you have attached. Two nominally identical baits may behave slightly differently, and soaking changes some baits. Your useful reference is the actual baited rig, not a demonstration made with a different hook from the same packet range.
Lower it into a container deep enough for the hook and bait to move freely, without the sides supporting them. Let trapped air clear. Observe which part settles first, whether the hook remains down and whether the hookbait can fold over the point. Gently move the hooklink and let everything settle again; a single neat landing is not the only test.
If the wafter lifts more of the assembly than intended, first consider changing or carefully trimming the bait, then retest. Don't automatically add several lumps of putty until it behaves differently from the version you set out to tie. A bait that needs substantial counterweight may be a pop-up choice for a different rig, rather than the wafter you wanted.
A sinking boilie is a separate useful option, but it is not behaviourally identical. Make the attachment suit that bait and check clearance again. If you want to understand a conventional hair-mounted bottom bait before comparing these arrangements, the hair-rig tutorial is the simpler reference point.
German, Turbo German and Ronnie: keep the names separate
| Name | Main distinction | What to do with this guide |
|---|---|---|
| Conventional German | Hook tied to hooklink; bait attachment travels on shank | Use the listed wafter rig and fitting checks |
| Turbo German | Specific articulated hook-eye connection | Learn its complete separate construction |
| Ronnie / spinner | Purpose-made spinner swivel retained with a matched kicker | Use a dedicated spinner rig and balance test |
| Blowback | Moving ring positions a bait-carrying hair | Don't replace its hair with unrelated German-rig parts |
Gardner's Turbo German demonstration specifies the swivel, hook and retaining-tubing arrangement for that design. Its articulation is a construction change, not a reason to insert any small swivel between the hook and the knot above. Follow the complete demonstrated combination if progressing to it.
The modern Ronnie or spinner rig has its own hook-retaining connection and bait-balance requirements. A superficially similar photograph doesn't make the rigs interchangeable. The same goes for a blowback rig: its moving ring manages a hair, whereas our German example carries the bait on a swivel.
If you're not yet sure why the extra joint would help your particular presentation, there's no requirement to learn it immediately. The conventional arrangement already provides enough variables to practise: attachment movement, hook clearance, knot quality and bait balance. Learn to recognise a correct version before experimenting with hybrids.
The lead system, casting and fishing the rig
A completed German hooklink is not a completed fishing setup. Match it to a safe, permitted lead arrangement and check the whole line-break escape path. A clip releasing a lead doesn't by itself prove that every remaining component can disengage safely. Don't glue tail rubbers, force mismatched swivels into clips or add stops to cure a casting problem.
Read the safe carp lead systems guide, and follow the instructions for the exact complete kit. If using a quick-change connection, its retaining sleeve needs to cover the open connection correctly without locking other parts. If the supplied swivel requires a knot instead, use that construction rather than assuming the shopping-list alternative is compatible.
Before a practice cast, check the hookbait is secure and the line is clear of the tip ring and your body. Practise at a controlled distance with space around you. The question is whether the hooklink arrives without wrapping the lead or main line, not whether you can reach your maximum range immediately.
Inspect carefully after retrieving. Weed, clay, a blunted point or a displaced bead is information. A tangle proves that the rig is tangled when you retrieve it, not exactly when it tangled. For a persistent problem, compare one change at a time and use our rig-tangle troubleshooting guide. Don't keep recasting a presentation you have not checked.
Finally, don't let confidence in a rig overrule the venue. If a hooked fish would have to be dragged through an unsafe obstruction, move the spot. Have the net, wet mat and unhooking tools ready before casting; none of the small components in the shopping list compensates for being unprepared to land a fish.
German rig troubleshooting
| What you see | Check first | Don't do this |
|---|---|---|
| Swivel jams on the hook | Ring size, hook shape, burrs and damaged fitting | Force it around the bend with pliers |
| Bead moves too easily | Correct bead size and grip after fitting | Glue it in place |
| Bait masks the point | Bait size, attachment and travel range | Judge the unbaited hook alone |
| Wafter lifts the hook unexpectedly | Actual bait buoyancy against the complete hook assembly | Assume every wafter balances identically |
| Hooklink arches over the bottom | Ground, material stiffness and lead-end angle | Call the rig suitable for every lakebed |
| Knot slips or material whitens | Material condition and tying method | Hide the fault beneath a sleeve |
Common German rig questions
Is a German rig better than a hair rig?
It offers a different bait attachment, not an automatic improvement. A properly tied hair rig on a suitable clean spot is still a useful choice. Compare rigs because you understand the difference you're testing, not because a new name suggests that your existing setup has stopped working.
Can I use a pop-up on this version?
This guide teaches a conventional wafter presentation, with a sinking-bait alternative to test. It doesn't teach a balanced pop-up conversion. Use a proven pop-up rig, such as the spinner, when you want the hookbait raised, rather than changing only the bait and hoping the remaining geometry is right.
Does it need a kicker?
Not in the conventional tied-hook rig listed here. A kicker is not a universal finishing touch. Adding one changes the hook-eye area and can create a different arrangement from the one you practised. Get the specified version working before considering a separately demonstrated variation.
Can all the tackle be Korda?
The terminal components listed here favour Korda, with a Mainline hookbait example. Matching a brand doesn't remove the need to match dimensions. In particular, test the selected hook, bead and bait swivel together; a medium component is not a promise of universal compatibility.
When should I replace it?
Replace damaged or suspect parts immediately. Check after a fish, contact with gravel or snags, a hard retrieve and before recasting. If the point is damaged, the bead has torn, the material is nicked or a connection moves under a controlled test, saving that hooklink is not the priority.
A useful first-session plan
Make a small number of consistent rigs, mount the bait you intend to use and test each one. Keep one checked example as a visual reference while learning. Write down the hook pattern, bait and finished length so a later adjustment is deliberate. On the bank, concentrate first on finding a safe, suitable feeding spot and placing the rig accurately.
Before packing away, check that storage will not defeat that preparation. Keep points protected and avoid pressing the hook bead against a foam divider that might move it. Don't store the bait swivel pulled hard against the point. When taking a rig out again, inspect the bead position and swivel movement rather than assuming an undisturbed wallet means an unchanged rig. Keep wet, used hooklinks separate from the checked spares until you have inspected and dried them. A simple label recording the hook pattern and material makes it easier to identify the intended replacement without relying on memory in poor light.
The manufacturer demonstrations below give you another view of the construction. Its purpose is to make the parts and checks understandable. For other presentations, return to the complete beginner rigs guide, or compare a combi rig if the difference you want to explore is stiffness along the hooklink rather than the bait attachment alone.