Method feeder fishing puts the hookbait and feed together in a neat parcel. We'll start with a small free-running inline feeder, matching mould and short hooklength, then work through preparing the bait, loading the feeder and testing the setup before casting.
Although the Method is familiar on commercial carp fisheries, it is also effective for bream, skimmers, tench, crucians and F1s where venue rules allow. This guide keeps the approach within mixed coarse fishing and avoids assuming that powerful carp tackle or large amounts of fishmeal are necessary.
We'll check the feeder's release, prepare the bait following its packet directions, fill the mould and practise repeatable casts. Keep the fishery rules and rod rating in mind throughout. Even a small feeder needs to be matched to the fish, snags and hooklength you're using.
Method feeder fishing for beginners: setup and bait preparation
Thread the main line through a purpose-made inline Method feeder and add its compatible bead or connector exactly as instructed. Tie a sound main-line knot and attach a short ready-tied or tested hooklength. Before fishing, confirm that the feeder runs or releases as designed and cannot remain permanently fixed to a broken hooklength.
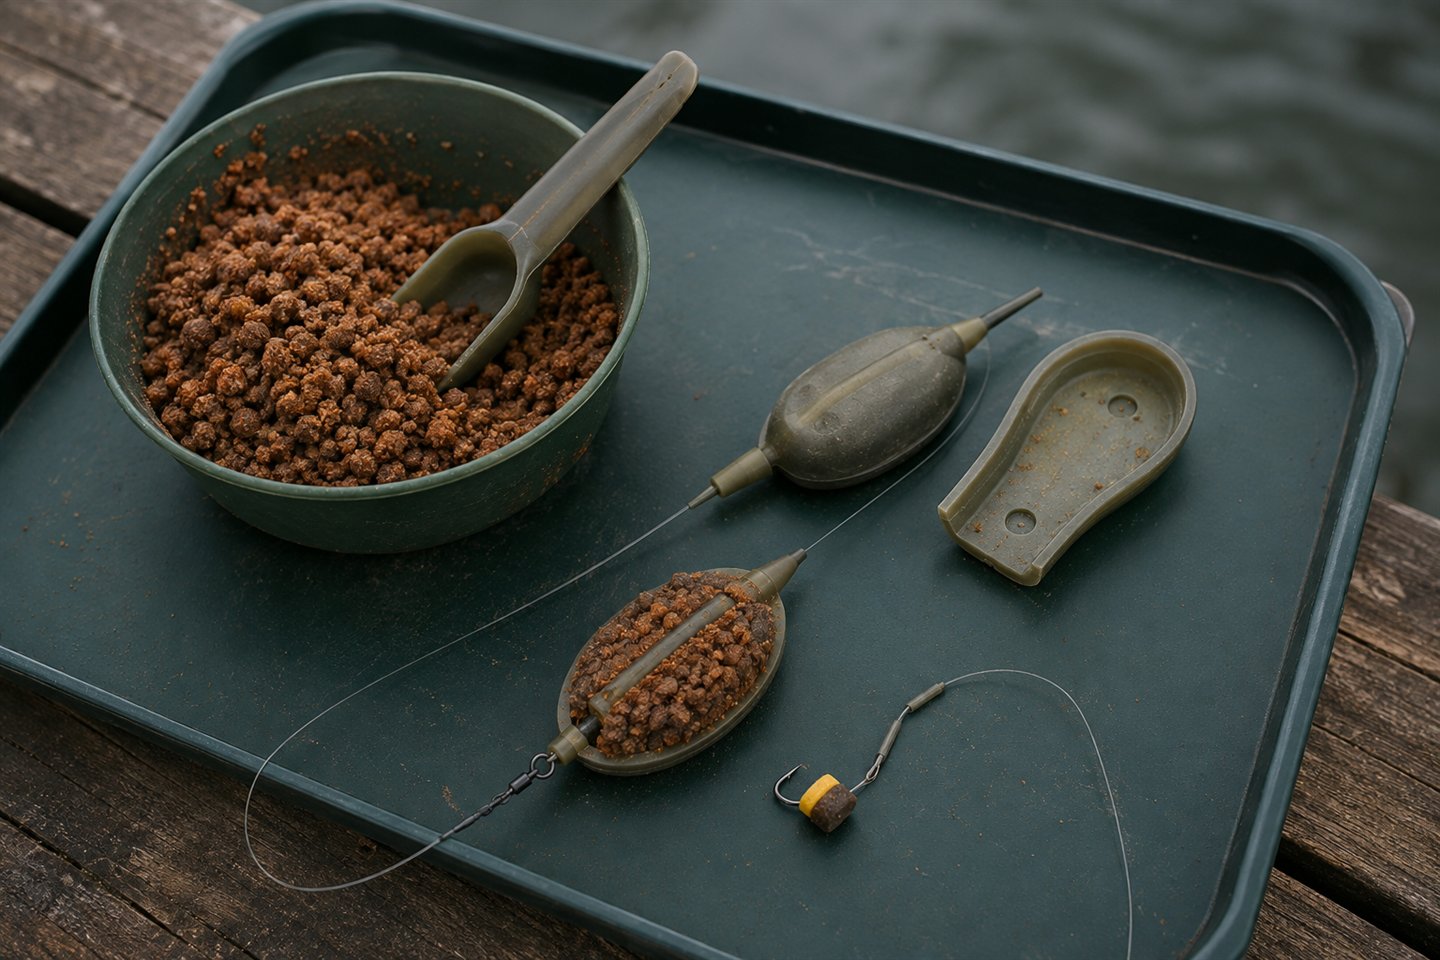
Prepare a small quantity of Method groundbait or two-millimetre feed pellets according to the actual packet, because products absorb water at different rates. Put some feed in the matching mould, position the hookbait as the feeder maker recommends, fill the mould, press in the feeder and eject a neat parcel.
Make a smooth short cast, feather it before landing and let the feeder settle without dragging it. Tighten to a gentle quivertip curve and remain beside the rod. Lift into a positive pull or clear drop-back, then use the clutch and landing net rather than forcing the fish.
How the Method feeder works
A flat Method feeder has weight on its underside and ribs or a platform on top for feed. It is designed to land in a predictable orientation so the bait parcel sits accessible on the bed. A mould can make the same compact size and shape on every cast.
The hooklength is much shorter than on a conventional cage feeder. The hookbait may sit within, partly within or on top of the feed according to the feeder design and venue rules. As the parcel breaks down, the hookbait becomes a distinct edible item among the fine material or pellets.
This compact presentation works best on a bed where it can settle without disappearing. Thick weed, deep soft silt, steep slopes and heavy debris may mask the feeder or trap line. A cage feeder or float can be more appropriate, as the coarse-fishing beginner's guide explains.
Method, hybrid and pellet feeders
A traditional flat Method has open ribs and is normally loaded with a mould. A hybrid or banjo-style feeder has raised sides that protect feed during the drop and may be loaded by hand. A pellet feeder is designed to hold softened pellets in a cavity or behind ribs.
Names overlap between manufacturers, so follow the instructions for the exact product. A mould from one size or range may not fit another feeder even when they look similar. Stem, bead and quick-change components also need documented compatibility.
For a first session, choose one small or medium inline flat Method in a weight appropriate to the rod and distance. Learning how one feeder lands and releases is more useful than switching between several systems. The empty weight is not the casting weight: damp feed adds mass.
Choose a balanced feeder outfit
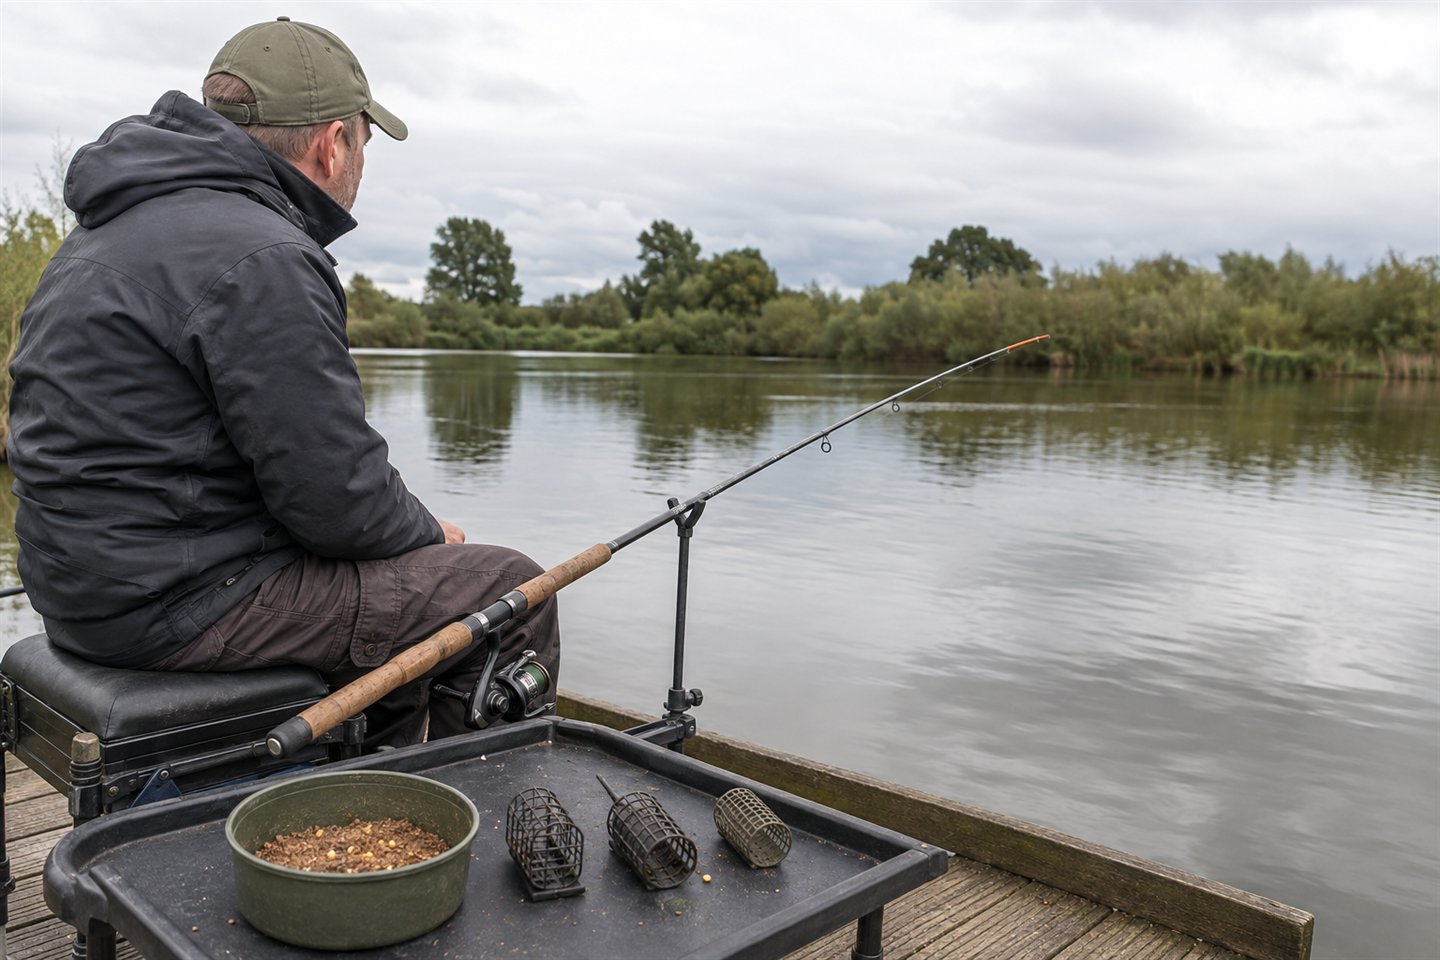
A 10- or 11-foot feeder rod often suits short and medium casts on smaller waters, provided its casting range covers the loaded feeder and its action matches the fish. Larger reservoirs and strong rivers require specialist rods, while tiny stillwaters may need a lighter setup.
Fit only a quivertip supplied or approved for the rod. Use a tip strong enough to remain stable in wind and tow but soft enough to show movement. Coloured ounce labels don't translate precisely across makers, so identify each tip and protect spares in a tube.
A modest fixed-spool reel with smoothly laid monofilament and a reliable clutch completes the outfit. Check spool capacity and weight rather than relying on the printed reel size. The coarse reel guide explains those comparisons.
The 10-piece method-feeder kit with mould (paid link) covers the feeder-and-mould part of the setup. Check its feeder sizes and mould compatibility; select the rod, reel, line and fish-care equipment separately for the venue.
Main line and hooklength balance
Use mono main line strong enough for the fully loaded feeder, casting distance, snags and expected fish. The rod and reel instructions set the safe range. A fine line selected only to gain distance can snap during casting and send a weighted feeder beyond the fishery boundary.
Short Method hooklengths are commonly supplied around 10 centimetres or four inches, but the correct length is governed by the feeder system and venue. Some fisheries or competitions impose rig dimensions. Never shorten below a stated rule just to make the feeder appear more self-hooking.
The hooklength can be slightly finer than the main line, creating a replaceable lower section, yet must withstand the target fish. Inspect after every capture and snag. The coarse line and hooklength guide covers diameter, strength and controlled failure.
Build and test a safe inline setup
Pass the main line through the feeder's central stem in the direction shown by the maker. Add the compatible quick-change bead or swivel component and tie it with a knot suited to the mono. Trim the tag closely without nicking the knot, then attach the hooklength by its intended loop.
Slide the feeder away from the connector along the actual main line. It should move freely or separate according to the design if the line parts above it. Check that a bulky knot, leader or damaged bead cannot trap it. Repeat the test whenever components are changed.
Some elasticated systems use a proprietary stem intended to retain elastic benefits while remaining free-sliding. Don't make a fixed elastic stem from loose parts or thread elastic through an ordinary inline feeder. Use the complete documented system and obey a fishery ban on elasticated feeders.
Pull-test main-line knot, hooklength loop and hair attachment separately. Hold the hook with a safe tool rather than a finger. If the components don't match, stop and seek qualified help; a catch is never worth leaving a fish attached to a feeder.
Hooks, bands, bayonets and stops
A hair separates the bait from the hook so the point remains exposed. Soft or hard pellets can sit in a band, semi-soft wafters may accept a bayonet, and drilled baits can be held with a stop. Each attachment needs a bait of the correct size and firmness.
Don't force a fine bayonet into a hard bait while holding it towards the hand. Use the maker's tool, work away from the body and discard a split bait. A band must grip without cutting deeply; a loose pellet can leave a bare hair after casting.
Choose a barbless or permitted hook with gape appropriate to the bait. Hook and hair sizes printed on ready rigs vary. The coarse hook guide explains wire, gape and pattern rather than prescribing a number.
Groundbait or micro pellets?
Method groundbait produces fine attraction and can carry a few samples without adding many solid items. Softened micro pellets offer more discrete food and often bind neatly. A mixture can combine the two, but the ratio changes breakdown and must be tested.
In cold or difficult conditions, a small groundbait parcel can create scent and colour without many filling items. In warm water with active mixed fish, pellets may hold bream, tench or F1s. These are starting ideas, not seasonal laws; venue form and actual feeding response matter.
Colour can affect confidence in clear water, while high fishmeal content is not compulsory. Sweet, cereal and natural groundbaits remain relevant for skimmers and mixed fish. Select one product whose instructions are clear. The groundbait beginner's guide covers mixing and riddling.
How to prepare micro pellets for a Method feeder
Small feed pellets differ in density, oil, ingredients and water uptake. The familiar rule of soaking for one minute per millimetre is not reliable for every product or temperature. Follow the manufacturer's method on the current bag, including drain and rest stages.
Measure only enough for the session and use clean water. After the stated wetting stage, distribute moisture evenly and allow the pellets to rest. They should squeeze into a parcel yet separate when rubbed. Mushy pellets can stick to a mould; under-wetted pellets may fall off during the cast.
Test a loaded feeder in shallow water or a bait tub. Time how it releases without assuming a perfect moulded shape guarantees breakdown. Deep water and compression can slow release, so reproduce the pressure used for fishing and adjust a small portion at a time.
The Sonubaits Fin Perfect 2mm feed pellets (paid link) are one current option. Read their preparation directions and confirm that the venue permits pellets.
Mixing Method groundbait
Add the packet's initial quantity of water progressively while turning the whole dry mix. Break lumps against the side of a round bowl, then leave it for the stated absorption time. Fine particles continue taking water, so an apparently damp mix can become dry after resting.
Riddle when instructed to create even texture, then adjust with a mist rather than one uncontrolled pour. A Method mix needs enough cohesion to survive the cast and entry, but should release around the feeder. Pack pressure, not only moisture, changes that balance.
Keep most groundbait covered and take a small working amount onto the tray. Sun and wind dry the surface first. Remix that portion and compare it with the protected supply. Don't add liquid flavour merely to repair texture; additives can change binding and must be used within label and fishery directions.
How to load a Method feeder with a mould
Use the exact mould designed for the feeder size. Add a shallow layer of feed, place the hookbait in the feeder maker's recommended position, then fill level. Press the feeder into the mould evenly and use the release button or flex the mould as designed.
The finished parcel should be centred with no loose wing that can break in flight. Remove excess from the stem and line. If bait remains stuck inside the mould, review moisture and cleanliness rather than coating it with an unapproved oil.
A mould helps regulate how much bait enters the swim and makes casting shape consistent. The 10-piece method-feeder kit with mould (paid link) is one current feeder-and-mould option; check its confirmed size and compatibility, not colour alone.
Where should the hookbait sit?
Many flat Method systems position the hookbait in the mould first so feed covers it and protects the hook during casting. Others use a platform or recommend leaving the bait visible. Follow the product directions and test how it emerges rather than copying one loading order universally.
Covering the hook can reduce tangles but requires feed that releases. Leaving it exposed ensures immediate visibility but can catch weed or separate during flight. In every case, the hook point must be clear when the parcel breaks down.
Keep the short hooklength untwisted and away from the feeder stem. If it repeatedly wraps around the main line, check casting, hookbait size, hair and loading. Replace kinked mono; short damaged line can look acceptable while being weakened.
Choosing a hookbait
A small hard pellet, soft hook pellet, wafter, dumbbell or sweetcorn grain can all work where allowed. Match size to hook and the fish that can safely be landed. A bright bait may be easy to locate; a subdued one may suit clear pressured water.
A wafter should not lift the hook and hooklength into an unintended position. Test it in water with the actual hook, hair and stop, and repeat after changing bait. “Critically balanced” is not guaranteed by a packet when hook weights differ.
Keep the first selection narrow. One natural pellet and one visible alternative are enough to compare. If liners occur without bites, change presentation or feeder placement before cycling through flavours. Location and a functioning rig outweigh novelty.
Pick a safe, clean target
On a commercial fishery, far-bank margins, island slopes and open-water shelves can hold mixed coarse fish, but casting too close to boards, reeds or ropes risks tethering. Leave a margin for error. A bare patch at modest range is a better first target than a snaggy feature.
Plumbing with a separate float or gaining venue advice can reveal depth and silt. If the feeder returns covered in black silt, weed or foul smell, shorten the cast or choose a more open presentation. Don't repeatedly cast a short hooklength into unknown dense weed.
Watch for fish rather than assuming every visible island is productive. Bubbles from bream or tench, coloured water, rolling fish and changes in depth can justify a line. Keep another angler's water and fishery boundaries out of the casting arc.
Accurate, controlled casting
Check the loaded weight against the rod limit. Look behind and above, allow a manageable drop and bring the rod through smoothly. Method parcels can leave the feeder when punched violently. Practise with an unloaded feeder and no hooklength if timing is unfamiliar.
Use a fixed horizon marker. Feather the line before impact so feeder and hooklength straighten, then lower the rod as it sinks without pulling the parcel away. Once it rests, place the rod and tighten gently; dragging destroys the intended presentation.
A line clip can repeat distance but requires clear open water, an attended rod and the ability to unclip if a fish runs. Avoid clipping tight to snags. Count reel turns or use a removable marker when a fixed stop creates unacceptable risk.
Setting the quivertip and reading bites
Take up slack until the tip shows a small steady curve. Too much tension can move the feeder or fold the tip, while slack line delays signals. Stable rod rests and a butt grip keep the rod secure, but it must remain within immediate reach.
A Method bite often develops into a firm pull as a fish moves against the feeder, but skimmers and cautious fish can show taps or a drop-back. Don't strike violently. Lift smoothly, wind and let the rod and clutch absorb pressure.
Repeated sharp taps without hook-ups may be liners as fish brush line, small fish picking at feed or a hookbait problem. Inspect the returned rig and vary feeder position, feed amount or hookbait before making the rig more aggressive.
How often should you recast?
Start with a measured interval long enough for the bait to release and a fish to find it. On active stocked waters that may be several minutes; in cold or low-stock conditions it can be much longer. No fixed clock suits every swim.
Early repeated casts introduce feed quickly, so count them. If the mould contains more than the fish can eat, frequent casting can overfeed a small area. Use a smaller mould or partial load when attraction is needed without a full parcel.
After every retrieval, check whether feed has left and hookbait remains attached. A full feeder returning after the planned interval shows a mix or compression problem. An empty hair shows a bait or attachment problem. Correct evidence before changing flavour.
Playing and caring for mixed coarse fish
Keep steady pressure and let the clutch give line. Short hooklengths and relatively heavy feeders can increase leverage, so avoid pumping or trying to surface a fish immediately. Guide it away from other anglers and obstructions.
Lead it head first over a submerged soft-mesh landing net. Locate the feeder before handling the fish so a swinging weight cannot strike it. Transfer low over a wet unhooking mat where necessary, wet hands and use a suitable disgorger.
Return the fish promptly once it is balanced and able to swim. Larger bream and tench may need support in quiet water. The coarse fish-care guide gives the full sequence for mixed species.
Why does bait fall off my Method feeder?
The most serious mistake is assembling a feeder that only looks inline. A trapped bead, fixed stop or incompatible elastic stem can leave weight attached after breakage. Test movement with the actual line and observe venue rig rules.
Over-wet bait sticks in the mould or remains as paste; dry bait breaks on casting. Correct only a small portion, allow time for absorption and test breakdown. Repeatedly squeezing harder is not a substitute for correct preparation.
Casting too close to cover is another avoidable error. The Method can hook fish quickly, and a surprise tench or carp needs room. Build confidence in open water before approaching features with suitable stronger tackle and a clear landing plan.
A first-session plan
Prepare one feeder, one matching mould and two simple hookbaits. At the fishery, identify a clear short line and assemble the inline system. Pull-test it, slide-test it and make two unloaded practice casts without a hooklength if required.
Mix a small amount of feed, let it rest and test one parcel in the edge. Fish measured casts for long enough to compare them. Keep distance constant and alter only feed compression, hookbait or recast interval.
Stop before concentration fades. Detach the hooklength, clean feeder and mould, dry the net and take unused bait home. Record the feeder weight, mould size, bait preparation, depth, interval and any bites; this builds a repeatable coarse-fishing method.
Frequently asked questions
Is a Method feeder only for carp?
No. Bream, skimmers, tench, crucians and F1s can all respond. Choose tackle and bait for the actual stock and treat an unexpected carp safely. This guide uses the Method as a mixed coarse-fishing technique.
Should the hookbait be buried?
Follow the specific feeder and mould instructions. Many systems cover the hookbait; others use a visible platform. Test release so the hook point is clear, and don't assume one loading order fits every design.
How long should Method hooklengths be?
Around 10 centimetres is common in commercial systems, but use the length specified for the product and allowed by the venue. Longer or shorter choices change behaviour and may breach rules.
Can I use dry pellets on the feeder?
Only if the product and feeder are designed for that use. Most moulded micro pellets need preparation to bind. Follow the current packet instructions rather than a universal soaking formula.
Final thoughts
Method feeder fishing for beginners is a precise coarse-fishing system when safety and consistency come first. Use compatible inline parts, balanced mono and an open target, then prepare a small amount of feed exactly as its maker directs.
Use the matching mould, make a smooth cast and let the feeder settle without dragging it away from the bait. Watch the tip and inspect what comes back before adjusting the setup. Keep the tackle strong enough for the fish that may turn up, not only the ones you hoped to catch.