A running lead rig lets the main line slide through the lead's carrier, so a fish can move the line without immediately shifting the whole weight. It's a straightforward setup to learn on clear open-water spots, and useful where a fishery asks for genuinely running tackle. We'll build it, check the sliding path and get it ready for a suitable hooklink.
This tutorial builds a simple naked-mainline version with the Korda Running Rig kit, a separate compatible terminal swivel and a tested hooklink. The key lesson is straightforward: there must be an unobstructed sliding path towards the rod and, after a break, towards the free end. Adding a top stop to create more resistance changes the system.
Running is not the same as loosely semi-fixed
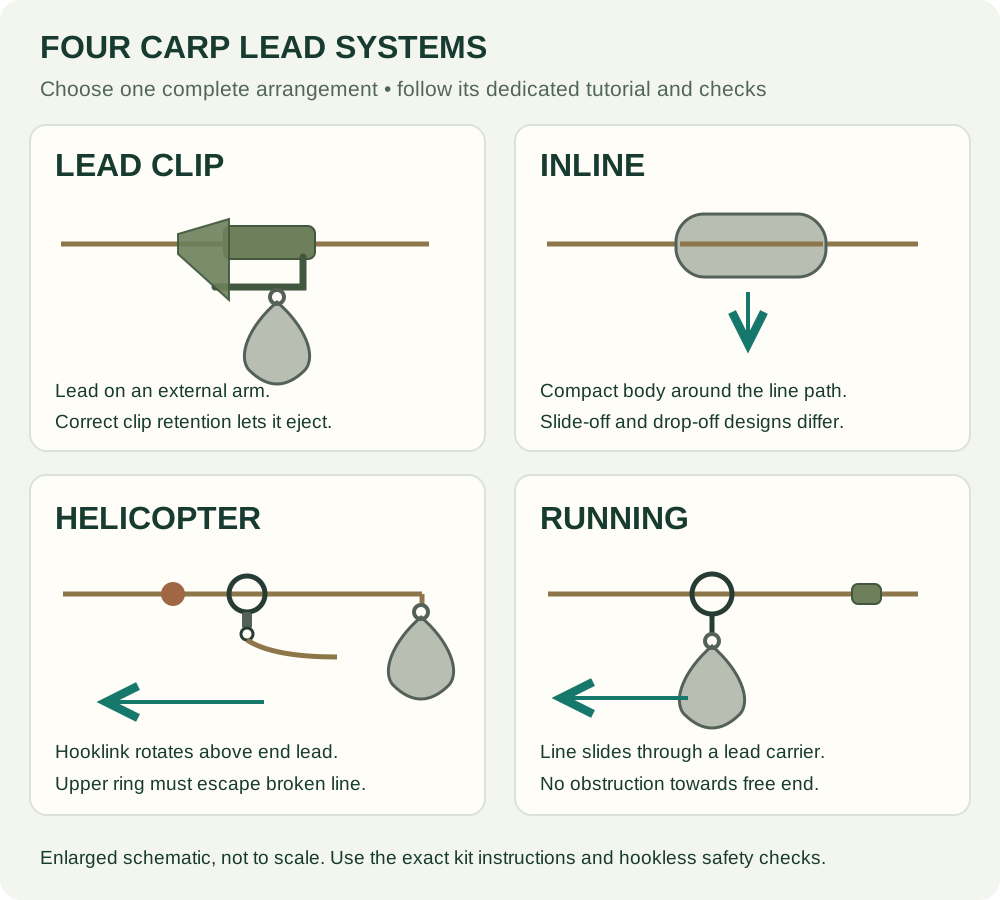
A fully running arrangement has a carrier that can move along the line without first having to pull a swivel from an insert or dislodge a stop. A semi-fixed setup deliberately creates initial resistance before a designed part releases. Both need correct construction, but they should not be described as interchangeable.
The running lead doesn't have to fall off its link during a take. In this rig, the large carrier eye is the moving component; the line passes through it while the lead can stay on the lakebed. If the line parts above the rig, that same clear route must allow the lead and carrier to leave the broken line.
That's why an upper bead, stop knot, backlead or trapped tubing can matter. An arrangement that runs for a few centimetres and then meets a permanent obstruction is not the simple free-running system being taught here. The breakage check includes every component on the actual fishing line, not just a loose ring on a desk.
For comparison, our lead-clip guide teaches a deliberately retained swivel and a separate lead-release arm. Don't make a running rig by modifying those parts while expecting the original clip's ejection sequence to remain unchanged.
Where to begin with a running lead
Choose a reasonably firm, clear spot and a clear line path. That makes it easier for the carrier to slide and easier to distinguish movement of the hooklink from the lead being dragged through debris. It is also a helpful learning environment for understanding the relationship between line tension and bite indication.
Heavy weed, branches, thick leaves or an awkward bar can stop apparently free-running tackle behaving freely. The carrier may bury, the line may rub or a fish may move at an angle that pulls the lead rather than drawing line through it. Don't assume a running label guarantees low resistance under all underwater conditions.
Keep the first practice casts short and manageable. You want to inspect what comes back and learn how the hooklink, carrier and lead fly together. There is little benefit in starting at maximum range, where line stretch and drag complicate the lesson and you can't see whether the tackle lands cleanly.
Check the fishery's exact definition of a running rig. A bailiff may require a particular buffer, prohibit leaders or specify a release feature. Show the complete assembly when asking, rather than quoting the name of one component from its packet.
Complete component list
Required for the lead arrangement
- Korda Running Rig kit (paid link): its large-eye swivels are the running carriers; the supplied Shok beads protect the terminal connection, and the links and silicone cover the lead attachment.
- Korda size-8 quick-change swivel (paid link) for the separate terminal hooklink connection, with a matching anti-tangle sleeve (paid link) covering its open crook. Check that its closed-eye end seats appropriately in the Shok bead without affecting the running carrier.
- A suitable swivel lead (paid link), chosen for the complete casting load and the spot.
- Sound monofilament main line (paid link) in a permitted strength and diameter. No separate leader is used in this worked example.
- A tested finished hooklink, with a suitable loop for the covered quick-change connection.
Simple hooklink ingredients
Korda N-Trap Soft coated braid (paid link), a permitted Wide Gape X hook (paid link), Hybrid Bait Stop (paid link) and sinking hookbait (paid link) make a straightforward hair-rig example. Use the full hair-rig tying guide for the hook end.
Tools
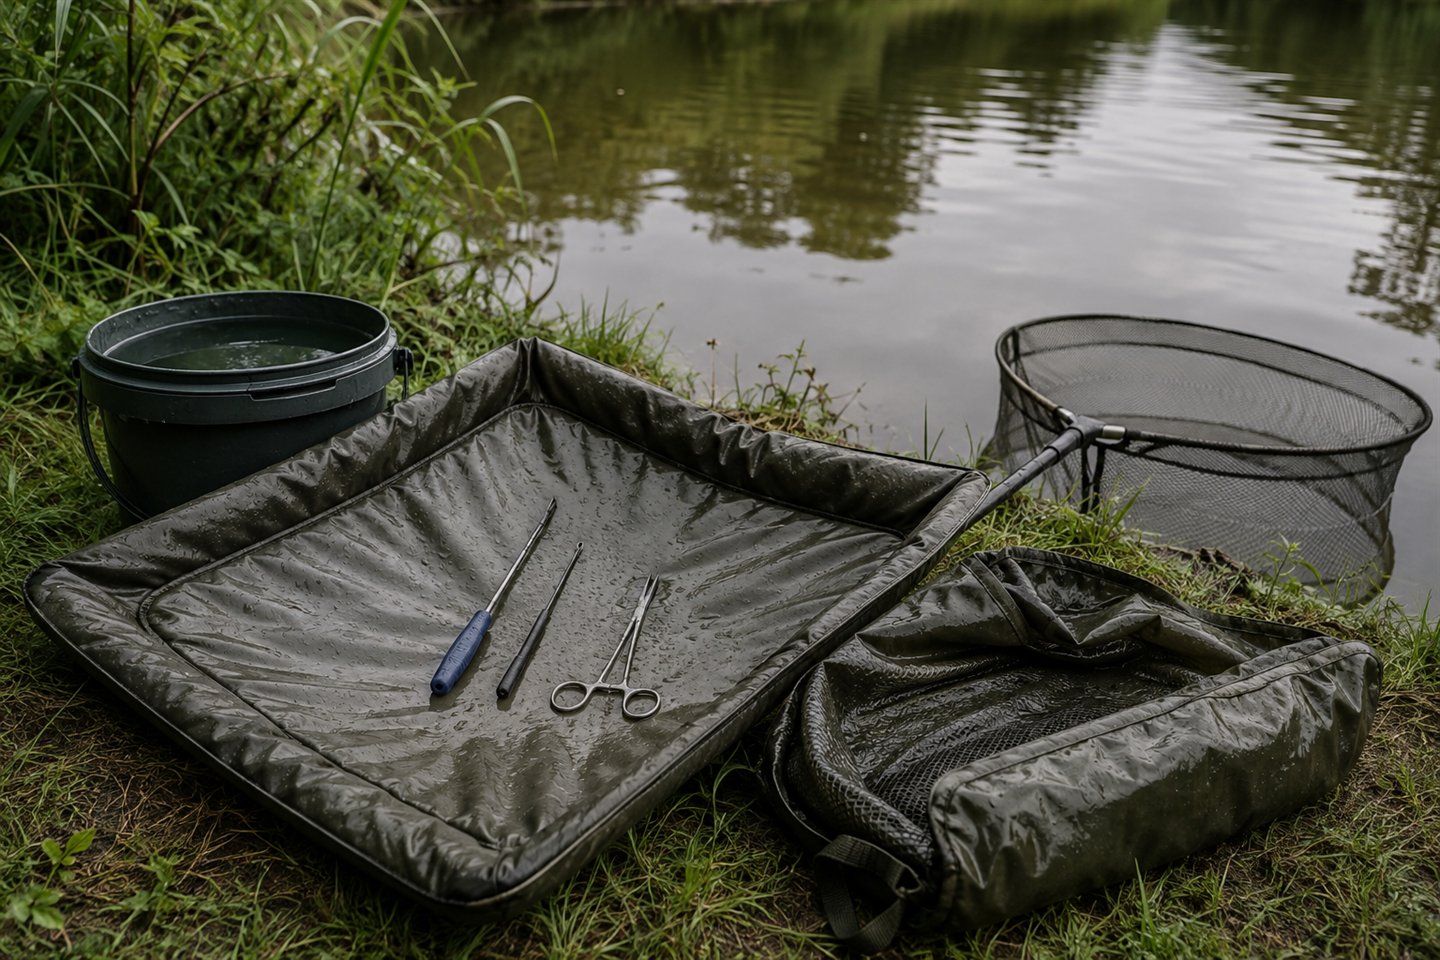
Scissors (paid link), knot-pulling tools (paid link), a suitable baiting needle (paid link) and coating stripper (paid link) if tying the coated hooklink. A clear tray and a little water make the movement checks easier to observe.
The kit's big-eye swivels are not spare terminal swivels. They carry the lead and let the main line run through their enlarged eye. Count the separate terminal connection in your shopping list rather than discovering it is missing when you start tying.
Amazon links are affiliate links; we may earn a commission from qualifying purchases. Check that the swivel, bead and other components fit the chosen system.
Lay out the parts in their working order
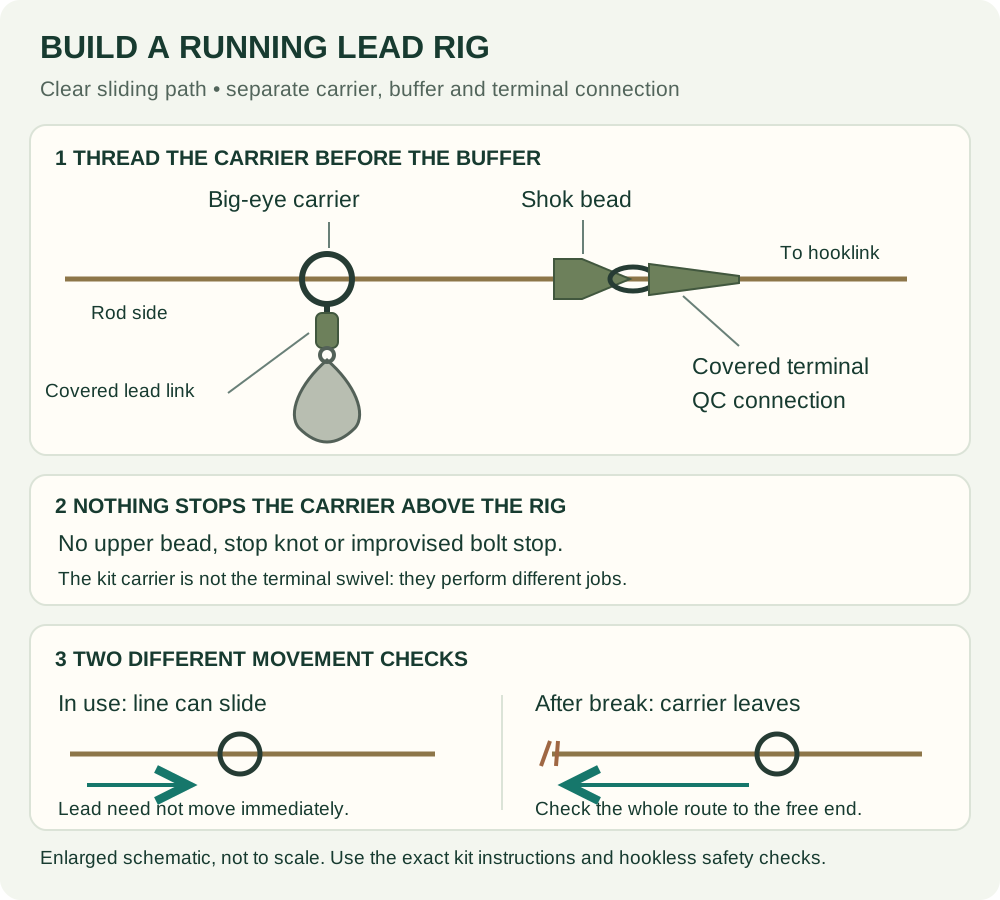
From the rod towards the hook, the main line first passes through the large eye of the running carrier, then through the buffer bead, and finally ties to the closed eye of the terminal swivel. The lead hangs from the carrier's other end through its covered link. The hooklink connects beyond the terminal swivel.
The buffer sits between the moving carrier and the terminal knot. Its purpose is to protect and tidy that end, not to create an upper barrier on the line. Korda's Shok bead has a cavity for a size-8 swivel; use its intended orientation and check the actual fit before tying everything permanently.
Keep the two silicone jobs separate. The kit's sleeve covers the link holding the lead. The hooklink's anti-tangle sleeve covers the quick-change crook at the terminal swivel. A covered lead link doesn't make an uncovered hooklink connector safe from accidental unhooking.
How to build the running lead rig
- Prepare the main line. Inspect the end and remove abrasion or flattening. Keep the hook off the work surface while building the terminal arrangement.
- Thread the running carrier. Pass the main line through its enlarged eye. Before adding anything else, slide it along the line and check for roughness or sticking.
- Add the Shok bead. Thread it so the cavity intended for the terminal swivel faces that swivel. The carrier remains on the rod side of the bead.
- Tie the terminal swivel. Attach the main line to the closed eye, using a suitable practised knot. Moisten and tighten steadily, then inspect and pull-test with tools before the bead covers the connection.
- Seat the buffer. Locate the closed-eye end in the bead as intended. Keep the hooklink crook accessible at the other end and confirm that the running carrier is not trapped against the swivel.
- Attach the lead link. Use the Running Rig kit's link on the carrier's remaining eye, attach the compatible lead and cover the link with its supplied silicone.
- Fit the hooklink. Add its anti-tangle sleeve before forming the suitable end loop. Place the tested loop on the quick-change crook and slide the matching sleeve fully over that open connection.
- Check normal movement. With the lead resting safely, draw line through the carrier. It should move without first having to release another component.
- Check the breakage route. Use the separate hookless dummy test below to verify that the carrier can leave the free end without meeting an obstruction.
If the fit of the selected terminal swivel and bead is uncertain, use the manufacturer's specified closed-eye swivel alternative and tie the hooklink directly. Don't trim, drill or glue the bead to accommodate a mismatched component. The running carrier still needs its independent path whatever terminal connection you choose.
Two checks before adding a bait
Check 1: free movement in normal use
Place the lead on a soft surface and hold the hooklink end safely with the hook omitted or protected. Draw a modest amount of line through the carrier. Watch whether line travels through the big eye or whether the entire lead immediately has to move. Repeat the test gently from different angles. A straight line on the table slides more easily than one running across an uneven lakebed.
There will still be some friction. Running is not a claim of zero resistance: line diameter, its surface condition, the carrier and the underwater angle all matter. If it catches visibly, find the cause before fishing rather than relying on a fish to overcome it.
Check 2: escape after a break
Build a short hookless duplicate with a free line end above the carrier. Wet it, then confirm that the carrier and attached lead can move off that free end in the intended manner. Include every part you intend to fish. A leader knot or upper stop that was absent from your test cannot be presumed harmless later.
Use controlled hand movements and suitable tools, keeping the lead low and fingers away from tensioned line. Don't wrap mono around your hand or pull a lead towards your face. The test is about the path, not about breaking the strongest component.
If the carrier cannot leave the assembly, simplify or replace it. A running lead that remains captive above a broken terminal section is not made safe by the absence of a bolt effect.
Lead weight and hooklink length
The weight must be suitable for the rod and enough to behave sensibly on the chosen spot. A lead that skates across the bottom whenever the line moves can obscure the very sliding action you're trying to create. That doesn't justify fitting the heaviest lead available; use an appropriate shape and weight within the complete setup's limits.
Begin with a straightforward hooklink that you can cast without tangling. Its length depends on bait, bottom and material, not on a universal running-rig measurement. A longer hooklink gives more potential separation from the weight but also more loose material in flight. A shorter one is compact but may pull into soft sediment if the lead buries.
Change one variable at a time during practice. If you simultaneously alter lead size, hooklink length, sleeve, bait and cast, a clean retrieve will not tell you which change helped. Keep notes on the actual presentation rather than assuming a new purchase produced the improvement.
Bite indication: keep contact without dragging the lead
After the cast, let the tackle settle before taking up excess slack gently. The aim is a sensible line path and an indicator that can show movement in either direction, not winding the lead several feet across the spot to make the line look tidy.
A very slack bow can delay what reaches the alarm; excessive tension can move the lead or lift line across the swim. Wind, depth and distance influence the compromise. Use our guide to line bites, drop-backs and runs to understand the indication rather than expecting one bobbin setting to suit every session.
Stay close enough to respond promptly. A running rig is not a reason to wait through prolonged indication or assume a fish has not felt anything. Follow venue rules, keep the landing net ready and never leave baited rods unattended.
Troubleshooting
The rig tangles on the cast
Check both covered links, hooklink length and casting smoothness. Practise a controlled short cast and feather the line appropriately as the tackle lands. Remove unnecessary extra connectors before adding more sleeves. Inspect the actual tangle: a hooklink around the main line is different from a loop caught in an uncovered crook.
The lead slides up only a short distance
Find the stop. It may be a sinker, leader knot, damaged line section or a bead introduced as an improvised bolt stop. Don't classify the rig as fully running until the intended route is clear and the dummy breakage test passes.
The carrier comes back full of silt or weed
Clean and inspect it, then reconsider the spot and system. A large eye still cannot slide reliably when blocked with material. A different permitted arrangement may suit that bottom better, as explained in the four-system comparison.
The lead link or hooklink loop comes loose
Check that the correct sleeve fully covers the relevant open connector and has not split or crept back. Replace worn parts and retest. Don't substitute glue or tape for a correctly matched retaining sleeve.
Frequently asked questions
Is a running rig safer than every other lead setup?
No design wins by name alone. The carrier needs a clear route off broken line, the complete tackle must suit the swim and the fish must be landable. A blocked running system can be unsafe.
Should I put a stop above the lead for better hooking?
Not in this rig. It changes the mechanism and can obstruct separation. Use a properly designed, permitted alternative if you want a different initial-resistance arrangement.
Can I add tubing or a leader?
Only as part of a manufacturer-approved combination whose entire release path you can verify. Neither is automatically compatible with the carrier simply because the line itself passes through the eye.
Final bank-side check
Check that the carrier slides freely, the buffer sits below it and nothing blocks the line above. Inspect the knot and covers on the lead and hooklink connections. Then check the casting weight, bait presentation and landing route. Keep it simple: adding extra stops or fittings can get in the way of the free-running setup you wanted.