The hinged stiff rig has two main sections: a boom to keep the hookbait away from the lead and a short, curved hook section that moves at a swivel. Together they hold a pop-up above the bottom. If you're ready to move on from simpler rigs, we'll work through the parts, connections and balancing a step at a time.
This guide explains the Hybrid Stiff boom and Mouth Trap hook-section version used in our beginner carp-rigs guide. It covers the components, tying sequence, buoyancy tests and decisions that make the diagram useful at the bankside. If tying, crimping and testing several different connections at once feels unfamiliar, practise the basic hair rig first, then learn this one with an experienced angler checking your work.
When is a hinged stiff rig a sensible choice?
Start with the presentation you need, not the rig name. A suitably buoyant pop-up can hold the hook section above a little low-lying debris while the boom settles onto the chosen spot. That makes the hinged stiff an option when you want a deliberately raised bait rather than a sinking boilie or low wafter. The important condition is that the boom and its counterweight can settle without being propped across something awkward.
A thin scattering of leaves and a deep bed of rotting leaves are different problems. So are a short strand of weed and a dense weedbed. Don't read “pop-up” as permission to cast onto any bottom. A hookbait can be raised yet still hidden, a boom can bridge uneven ground, and a rig can be presented somewhere from which a hooked fish cannot safely be landed. In each case the better decision may be to choose another spot.
On a clean, firm patch, ask what the raised bait adds. If carp are feeding confidently on sinking boilies, a simple bottom-bait presentation may be easier to check and entirely adequate. A different rig becomes useful when it solves a specific problem: keeping the hookbait just clear of suitable debris, for example, or presenting one buoyant bait where you have decided it belongs. A difficult session alone doesn't diagnose a rig problem.
It is also worth considering how you fish. The hinged stiff involves a dedicated filament, an articulated joint and a tested pop-up. Those are manageable with a calm tying routine and spare rigs made at home. They become less attractive if you're learning in poor light, have no way to check buoyancy, or cannot tell whether a crimp has slipped. Choose the presentation whose important checks you can actually perform.
What makes the hinge different?
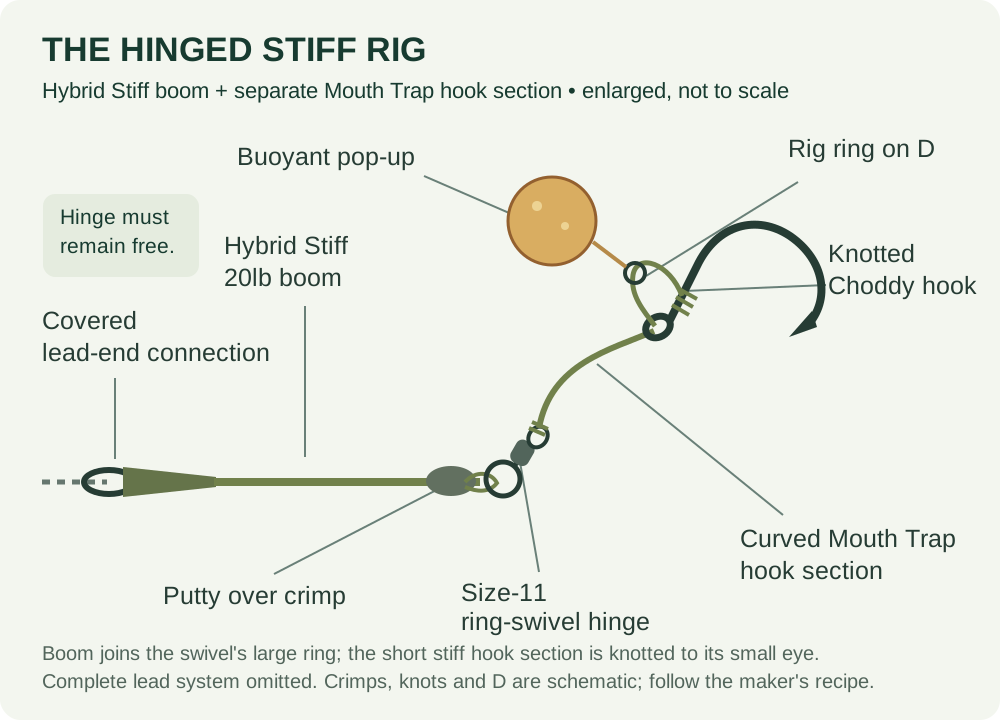
Follow the diagram from left to right. The covered lead-end connection is followed by the boom. At its far end, the large ring of a ring swivel provides articulation. The short hook section attaches to the swivel's smaller eye, and its shaped filament leads to an out-turned-eye hook. A separate D holds the bait ring, with floss securing the pop-up. Putty sits around the hook-end boom crimp without stopping the joint moving.
That arrangement is not the same as a naked chod. A chod's short hook section rotates around the main line or a permitted leader; here the hook section is attached to a separate boom. It is not a spinner rig either: the hook on this version is tied to stiff filament rather than mounted on a spinner swivel. Our spinner-rig tutorial explains that alternative. Similar-looking pop-ups don't mean that the underlying connections can be swapped indiscriminately.
Hinged stiff rig components: the specified version
The list favours Korda and keeps the material choices consistent with the overview. Check the breaking strain, crimp size, permitted hook type and pack contents before buying.
Hook section and boom
- Korda Choddy hooks (paid link), in a fishery-permitted size matched to your pop-up.
- 20lb Korda Mouth Trap (paid link) for the short, knotted hook section.
- Korda rig ring (paid link) for the D, plus Korda bait floss (paid link) to secure the bait.
- Korda size-11 ring swivel (paid link) for the articulated hook-end connection.
- 20lb Korda Hybrid Stiff (paid link) for the boom, with Small 0.6mm Korda Krimps (paid link) and the matched Krimp Tool (paid link).
- Korda shrink tube (paid link) for the specified covered lead-end finish.
- A sufficiently buoyant pop-up (paid link) and Korda Dark Matter putty (paid link) for balancing.
Tools and complete lead-clip example
Use RazorBlades scissors (paid link), Pulla tools (paid link) and an appropriate baiting needle (paid link) if piercing the bait. A Chod It tool (paid link) is an optional shaping aid. For the lead-clip version, add the complete Lead Clip Action Pack (paid link) with its matched swivel and other parts, a suitable swivel lead (paid link) and main line (paid link). You don't need an extra quick-change swivel when using the pack's approved standard-swivel finish.
Korda's Krimps specification makes material and size matching important. The crimped boom here is Hybrid Stiff, not N-Trap or an arbitrary coated braid. Use the correct tool recess for the selected crimp. Don't choose a larger crimp because it is easier to thread or flatten one with ordinary pliers. If you replace the boom material, follow a complete rig approved for that replacement.
The hook section is a different material again. Mouth Trap is a stiff, shape-retaining rig filament; don't treat the name as another description of IQ2 fluorocarbon. The specified version knots that section. There's no benefit in changing its connection to a crimp merely because the boom is crimped.
Choose the bait and hook before setting the dimensions
Lay out the actual pop-up and hook before tying. A small bait that lifts an empty hair rig may fail to support this hook section after soaking. Conversely, a very buoyant bait may require more counterweight than expected. The target is not the smallest hook or the largest pop-up; it is an unobstructed hook and a bait that can support the intended section reliably.
The hook-section length determines part of the presentation height, but the curve, hook, ring and bait also occupy space. Measuring filament alone doesn't tell you the height of the top of the bait above the bottom. Make one reference rig, test it baited in water and note what you actually built. Our carp hook-size guide helps with pattern and size choices without assuming that one numbered hook suits every bait.
Likewise, don't shorten the boom simply to make the finished rig look compact in a storage box. It must separate the hook section from the lead and work on the chosen ground. Avoid changing boom length, hook-section length and bait size simultaneously while learning: if the presentation changes, you'll have no useful starting point for identifying why.
How to tie the hinged stiff rig
Use the numbered sequence below as a workbench checklist alongside Korda's full hinged-stiff demonstration. Its photographs show the threading and knot formation that a component diagram cannot. The rig uses a crimped Hybrid Stiff boom and a knotted Mouth Trap section; the lead-end swivel depends on the complete lead system chosen.
- Prepare the boom. Cut spare Hybrid Stiff. Thread a Small Krimp and the approved lead-end swivel, then return through the second barrel.
- Make the first connection. Set the tag and crimp with the matching tool. Slide on the specified shrink tube for the lead-end cover.
- Form the hinge end. Repeat the crimped connection through the large ring of the size-11 ring swivel, setting the boom length before compressing.
- Tie the hook section. Use Mouth Trap, a Choddy hook and the demonstrated knotless-knot construction. Retain a tag for the bait-carrying D.
- Complete the D. Add the rig ring, return the tag through the eye and make the specified retaining blob carefully.
- Join the sections. Set the hook-section length and attach it to the hinge swivel's small eye with the demonstrated two-turn blood knot.
- Finish and test. Test connections, shape the filament, finish the shrink tube safely, attach the bait and balance with putty around the hook-end boom crimp.
Separate making a connection from trusting it. After each one, look for crossed material, a damaged coating, a sharp bend beside the fitting or a tag that has moved. A pull test should load the actual connection in a controlled manner with suitable tools. It should not rely on your bare fingers beside an exposed hook. If anything slips or looks damaged, remake that section instead of covering the defect.
Heat deserves its own pause. A tag-end blob is a small retaining feature, not an invitation to heat the adjacent load-bearing filament. Work with the hook and material held securely away from your hands and flammable items. Shrink tube is finished with the maker's specified heat method, not a flame waved underneath the complete rig. Steam can burn just as surely as a flame; use suitable handling tools and keep your face and fingers clear. If you can't control the operation safely, get practical help.
Finally, hold the finished rig against the diagram and identify each connection aloud. Boom to large ring; hook section to small eye; bait ring free on the D. This simple check catches a surprisingly basic class of mistake: completing a neat connection to the wrong part. Neatness is useful, but the route through the components determines how the hinge works.
Balance the actual rig, not an example in a photograph
Use a container deep enough that the hook section can stand normally without touching the sides. Wet the complete baited rig, lower it carefully and watch from the side. The boom and counterweighted hinge should settle, while the pop-up supports the intended raised section. If the whole hinge lifts away from the bottom, it needs adjustment. If the bait collapses onto the hook, adding more putty cannot provide the missing buoyancy.
Add counterweight in small amounts and watch the effect after each change. Keep it firmly secured around the intended crimp area without spreading it over the moving ring, swivel barrel or hook-section knot. A big lump can produce a convincing sink rate while quietly preventing articulation. After adjustment, move the joint through its useful range and check that it has not become sticky or mechanically restricted.
Repeat the test after the bait has soaked for a period relevant to how you intend to fish. A quick dip confirms only that moment's behaviour. Baits can take on water or change after trimming, piercing or adding an attractor. There's no honest universal soaking time that certifies every bait for an overnight session. Check your combination at home, then recheck when you change the bait or encounter a different result on the bank.
A useful record is very simple: hook pattern and size, bait type and size, hook-section length, boom material, and where the counterweight sits. A photo of the rig in your test container helps you reproduce it. Don't turn that reference into a claim about underwater performance at every lake; a flat container cannot recreate an uneven bottom, line tension, current or a carp approaching the bait.
Finish with a complete safe lead system
The diagram deliberately ends before the lead system. For the lead-clip example in the shopping list, use the actual supplied components and the manufacturer's approved swivel connection. A component that looks close to the correct size is not a substitute. The clip must behave as specified, and the tail rubber must not be glued, forced into a permanent position or altered to keep the lead attached at all costs.
A helicopter arrangement is an alternative whole setup, not a single replacement swivel. Its top bead, any leader or tubing, connection knots and escape route all need checking together. Dropping the lead and releasing the hooklink after a main-line break are different safety functions. Neither the word “helicopter” nor a shop-bought ready-tied hook section proves that the finished system is safe.
Read the safe carp lead systems guide, check the venue's current rules and ask a competent fishery team member to inspect an unfamiliar arrangement. Describe which version you intend to use rather than presenting a bag of parts from several systems. Leaders are not compulsory, and restrictions on hooks, leaders or lead arrangements still apply to an otherwise well-made hinged stiff rig.
Casting, settling and checking the retrieve
Before casting, extend the boom, check the hinge is free and make sure the bait has not wound through the hook or swivel during handling. Keep the hook away from clothing, vegetation and your body. A carefully tied rig can be damaged on the bank before it ever reaches the water. Choose a lead weight within the rod's capability and include any additional carried material in the total load.
Use controlled practice casts in an appropriate clear area and learn how your chosen arrangement behaves. Don't infer that every cast is tangle-free because the boom feels stiff. If you use a dissolvable aid, check that it releases as intended in the actual conditions; it is another variable, not a repair for an incorrect connection. Follow the complete setup's casting advice rather than mixing instructions from unrelated lead systems.
On retrieval, inspect before straightening everything. Where is any tangle? Has putty moved? Is there debris on the point, a kink in the filament or damage beside a crimp? A retrieved tangle shows that a tangle exists now, not exactly when it formed. Our rig-tangle troubleshooting guide explains how controlled changes help separate casting, landing and retrieval problems.
Replace a damaged hook section; don't fish a blunted point because the boom still looks perfect. Inspect the reusable parts too, including the ring and swivel. Saving a boom is sensible only when its connections and material remain sound. Store rigs without forcing a sharp bend into the shaped section, and label different bait and hook combinations so that a tested reference rig doesn't become an unidentified assortment.
Hinged stiff rig troubleshooting
| What you see | Likely checks | Useful response |
|---|---|---|
| Bait and hook section collapse | Actual bait buoyancy after soaking; hook weight | Use a suitable bait and retest, rather than removing all counterweight blindly |
| Hinge lifts off the bottom | Counterweight and chosen pop-up | Adjust incrementally while retaining free articulation |
| Joint moves reluctantly | Putty spread, trapped material or damaged swivel | Clear the intended joint or replace the affected part |
| Boom arches unnaturally | Storage damage, incomplete straightening, unsuitable ground | Remake or correctly finish it; reconsider the spot |
| Crimp slips under pressure | Material, crimp size, tool and compression | Reject that connection; don't patch it with glue |
| Hookbait catches around the hook | D shape, bait attachment and casting control | Correct one cause at a time and repeat a controlled test |
Hinged stiff rig questions
Is the hinged stiff rig suitable for beginners?
It is learnable, but it is not the simplest first rig. You need to identify compatible materials, form the stiff hook section correctly, make and test crimps, balance a pop-up and check the complete lead system. Someone showing you a reliable example and checking your first attempts is more useful than assembling it quickly from a shopping list.
Can I use any coated braid for the boom?
No. This crimped rig specifies Hybrid Stiff. N-Trap and other coated braids must not be treated as equivalent simply because they share a nominal breaking strain. Changing material changes the connection requirements. Start again with a proven rig for the intended material rather than combining the knot from one guide with the crimp from another.
Does a hinged stiff rig need a pop-up?
The version taught here does. A sinking bait will not hold up the stiff hook section as intended, and a wafter designed merely to counteract some hook weight may also be unsuitable. Changing the tub label is not enough: test whether the actual bait supports this assembled rig. For a sinking presentation, the blowback guide offers a different starting point.
Is it the best rig for weed?
There's no useful blanket answer. A raised bait doesn't solve an unsafe landing route, deeply buried lead, obstructed boom or concealed point. Judge the amount and type of weed, the whole setup and your ability to land a fish. If that assessment is uncertain, move to a safer spot rather than relying on the name of the rig.
Must the boom be exactly the same length as the demonstration?
A demonstrated length is a reproducible starting point, not a rule for every bottom. While learning, reproduce a complete example before changing it. Once you can test the connections and explain the presentation, alter one dimension for a specific reason and check what changes in water and on controlled casts.
A practical final check
Check the permitted hook is sharp and both materials are undamaged. Pull-test every connection, check that the D and hinge move freely and test the soaked bait's balance. Then check the lead system and get the net, wet mat and unhooking tools ready. Take your time; the last checks deserve as much care as the tying.
The sources below show the components and construction used for this version. Use the linked manufacturer demonstration for connection detail and practical assistance for anything you can't inspect confidently. The aim is a hinged stiff rig you understand and can reproduce, not a collection of specialist components whose roles are unclear.