
Let's tie a rig
Blowback Rig Workshop: Build Along Step by Step
Build a knotted blowback rig with a Korda-first component checklist, illustrated assembly, moving-ring checks and progress saved on your device.
Next after the hair rig · 6 practical steps
Get your tackle ready
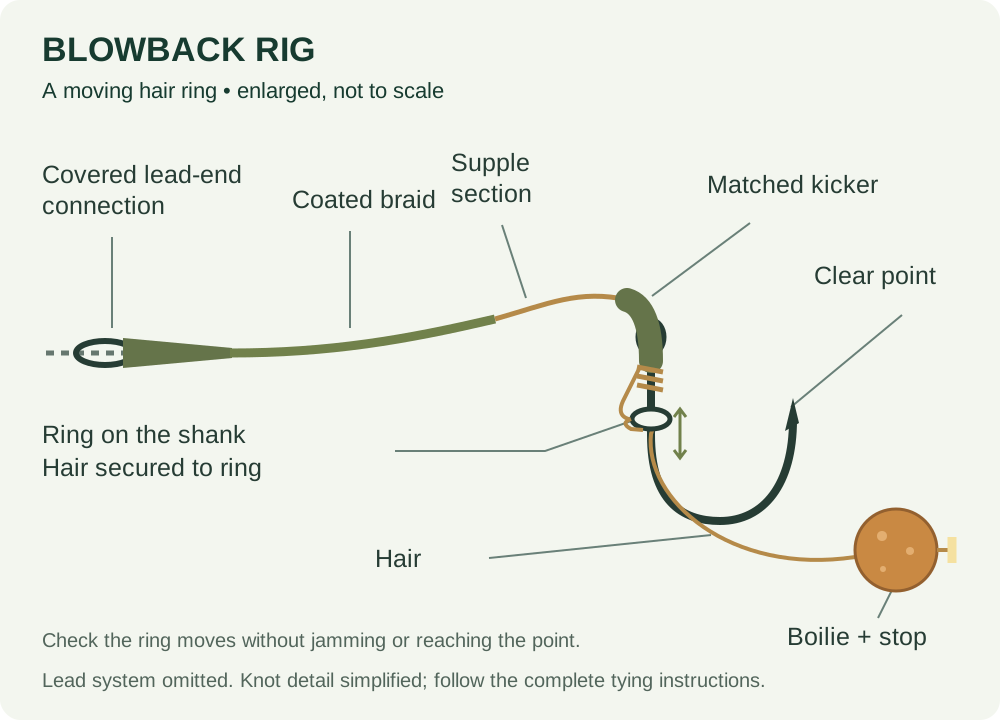
Got the hang of the hair rig? Let's add the small moving ring that makes this a blowback rig. We'll use knotted N-Trap and a sinking bait, then check that the ring travels freely. Take your time setting the hair and ring position; those small details are easier to understand with the rig in your hands.
Where to use it: Use on a checked clean spot with a sinking bait. This rig uses a size-6 Wide Gape X, medium Kicker and a freely moving rig ring. It is not Korda's crimped Hybrid Stiff DF rig: never crimp N-Trap.
New to this rig? Read the full blowback rig guide first, or try the rig selector if you're still choosing.
Progress can be saved on this device when JavaScript is available.
Download the printable beginner rig cards (PDF). Use your card as a reminder after learning this workshop. It includes the same component combinations and the checks to make before casting.
Build-along mode
Work through your rig
Check the component list before starting. You can browse ahead without marking a step complete.
0 of 6 steps checked.
Step 1 of 6
Prepare braid and bait
Cut roughly 30cm of N-Trap Soft and strip enough for the hair, knotless-knot wraps and a short flexible section above the hook eye. Tie the small overhand hair loop, mount your actual sinking bait and secure the stop. Inspect the braid after stripping. Use a little spare material rather than trying to finish a short, awkward offcut.

Check before moving on
The bait is secure and the braid is undamaged. The material is N-Trap, to be knotted rather than crimped.
Common mistake to avoid
Don't copy a crimped finish from a different blowback rig: the same rig name can use different materials.
Step 2 of 6
Locate and secure the rig ring
Pass the hair through the ring and secure it with an overhand knot in the intended position. Carefully pass the ring over the hook point onto the shank. With the hair laid behind the hook, position the ring approximately opposite the barb position (or equivalent point on a barbless hook) and check the bait has room below the bend. Adjust before tightening the hair-to-ring knot fully.

Check before moving on
The ring sits at the intended resting point with bait-to-bend clearance and can slide without catching.
Common mistake to avoid
Don't force a tight ring over the hook or leave it where it can jam at the eye or interfere with the point.
Step 3 of 6
Secure the hook with a knotless knot
Pass the working hooklink through the eye to the point side, holding the hair along the back of the shank. Make about seven to nine tidy adjacent turns towards the bend, starting away from the eye join. Return through the eye with a point-side exit, moisten and bed down. Keep the ring free of the wraps and recheck its position with the bait hanging naturally.

Check before moving on
The ring remains mobile, the knot is neat and the hair has not crossed the gape.
Common mistake to avoid
Trapping the ring beneath whipping removes the movement this presentation is intended to have.
Step 4 of 6
Seat the matched Kicker
Thread the medium Kicker down the free hooklink and seat it over the size-6 hook eye as intended by its maker. Use this preformed component rather than introducing steaming into the workshop. Check that it grips, doesn't split and doesn't obstruct the moving ring. Look at the finished hook section from both sides.

Check before moving on
The Kicker fits securely, with no trapped braid or blocked ring movement.
Common mistake to avoid
Changing hook size without checking Kicker size can leave a loose or overstretched connection.
Step 5 of 6
Finish the hooklink and connect the lead system
For a compatible quick-change connection, slide the anti-tangle sleeve onto the hooklink first, then tie a figure-of-eight loop. Aim for roughly 15–20cm finished length on this clean-bottom example. Seat the loop on the swivel and fully cover the crook with the sleeve. If your complete system requires a direct knot to its supplied swivel, use that specified connection instead; don't force a replacement swivel into a clip.

Check before moving on
The loop is seated, the crook is covered and the connection matches the lead-system instructions. Test every knot with rig pullers.
Common mistake to avoid
A neat-looking knot can still slip. Moisten, bed down and pull-test it; remake any damaged or slipping connection.
Step 6 of 6
Water-test and check the complete setup
Lower the actual baited rig into clear water and watch it settle. The hook point and gape must remain unobstructed. Recheck after the bait has soaked. Separately verify the complete manufacturer's lead arrangement and what can release after a main-line break, including knots, tubing and any leader. Check venue rules and have your net, wet mat and unhooking tools ready. If any part is uncertain, ask the fishery team or an experienced angler before casting.

Check before moving on
I have tested the connections and bait presentation, checked the line-break escape path and confirmed the venue rules. A tick records my check, not a safety certification.
Common mistake to avoid
Don't test hook sharpness on your skin or cast an untested setup into weed or snags. Repeat checks after damage, a fish or a bait change.
Check the whole setup before fishing
Stick to the version shown while you're learning, and follow the instructions supplied with your tackle. If a knot slips, a part doesn't fit or you're unsure what releases after a break, stop and ask an experienced angler to have a look. Check the fishery rules and the swim too; finishing the steps here can't do those jobs for you.
Need a closer look at a knot? Try our fishing knots guide. The beginner rig guide will help you compare this rig with the other options.
Manufacturer guides
Workshop prepared 21 September 2026. Manufacturer demonstrations may show a different version. Check compatibility before swapping knots, crimps or lead components between setups.