
Let's tie a rig
Fixed Zig Rig Workshop: Tie and Set the Fishing Depth
Build a fixed zig rig with illustrated tying steps, a depth calculator, Korda-first component links, buoyancy checks and saved workshop progress.
Measure depth and plan the cast · 6 practical steps
Get your tackle ready
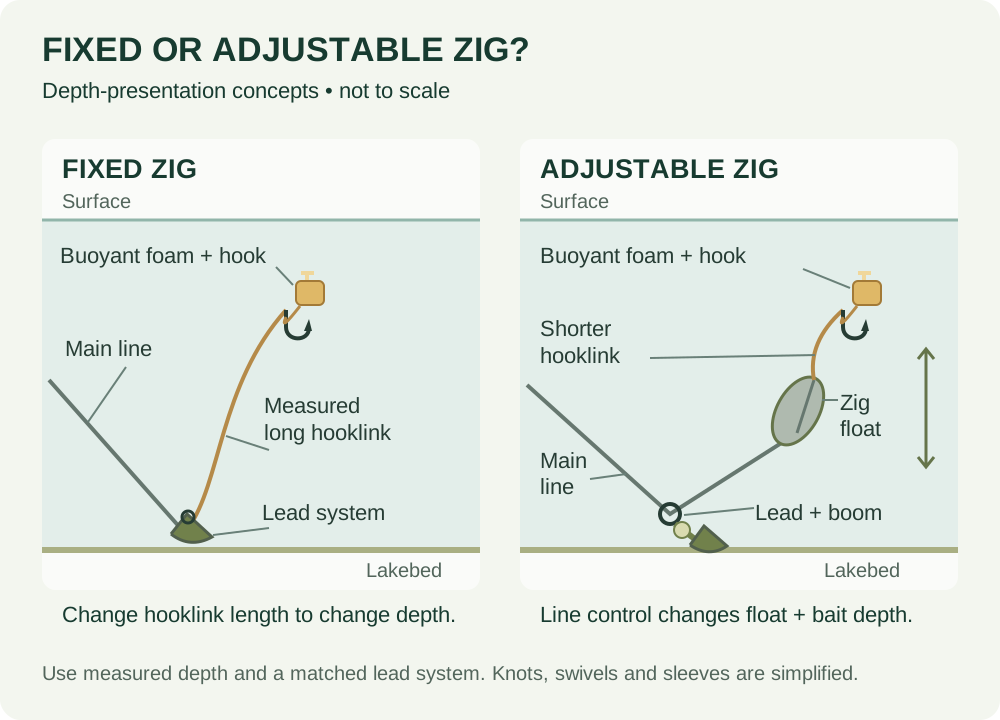
Let's work out the depth and tie a fixed zig to suit it. The lead stays on the bottom while a buoyant hookbait sits higher in the water. Use the calculator to turn your chosen depth below the surface into a hooklink length. This is a fixed zig: letting out more main line won't change its depth as it would with an adjustable zig float.
Where to use it: For permitted open-water fishing at a measured depth, with clear casting and landing space. Use dedicated buoyant zig hooklink, not sinking IQ2. Long hooklinks need appropriate casting and netting technique; get experienced help before attempting lengths you can't manage safely.
New to this rig? Read the full fixed zig rig guide first, or try the rig selector if you're still choosing.
Progress can be saved on this device when JavaScript is available.
Build-along mode
Work through your rig
Check the component list before starting. You can browse ahead without marking a step complete.
0 of 6 steps checked.
Step 1 of 6
Measure the water and choose the height
Establish the actual depth at your intended spot before choosing a hooklink. Decide whether you're recording height above the bed or distance below the surface. For a fixed zig, the nominal finished hooklink is water depth minus the chosen distance below the surface: in 3m of water, 1m below the surface means about 2m above the bed. Use the calculator below as a planning aid, not a measurement of current, slope or line angle. Leave extra material for knots.
Fixed-zig depth planner
Use a measured water depth. Both measurements use the unit selected below; changing units converts the values.
Nominal finished hooklink: 2 m above the bed.
This is a vertical planning estimate, not a casting recommendation. Current, line angle and bottom contours affect actual bait depth. Add spare material for knots, then measure the finished link. Planner values are not saved with your step ticks.

Check before moving on
The water depth is measured, the units match and the planned bait height is within the water column.
Common mistake to avoid
Don't confuse a 1m surface clearance with a 1m hooklink, or cut a knot allowance off the finished target length.
Step 2 of 6
Mount the foam and set the short hair
Cut more Zig Line than the intended finished length so there is room for knots. Make a tiny overhand hair loop, draw it through a small piece of zig foam and seat a bait stop. Pass the working line through the Mixa eye to the point side. Set the foam close to the bend while keeping the point and gape unobstructed. Inspect the fine nylon for kinks before tying; don't use sinking fluorocarbon because it happens to be clear.

Check before moving on
The foam is secure and close to the hook, with the hook point exposed and the nylon undamaged.
Common mistake to avoid
An unnecessarily long hair or oversized foam can mask the point or change how the bait supports the hook.
Step 3 of 6
Tie the hook and fit the silicone
Make about ten to twelve adjacent knotless-knot turns around the shank and hair, working away from the eye join. Return the working line through the eye towards the point, moisten and tighten carefully so the fine nylon doesn't burn or kink. Thread roughly 10mm of correctly fitting silicone down the free end and over the eye, leaving it extending slightly up the hooklink. Inspect the covered connection; don't force tubing that splits or grips badly.

Check before moving on
The hook knot holds and the correctly fitting silicone covers the eye without damaging the line.
Common mistake to avoid
Don't use a large carp-rig Kicker by default or dry-cinch a knot in fine nylon.
Step 4 of 6
Measure the finished link and connect
Measure from the hook connection to the planned lead-end connection, allowing for the loop as you tie it. Fit the anti-tangle sleeve before forming a figure-of-eight loop; moisten, bed down and pull-test. Re-measure the finished length rather than assuming the cut length survived knot tying unchanged. Attach only to an approved connection in the complete lead system and cover any quick-change crook. No adjustable float or counterweight belongs on this fixed-zig hooklink.

Check before moving on
The finished length matches the intended nominal height, both knots hold and the lead-end connection is secure.
Common mistake to avoid
A simple overhand loop at the lead end is not the specified figure-of-eight finish for this fine nylon.
Step 5 of 6
Test the complete baited hook for lift
Immerse the actual hook, foam, stop, silicone and wet hooklink in clear water with room for them to move freely. Confirm the bait has enough lift for the whole assembly, then repeat after soaking. A small container checks buoyancy, not the full fishing depth: it cannot prove a long hooklink stands vertically in the lake. Replace damaged foam or adjust its size carefully and retest. Don't add putty to make this behave like a bottom-bait rig.

Check before moving on
The soaked foam supports the actual hook assembly and the point remains unobstructed.
Common mistake to avoid
Floating foam on its own doesn't prove it will lift a wet hook and long hooklink.
Step 6 of 6
Plan a clear cast and record the depth
Check the entire line-break escape path and that the lead system, hooklink and hook comply with venue rules. Lay the long hooklink on a clean unhooking mat clear of people, animals and obstructions; make sure it cannot catch the rod tip or your body. Begin only with a length and controlled cast you can manage safely, seeking hands-on help for longer links. Have a landing plan ready. Record the measured depth and finished length, and inspect for tangles and damage after retrieval.

Check before moving on
The casting and landing area is clear, the full system is checked and the fishing depth is recorded accurately.
Common mistake to avoid
Don't drag a long link through vegetation or assume feeding out main line raises a fixed zig.
Check the whole setup before fishing
Stick to the version shown while you're learning, and follow the instructions supplied with your tackle. If a knot slips, a part doesn't fit or you're unsure what releases after a break, stop and ask an experienced angler to have a look. Check the fishery rules and the swim too; finishing the steps here can't do those jobs for you.
Need a closer look at a knot? Try our fishing knots guide. The beginner rig guide will help you compare this rig with the other options.
Manufacturer guides
Workshop prepared 21 September 2026. Manufacturer demonstrations may show a different version. Check compatibility before swapping knots, crimps or lead components between setups.