
Let's tie a rig
Multi Rig Workshop: Tie, Balance and Change the Hook
Build a pop-up multi rig with illustrated steps, a Korda-first checklist, loop and hook-change checks, water testing and progress saved on your device.
Learn loop retention · 6 practical steps
Get your tackle ready
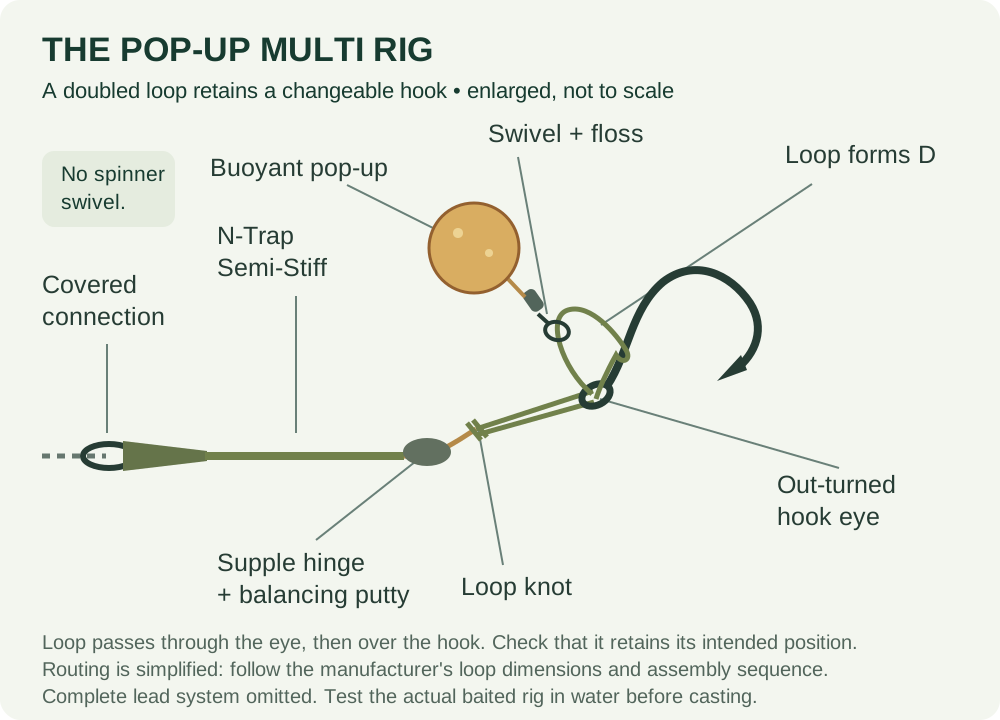
Fancy learning a rig that lets you change the hook without tying a whole new hooklink? We'll build a coated-braid pop-up multi rig and show how the loop holds the hook and carries the bait swivel. Follow the steps, test the balance, then practise a hook change so you know what to check afterwards.
Where to use it: For a checked spot where the coated body and counterweight can settle. This is the N-Trap Semi-Stiff pop-up multi, not a combi-multi or a spinner rig. A raised bait doesn't make it suitable for dense weed or unsafe snags.
New to this rig? Read the full multi rig guide first, or try the rig selector if you're still choosing.
Progress can be saved on this device when JavaScript is available.
Build-along mode
Work through your rig
Check the component list before starting. You can browse ahead without marking a step complete.
0 of 6 steps checked.
Step 1 of 6
Make and test the hook-end loop
Cut roughly 25–30cm of N-Trap Semi-Stiff as a working allowance. Double the hook end, form a figure-of-eight loop, moisten it and bed it down with pullers. Follow the linked knot guide and manufacturer's loop proportions; the loop must pass through the selected eye and over the hook without force. Inspect the knot and leave a visible trimmed tag. Don't strip the entire loop or substitute a simple overhand knot.

Check before moving on
The loop is neatly formed and holds under a controlled pull test, with no crushed coating or frayed fibres.
Common mistake to avoid
A loop that looks tidy but slips or will not fit the chosen eye needs remaking, not extra force.
Step 2 of 6
Create the hinge and finish the lead end
Use the stripping tool to expose a short supple section immediately below the hook-loop knot, leaving the coated body intact. Check every exposed fibre. At the opposite end, slide on the sleeve and tie the lead-end loop for the approved quick-change connection, or use the whole setup's specified direct knot. Pull-test this second connection independently. The hinge is a deliberate local change in flexibility, not a reason to remove all the coating.

Check before moving on
The hinge bends freely without damaged fibres, and the separate lead-end knot passes its pull test.
Common mistake to avoid
Don't hide stripping damage under putty; cut a fresh length and start again.
Step 3 of 6
Fit the hook and retain the bait swivel
Push the hook-end loop through the front of the out-turned eye, from the point side towards the back. Slide the Micro Ring Swivel onto the projecting loop. Open the loop carefully over the hook point and bend, then draw it into the demonstrated retained position, leaving the bait-carrying D. Keep the point away from your fingers. Inspect both strands at the eye and check retention before adding bait.

Check before moving on
The loop retains the hook without crushed strands, and the bait swivel can move on the D.
Common mistake to avoid
This rig has no spinner swivel or shank-mounted hook bead. Don't import those parts from the Ronnie workshop.
Step 4 of 6
Attach the actual pop-up
Pass bait floss through the bait swivel ring, use the needle to mount the actual pop-up and secure it with repeated overhand knots around the bait, as in the existing pop-up workshops. Pull-check the attachment without pulling the hook towards your hand. Check that neither the bait nor the floss crowds the point, and move the swivel through its available travel. Refit a damaged or loose bait before balancing.

Check before moving on
The pop-up is secure, the D remains correctly seated and the bait attachment moves without catching.
Common mistake to avoid
A larger or softer replacement bait can change clearance and buoyancy even when the flavour is unchanged.
Step 5 of 6
Balance at the hinge and water-test
Mould a small amount of putty securely at the intended hinge near the loop knot, keeping the flexible section and bait swivel able to work. Lower the complete baited rig into clear water and let the coated body settle. Adjust ballast in small amounts until the pop-up supports the hook section above the counterweight as intended. Repeat after soaking, with no hand tension supporting the rig. If buoyancy is inadequate, change the bait rather than accepting a collapsed presentation.

Check before moving on
The wet pop-up supports the intended hook section, the body settles and the counterweight stays attached.
Common mistake to avoid
Smearing putty over the whole hinge or relying on a dry bait-only float test conceals the actual presentation.
Step 6 of 6
Practise a hook change and recheck
With the bait out of the way, carefully reverse the hook-fitting sequence: open the loop over the point, remove the bait swivel and withdraw the loop from the eye. Inspect its contact points for wear before fitting the same suitable hook pattern again. Recheck retention, pull-test and repeat the bait-balance test. Finally cover the compatible lead-end connection and verify the whole line-break escape path, venue rules and landing equipment before casting.

Check before moving on
The refitted hook is retained, the undamaged loop holds and the complete baited setup has been retested.
Common mistake to avoid
A new hook doesn't renew a worn hooklink. There's no guaranteed number of safe hook changes.
Check the whole setup before fishing
Stick to the version shown while you're learning, and follow the instructions supplied with your tackle. If a knot slips, a part doesn't fit or you're unsure what releases after a break, stop and ask an experienced angler to have a look. Check the fishery rules and the swim too; finishing the steps here can't do those jobs for you.
Need a closer look at a knot? Try our fishing knots guide. The beginner rig guide will help you compare this rig with the other options.
Manufacturer guides
Workshop prepared 21 September 2026. Manufacturer demonstrations may show a different version. Check compatibility before swapping knots, crimps or lead components between setups.