
Let's tie a rig
Solid PVA Bag Workshop: Rig, Pack and Test
Tie a short solid PVA bag rig, assemble the matched inline system, pack and seal the bag, then test its melt. Illustrated workshop with a component checklist.
Hooklink + bag packing · 6 practical steps
Get your tackle ready
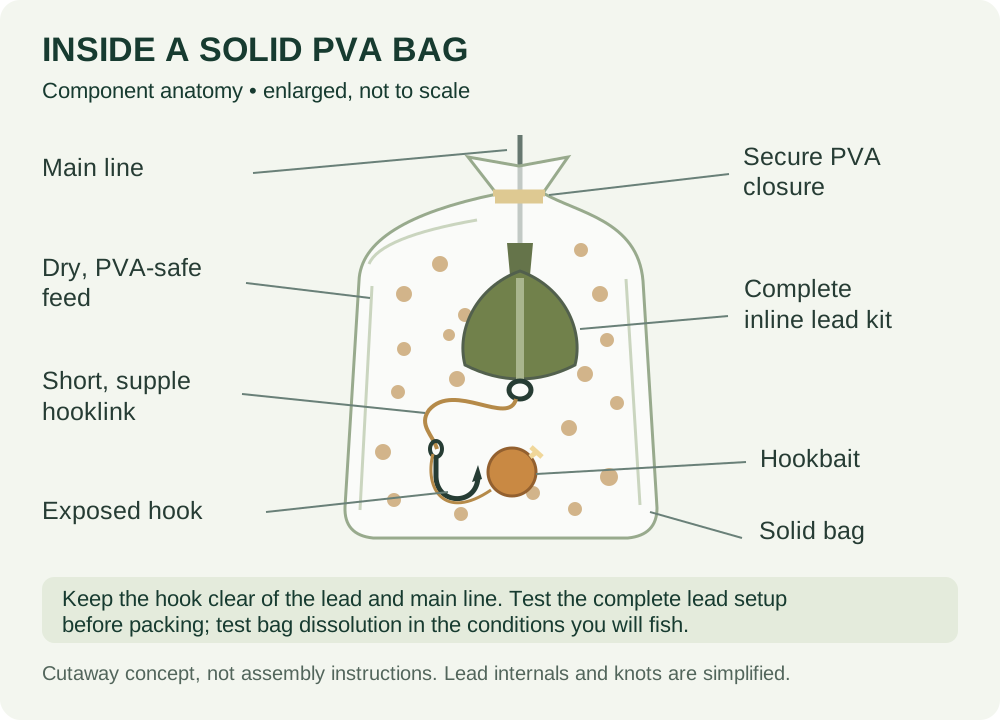
Let's put a solid PVA bag together from start to finish. We'll tie a short supple hooklink, check the inline lead system and pack the rig into a compact bag of feed. Then we'll test a bag in water to see how it releases. Getting the packing right is just as useful as getting the knot right.
Where to use it: For a checked spot where the bag can settle and dissolve freely. Not a way to make dense weed or snags safe. This version uses the complete Korda Inline Safety Kit: its lead, numbered insert with moulded-in ring swivel and tail rubber stay together.
New to this rig? Read the full solid pva bag guide first, or try the rig selector if you're still choosing.
Progress can be saved on this device when JavaScript is available.
Download the printable beginner rig cards (PDF). Use your card as a reminder after learning this workshop. It includes the same component combinations and the checks to make before casting.
Build-along mode
Work through your rig
Check the component list before starting. You can browse ahead without marking a step complete.
0 of 6 steps checked.
Step 1 of 6
Tie a short supple hooklink
Use uncoated supple braid and leave spare material for tying. Make a small hair loop, mount the actual hookbait and secure the bait stop. Set the hair with the point and gape clear. Tie the knotless knot with tidy adjacent turns and a point-side exit, as in the hair-rig workshop. Allow for a finished hooklink of roughly 7–10cm after its lead-end knot; don't fold a long stiff boom into the bag.

Check before moving on
The bait is secure, the short hooklink is supple and the hook point remains clear.
Common mistake to avoid
A wafter is not automatically balanced. Test it with this actual hook before putting anything in a bag.
Step 2 of 6
Assemble and check the complete inline kit
Match the numbers on the kit's lead and insert. Route the main line, tail rubber and insert exactly as the supplied instructions show. Attach the hooklink to the moulded-in ring swivel with the recommended knot, not an added quick-change swivel. Moisten, bed down and test the connections. Verify the manufacturer's main-line-break release behaviour before packing; don't glue, pin or overtighten parts that need to separate.

Check before moving on
The kit is correctly assembled, connections hold and the specified escape path works without obstruction.
Common mistake to avoid
An inline lead is not automatically safe. A generic inline diagram is not a substitute for this kit's assembly instructions.
Step 3 of 6
Test the bait, then dry the components
Lower the baited hooklink into clear water. Confirm the wafter doesn't lift the hook unexpectedly and the hair doesn't mask the point. Change or trim the bait and retest if needed. Dry the assembly and your hands before working with PVA. Set out a fresh bag, dry pellets and tape on a dry surface.

Check before moving on
The rig settles as intended and everything that will touch the bag is dry.
Common mistake to avoid
Moisture left from the water test can weaken a bag before you cast.
Step 4 of 6
Pack the hookbait, hooklink, lead and feed
Add a shallow layer of fine dry feed, then place the hookbait and hook section so the point cannot catch the main line or lead. Arrange the short supple hooklink without pulling the hair around the hook. Add the matched lead and more feed, tapping gently to fill voids. Keep the lead central and leave enough empty neck to close the bag. Compress carefully without crushing the hook point against a hard pellet or lead.

Check before moving on
The parcel is compact, the hooklink is not stretched and the point is kept clear of the main line and lead.
Common mistake to avoid
Air pockets and an oversized bag make an awkward payload. More feed is not automatically better.
Step 5 of 6
Seal the neck and tidy the corners
Twist the spare neck snugly around the exiting line or tubing without trapping it in a knot, and tie the neck with PVA tape. Trim surplus bag material carefully, away from the line. Tuck the bottom corners in and lightly dampen only the areas needed to stick them down. Keep the rest dry. Make small vent holes if required by the bag maker, taking care not to prick the hooklink.

Check before moving on
The bag is closed and compact, with no split seams or trapped line. Repack if it is damaged.
Common mistake to avoid
Don't soak the entire bag to seal it or cut blindly near the main line.
Step 6 of 6
Sacrifice a test bag and check the casting load
Test a matching packed bag in venue-temperature water and watch until the PVA has released the contents and cleared the hook. There's no universal melt time. Check that the bait and hooklink settle freely without residue holding them together, then prepare a fresh dry bag for fishing. Verify the whole payload is within the tackle's capability, the fishery permits the setup and your landing equipment is ready. Start with a controlled short cast only after all checks pass.

Check before moving on
The test bag releases properly, the hook is clear, the complete rig has been checked and the total payload is appropriate.
Common mistake to avoid
Don't cast the wet test bag or assume a cold-water bag melts like one tested in warm tap water.
Check the whole setup before fishing
Stick to the version shown while you're learning, and follow the instructions supplied with your tackle. If a knot slips, a part doesn't fit or you're unsure what releases after a break, stop and ask an experienced angler to have a look. Check the fishery rules and the swim too; finishing the steps here can't do those jobs for you.
Need a closer look at a knot? Try our fishing knots guide. The beginner rig guide will help you compare this rig with the other options.
Manufacturer guides
Workshop prepared 21 September 2026. Manufacturer demonstrations may show a different version. Check compatibility before swapping knots, crimps or lead components between setups.