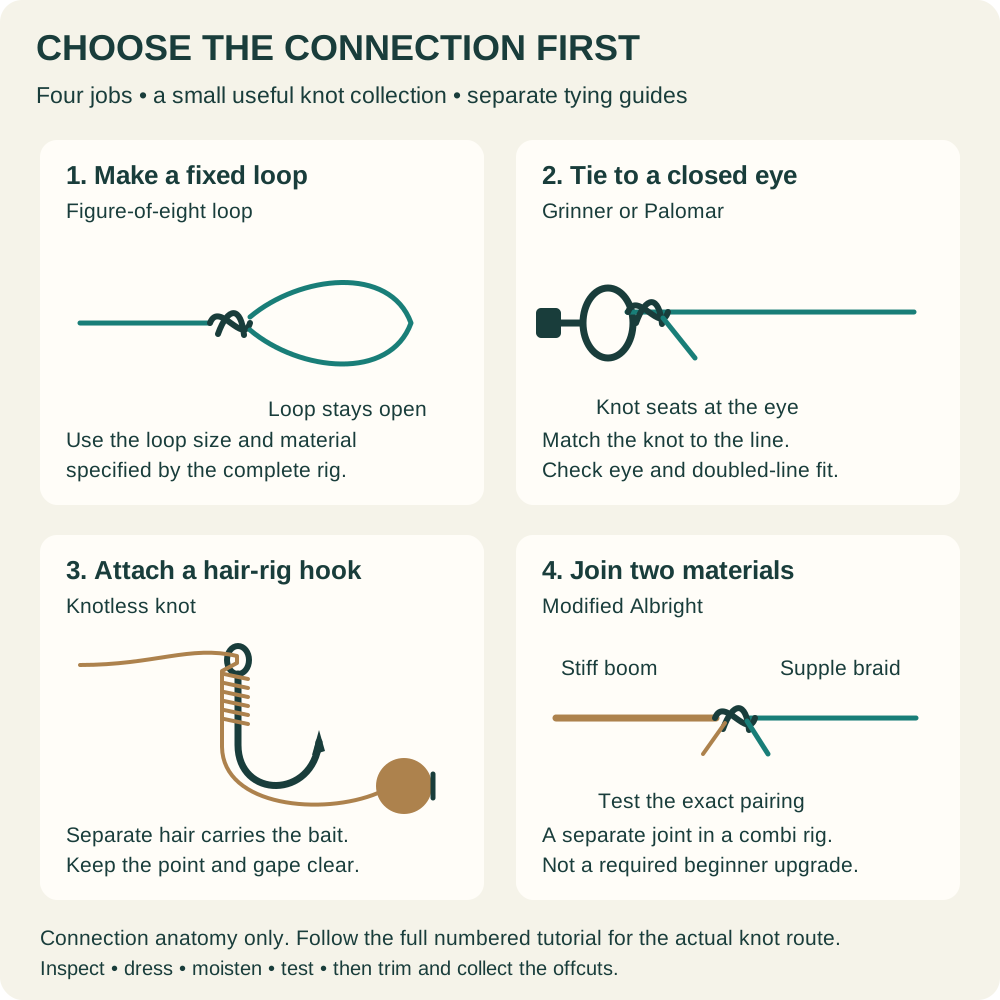
You've tied the rig; now let's get the hookbait mounted and balanced. A hair and bait stop, bait floss or a bait screw can each do the job on the right rig. We'll go through all three, then test bottom baits, wafters and pop-ups in water. A few minutes checking the finished baited rig is time well spent.
This illustrated workshop covers three attachment methods: a conventional hair and bait stop, floss through a bait swivel, and a purpose-made bait screw. It then shows how to check bottom baits, wafters and pop-ups in water. Start with one method and a rig you can already tie reliably. You don't need every accessory in the shopping list, and changing the attachment is not automatically an improvement.
For choosing a bait type, read our pop-ups, wafters and bottom-baits comparison. For the hook and hooklink construction, use the illustrated beginner rig guide. Here the job is narrower: attach your actual bait, examine what it does, and make a controlled adjustment if needed.
Decide what the finished hookbait should do
A bottom bait should sink with the arrangement intended for that rig. A wafter provides some buoyancy but is normally counterbalanced by the hook assembly, rather than lifting the complete hooklink off the bottom. A pop-up rig uses a buoyant bait and an appropriate counterweight or weighted hook assembly to establish the intended raised presentation. These are different targets, not three grades of the same test.
Write the target in plain language before starting: “the hook rests on the base while the bait lifts the hair”, for example, or “the pop-up supports the hook section above its weighted hinge”. The exact posture depends on the rig. Don't judge a KD wafter presentation against a hinged-stiff pop-up picture, or assume every spinner rig should stand at the same angle.
Mainline's High Impact Wafter guidance describes using the hook's weight to counterbalance the bait. That is a starting principle, not proof that every size of hook will balance every wafter. Hook pattern, wire thickness, bait size and attached hardware all change the combination in your hand.
Hookbait mounting components: buy for one method
For a simple hair
- A completed, tested hair rig, using suitable Korda Wide Gape X hooks (paid link) and N-Trap coated braid (paid link) where permitted. The linked hook is barbed; choose a permitted variant, not this listing at a barbless-only venue.
- A Korda Fine baiting needle (paid link) suitable for the softness and diameter of your bait.
- Korda Hybrid Bait Stops (paid link) and a suitable bottom-bait boilie (paid link) or Mainline wafter (paid link).
For floss mounting
- A finished rig with the correctly retained Medium Korda Micro Ring Swivel (paid link) or the rig ring (paid link) specified by its rig.
- Korda Bait Floss (paid link), clear Korda Floss Caps (paid link), a suitable baiting needle and Korda RazorBlades scissors (paid link).
- The selected wafter or pop-up hookbait (paid link). The cap method also needs controlled heat to finish the floss; use the hair method if you can't do that safely.
Optional alternatives and balancing
- Korda Bait Screw Swivel Large (paid link) is a different attachment option, not an extra part to add alongside the micro swivel. This linked product is Large; check ring, bead, hook and bait compatibility rather than replacing a Medium swivel automatically.
- Korda Dark Matter putty (paid link) where the chosen pop-up rig specifies a counterweight.
Also set out a dry tray, clean water container, a ruler and somewhere secure for hooks. These ordinary items don't need specialist tackle branding.
Choose each component for its job and compatibility. The list favours Korda, but suitable components from other manufacturers can also be used.
Check what is already in your tackle box. A bait stop is not a Floss Cap, and a bait swivel is not the larger load-bearing swivel at the lead end. Lay the small parts beside the chosen rig before opening packets. If your rig retains its bait attachment on the hook shank, it also needs the exact retaining bead specified by that rig; the D of a D-rig is a different arrangement.
Method one: mount a boilie on a hair
The hair method keeps the bait separate from the hook point and uses a stop through the small loop beyond the bait. It is a useful first skill because the completed result is easy to inspect. Use the existing hair on a properly tied rig rather than tying an improvised extra loop around the hook bend.
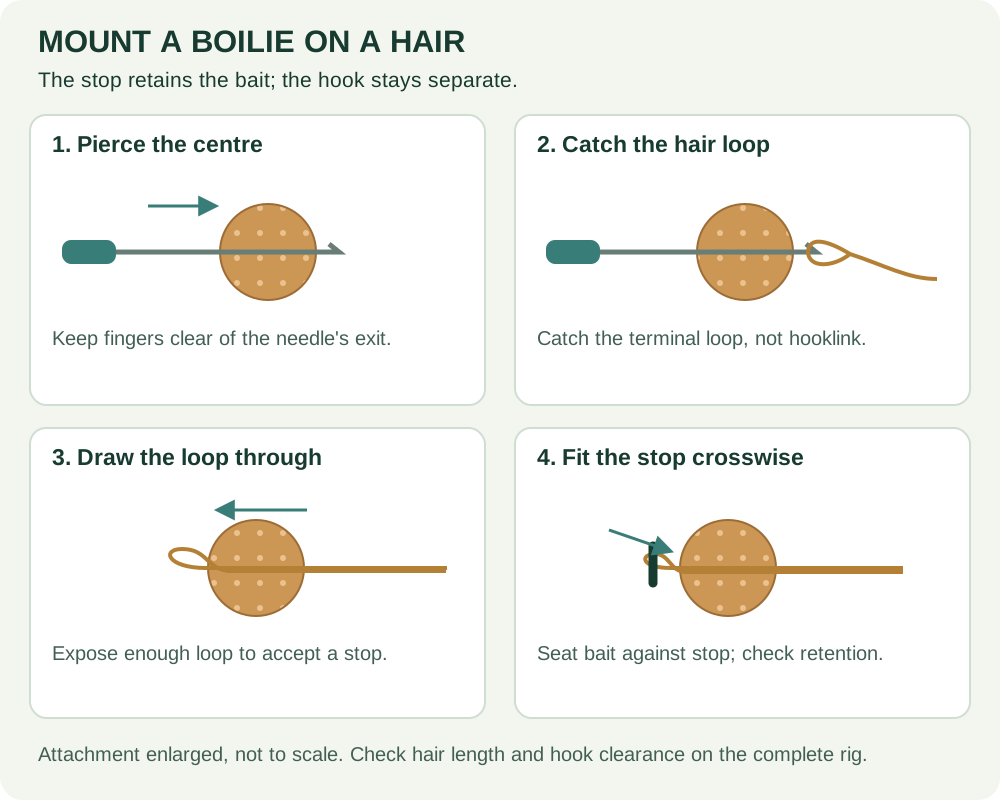
- Inspect the bait. Choose an intact boilie with enough substance around the planned hole. A cracked or crumbling bait is unlikely to become secure just because the stop is larger.
- Pass the needle through its centre. Support the bait without placing a finger in the needle's exit path. Use a suitable needle or a properly matched bait drill for hard baits; don't force a fine needle until it bends.
- Catch the hair loop. Open a gated needle if applicable, pick up the small terminal loop, then close the gate. Don't catch the main hooklink by mistake.
- Draw the loop through. Move the bait gently off the needle and onto the hair. Expose enough loop beyond the bait to accept the stop without dragging the hair knot into the bait.
- Fit the stop crosswise. Place it through the exposed loop and draw the bait back against it. The stop lies across the hole, not lengthways inside it.
- Inspect the complete presentation. Check retention with a gentle tug and move the bait around the hook. The point and gape must remain clear, and the hair must not already be wrapped around the shank.
The correct hair length depends on the hookbait and the rig instructions. Don't copy a fixed millimetre gap from an enlarged drawing. A larger boilie, two baits or an extending stop changes the effective separation. If the bait crowds the bend, remake the hair appropriately rather than moving the knotless-knot whipping at random.
Two small baits can also differ from one large bait even when their total length looks similar. They may hinge against one another or leave the upper bait against the hook. Rotate the assembled baits through their likely range of movement. If they repeatedly cover the point, change the arrangement and test again before fishing it.
A hair stop should retain the bait without cutting deeply through it. Soft meat and delicate corn need their own handling and attachment decisions; our sweetcorn guide and luncheon-meat guide cover those baits. Don't treat a hard-boilie tutorial as permission to force the same needle and stop through everything.
Method two: attach a hookbait with floss and a cap
Floss is useful when the rig carries its hookbait on a small swivel or ring rather than an ordinary hair. The bait attachment must already be fitted and retained correctly. On a spinner rig, for example, the small bait swivel on the shank is distinct from the spinner swivel at the hook eye.
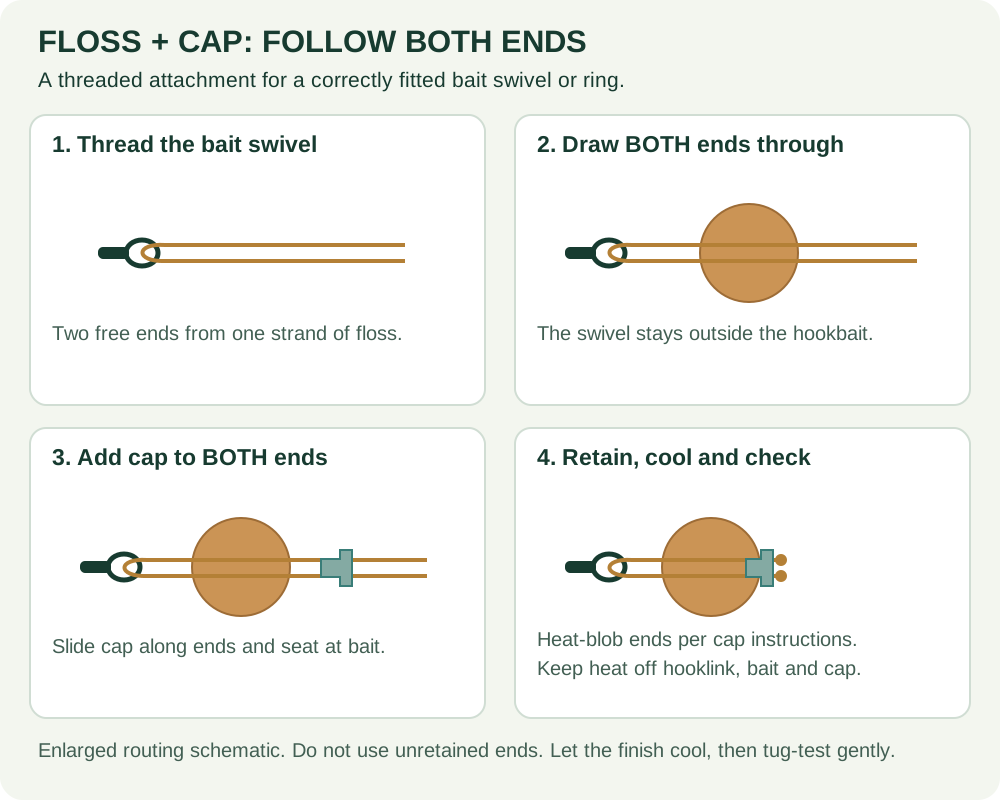
- Thread fresh floss through the bait-carrying eye. Bring its two free ends together, leaving enough length to handle without pulling the hook towards your fingers.
- Pierce the hookbait with the suitable needle. Catch both floss ends and draw them through the bait. Ease the bait towards the swivel without trapping the swivel's moving section inside the bait.
- Thread both ends through the Floss Cap. Seat the cap neatly against the outer face of the bait, following the cap manufacturer's fitting instructions.
- Finish the ends as specified. Korda's cap requires heat-blobbed floss ends to retain it. Work in a clear, sheltered position away from dry grass, clothing, bait liquids and the hooklink; allow the finish to cool before touching it. Don't melt the cap or heat the fishing line.
- Check the retained bait. Apply a gentle tug, then confirm that the swivel or ring still moves as the rig requires. A bait which pulls off or jams the attachment needs refitting.
These steps follow the component routing described in Korda's Floss Cap instructions. If the heat step is awkward in wind or unsafe on the bank, prepare suitable hook sections safely beforehand or use a different, properly demonstrated attachment. Don't leave unretained floss ends and hope that friction holds the bait.
Floss can also be used to tie around a bait instead of passing through it. Korda describes both approaches in its Bait Floss guidance. That tied-around method needs its own secure knot and seating; it is not achieved by omitting the cap from the threaded method above.
Keep the finished attachment compact enough that it doesn't wedge against the hook bead or restrict the D. When changing baits, remove discarded floss and caps into a rubbish container immediately. Small clear components are very easy to lose on the ground, and a tidy tray makes it easier to see whether an old piece is still caught around the swivel.
Method three: use a purpose-made bait screw
A bait screw offers a quick change without a hair stop or floss. Use one designed for fishing hookbaits and appropriate for the rig, not a household screw or a random metal spiral. Its attachment eye or ring must be able to move and be retained as the rig requires.
Korda's Bait Screw Swivel instructions specify screwing into the bait clockwise. Hold the bait securely, start centrally and turn it onto the screw until seated. Stop if the bait splits, the screw breaks through an unsuitable small bait or the attachment is forced into the bait. Check retention gently and inspect the swivel's movement.
The linked Large version is an option for a suitably matched arrangement, not the default replacement for every Medium bait swivel shown elsewhere. The screw contributes weight, and its ring dimensions affect retention. Recheck both if converting an existing rig. If you can't confirm the fit, keep the proven floss-mounted version rather than enlarging a retaining bead or bending a metal part.
Softened baits need particular attention after soaking. A screw that held firmly when first fitted may loosen as the bait changes. Reusing the same enlarged hole can also give a poor grip. Replace a damaged bait and repeat the water test; convenience is valuable only while the attachment remains dependable.
How to balance carp hookbaits in water
Use a container with enough width for the hooklink to lie freely and enough depth for the intended pop-up height. A tiny mug can hold the line against its side and make an unsuitable combination look balanced. Use representative water temperature, keep the hook point away from your hands and don't leave a baited rig where a child or animal can reach it.
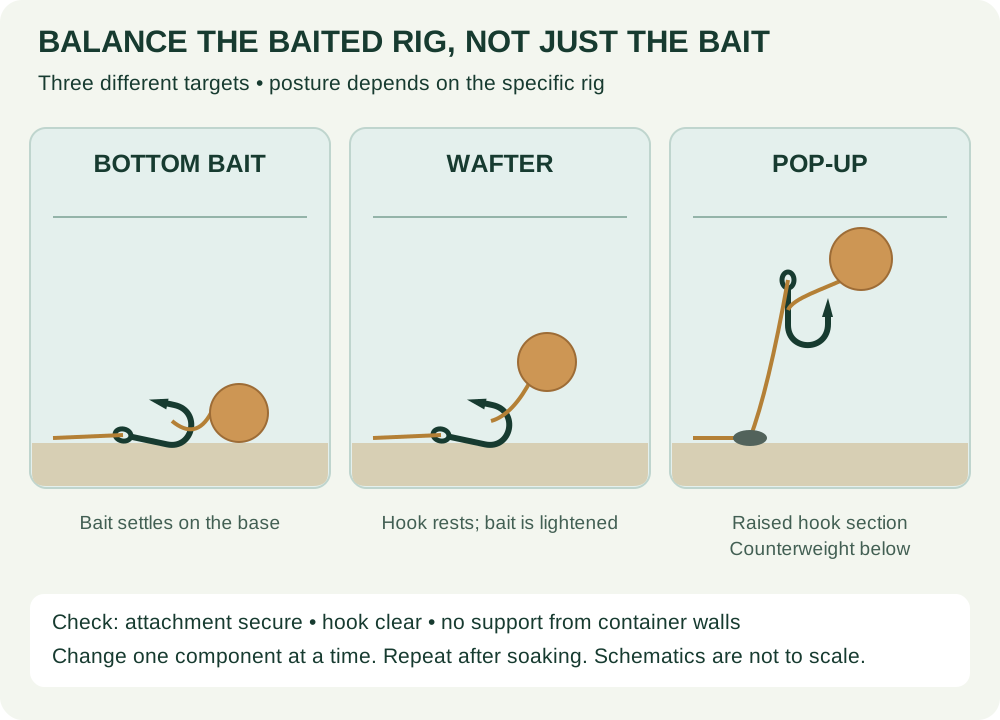
- Assemble the actual combination. Include the hook, attachment, bait and any specified counterweight. Testing a bare bait only tells you whether that bare bait floats.
- Lower everything gently. Let the hooklink settle without supporting it from above. Keep the lead outside the container if necessary, but leave enough slack that it doesn't pull the tested hook section.
- Watch from the side. Compare the hook position, bait position and counterweight with your target. Check that no part is resting on the container wall.
- Change one thing. Replace an unsuitable bait size or adjust the specified counterweight in small increments. Keep the rig's intended hinge and moving attachments free.
- Repeat after soaking. Observe whether the bait and attachment remain secure and whether the presentation changes. Note the actual interval you tested, rather than claiming a quick dip proves an overnight result.
- Recheck after a component change. A new hook pattern, screw, bait size or extra cap may alter the result even when the rig has the same name.
There's no universal rule that a balanced bait must take a particular number of seconds to sink. Some presentations deliberately settle more positively than others. A useful test produces the intended posture repeatedly and leaves the hook working freely; chasing the slowest possible descent can distract you from both requirements.
Adjust a wafter without rebuilding the wrong part
If a wafter lifts the hook when your chosen presentation requires it to rest, start by checking that you have selected a wafter rather than a visually similar pop-up. Then try a smaller or less buoyant suitable bait, or a maker-approved adjustment. Trim only a bait designed to tolerate it, remove small amounts and test again. Cutting changes shape and exposes the interior, so check the soaked result as well.
Don't immediately fit a much larger hook just to sink the bait. The hook still needs to suit the rig, bait clearance, fishing situation and fishery rules. It is often more sensible to find a bait that works with your appropriate hook than to let one pot of wafters dictate the entire presentation.
If the bait sinks firmly, that doesn't mean it cannot catch a carp. It means it is not producing the lightly counterbalanced result you intended. Decide whether a sinking presentation is acceptable or change the bait. Avoid describing it as a perfectly balanced wafter merely because that is printed on the tub.
Adjust a pop-up at the intended counterweight
On rigs which specify putty at a hinge or weight position, add a small amount there and repeat the test. Keep it secure without smearing it across a swivel or immobilising the hinge. The multi-rig and hinged-stiff guides explain their particular layouts; don't transfer the weight position from one illustration to another blindly.
If the pop-up cannot support the intended hook assembly even before excess counterweight is added, choose a suitable more buoyant bait. Removing required rig components to make it float creates a different rig. A useful check is whether the hook section still stands correctly after the bait has soaked, not just whether it rises impressively when dry.
A raised hookbait is not a licence to cast into unsafe weed or snags. The hooklink can still be caught in debris, and the complete lead arrangement still needs its own release checks. Read the lead-systems guide before treating the finished hook section as a complete safe setup.
Troubleshooting: look at the attachment before changing flavour
| What you notice | Check first | Practical next step |
|---|---|---|
| Bait slides off the hair | Stop orientation, loop damage and an oversized hole | Refit an intact bait and crosswise stop; remake a damaged hair. |
| Floss-mounted bait falls off | Both ends through the cap, the cooled finish and bait splitting | Rebuild the attachment rather than adding glue. |
| Screw turns without gripping | Softness, cracking or an enlarged reused hole | Use a fresh suitable bait or another proven mounting method. |
| Wafter raises the whole hook | Bait identity and actual hook/attachment weight | Choose a suitable less buoyant combination and retest. |
| Pop-up hook section collapses | Insufficient buoyancy, excessive weight or soaked bait | Correct the identified cause, preserving the intended rig. |
| Bait blocks the hook gape | Hair length, bait size or restricted swivel movement | Restore clearance using the rig's demonstrated layout. |
Keep a short record of combinations that worked in the water test: bait type and size, hook pattern and size, attachment and counterweight. Record observations, not imaginary precision. “Hook rests; bait lifts hair after this soak” is more useful than an unmeasured claim of perfect neutral buoyancy.
Frequently asked questions
Can I use the same bait on a hair and a bait screw?
Sometimes, but the bait must tolerate both attachments and its balance can change. A screw adds different hardware from a hair stop. Test the new combination rather than assuming the previous water test still applies.
Do wafters always need putty?
No. Many are intended to be counterbalanced by the hook assembly. Establish the intended rig first and test it. Adding putty automatically may turn a lightly balanced arrangement into something quite different.
Should I test every new hookbait?
Check each completed presentation before use, especially after changing a bait or hook. Previously successful pot and hook combinations are useful starting points, not a guarantee that every replacement behaves identically.
Can I use a hookbait straight from a freezer-boilie bag?
An intact sinking boilie can be mounted as a bottom bait where suitable. Check its condition and retention. A food boilie is not automatically a wafter or pop-up, so choose a rig intended for its actual behaviour.
What should I learn first?
Mount an intact bottom bait on a simple hair, confirm the stop and clearance, then test a suitable wafter with the same proven rig. Learn floss or screw attachments when a specific rig gives you a reason to use them.
Your last check before casting
Confirm the bait is retained, the point and gape are clear, the attachment moves properly and the tested posture matches the chosen rig. Then check knots, hook condition and the complete lead system separately. For bait parcels, continue to the solid PVA bag tutorial or mesh, sticks and stringers guide. Hookbait preparation and parcel preparation are connected tasks, but neither replaces the other.